-
Adopt Variable Color in SF Symbols
Explore how you can use Variable Color to make SF Symbols even more expressive. We'll show you how system-provided symbols use variable color and provide best practices and guidance for using it effectively. We'll also help you learn how to incorporate variable color into custom symbols using the SF Symbols app and its annotation tools.
Resources
Related Videos
WWDC22
-
0:00
0:17
0:21
We'll be going over how to bring symbols with Variable Color into your projects, and how the SF Symbols app can help you with every step along the way.
0:30
0:34
0:37
0:43
Before we get started, if this is your first time using SF Symbols, or if you just want a refresher, I recommend you watch last year's session, "Explore the SF Symbols 3 app," to find out more about how to find and organize symbols for your projects.
0:55
And if you haven't yet, check out Thalia's talk, "What's new in SF Symbols 4," for an overview of the visual design of SF Symbols and the different rendering modes we'll be showing today.
1:06
1:09
Variable Color is a new feature of SF Symbols that allows you to affect the appearance of a symbol using a percentage value.
1:17
By changing this percentage value, you can easily create symbols that reflect values that can change over time, like signal strength or progress.
1:26
I think the best way to see how Variable Color works is to jump into the SF Symbols app and let the system speak for itself.
1:33
This year in the SF Symbols app, we added a new preview area here in the rendering inspector that allows you to see a symbol in every rendering mode at a glance.
1:42
1:48
1:51
This option allows each symbol to choose its own preferred rendering mode, which you can see selected in the preview area here.
1:59
For example, this square.and.arrow.up symbol prefers Monochrome, while these iPhone symbols prefer Hierarchical.
2:08
2:12
And there's a new category for symbols that support Variable Color, which is a great place to start experimenting.
2:19
Let's select this speaker symbol, switch to Multicolor, and switch to the gallery view to get a closer look.
2:26
I'll start by clicking this button to turn Variable Color on, and pull the slider all the way down to decrease the percentage we're using.
2:34
2:38
2:44
2:50
And if I switch back to grid view, you can see all of the symbols in the Variable category are reacting to the changes.
2:58
So what did we just learn about Variable Color? First off, Variable Color can be used with every single rendering mode available for SF Symbols.
3:09
Every system symbol that supports Variable Color supports it in Monochrome, Hierarchical, Palette, and Multicolor modes.
3:17
3:23
3:27
Regardless, because Variable Color is controlled using percentages, you don't need to worry about this.
3:34
3:37
So how does the system interpret those percentages? How do we know when a particular layer is going to have Variable Color applied? Well, like the rest of SF Symbols, we designed Variable Color to make your apps feel right at home on Apple platforms.
3:52
And that means that we took inspiration from the behavior of system-level indicators that you might be familiar with.
3:58
4:01
The four dots on the left side of the microphone are each in a separate layer that participates in Variable Color.
4:08
4:14
4:20
4:25
4:29
4:34
4:37
4:42
4:49
4:56
5:02
5:07
Now, this next symbol has three layers that use Variable Color, which means that the thresholds between layers might fall at awkward values like 33.3333 and 66.6667 percent.
5:20
We didn't want rounding errors to make symbols appear in unexpected ways, and we didn't want you to have to worry about how many significant digits you typed into your code.
5:29
So, thresholds between layers are rounded to the nearest percentage point, and we don't activate the next layer until you're one full percentage point above that rounded value.
5:41
So, for the first threshold, 33.3 percent rounds down to 33 percent, so the second layer activates one percentage point higher at 34 percent.
5:52
The final threshold rounds from 66.7 percent up to 67 percent, so the last layer activates at one percentage point higher than that, at 68 percent.
6:04
6:08
With the SF Symbols app, you can make and annotate your own custom symbols, and even better, you can make your custom symbols just as flexible and just as powerful as symbols provided by the system.
6:21
What do I mean by flexible and powerful? Well, system-provided SF Symbols are available in nine different weights, and each one of those nine weights is available at three different scales.
6:33
6:41
6:45
6:51
6:56
When using this kind of template, instead of drawing 27 different combinations of weights and scales, you only need to draw three, and the system can generate the other 24 for you automatically.
7:08
After you've drawn your custom symbol, you can adopt different rendering modes through a process we call "annotation." Last year, if you wanted your symbol to adopt the Hierarchical and Palette rendering modes, you broke your custom symbol into different layers and assigned each layer a hierarchy level.
7:28
If you wanted your symbol to adopt the multicolor rendering mode, you broke your custom symbol into different layers again and assigned a color to each layer.
7:38
This meant that, to support all the available rendering modes, you had to manage two separate layer structures.
7:46
7:50
Unified annotation uses a single-layer structure for a symbol, and shares that structure across all rendering modes.
7:57
8:05
You now also have control over how your symbol will look in Monochrome rendering mode, in addition to the previous control you had over Hierarchical, Palette, and Multicolor.
8:15
8:22
8:27
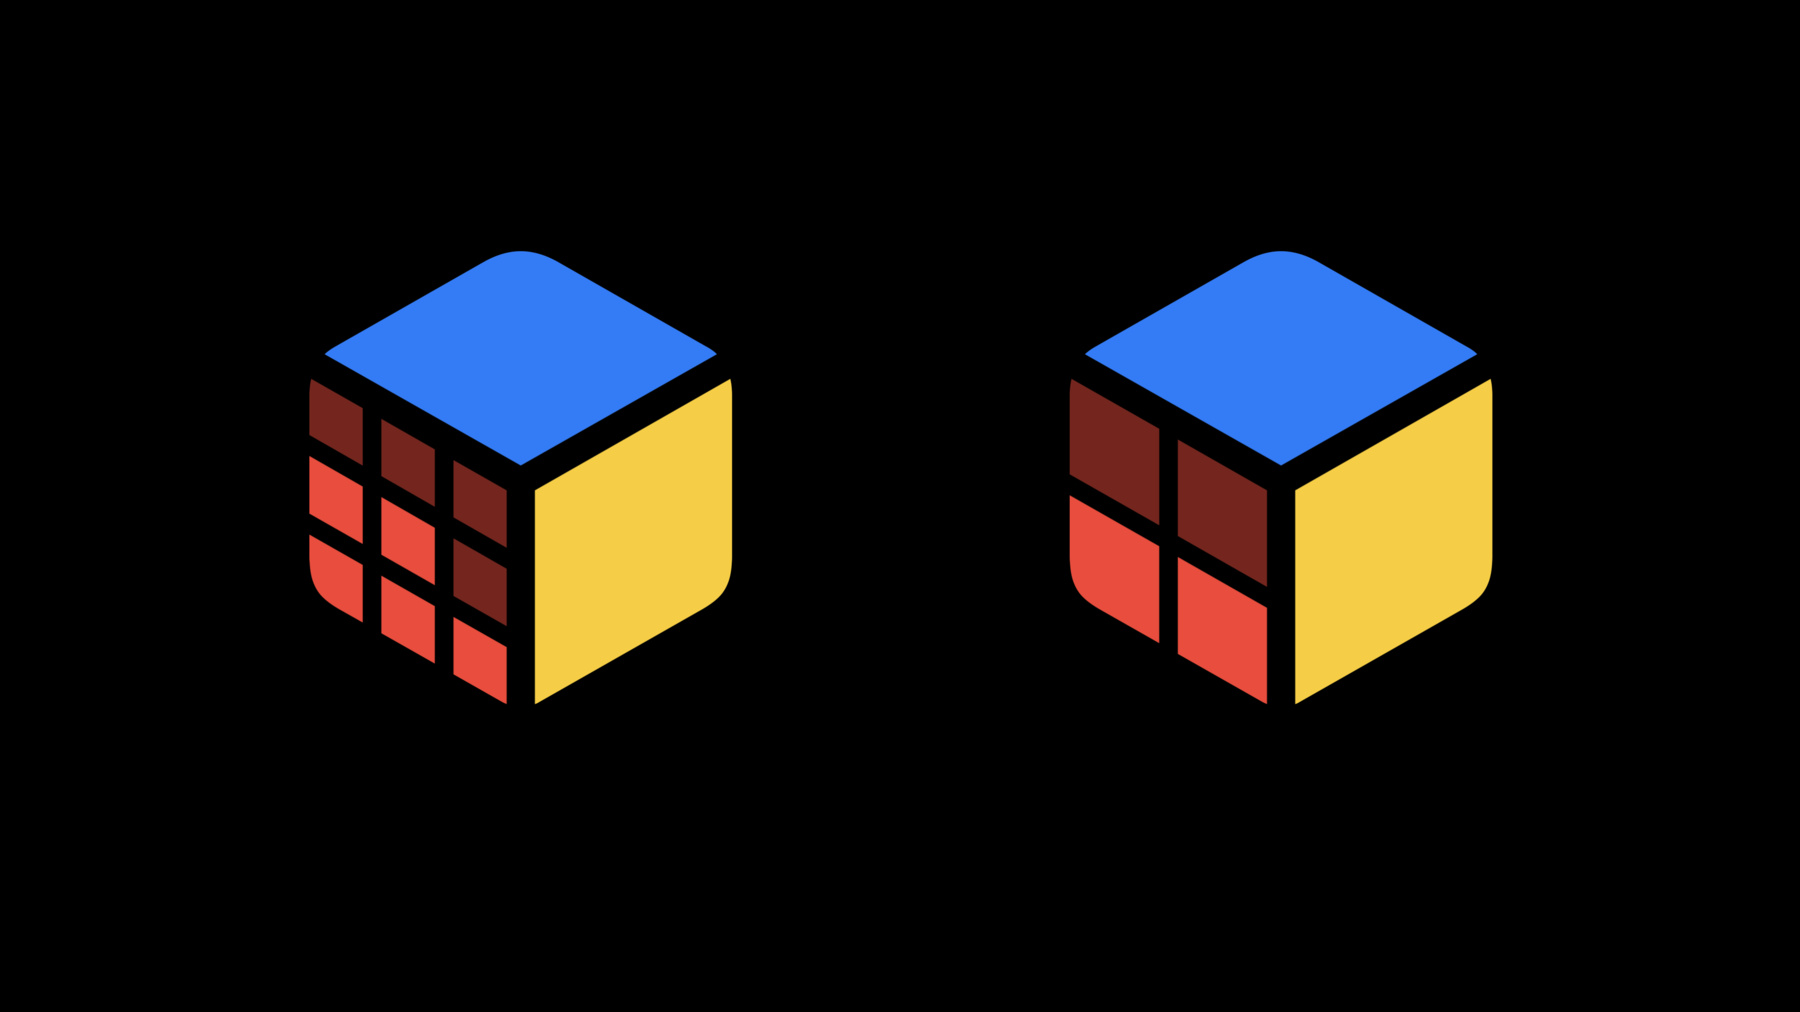
Last year, I was working on an app so my family could play card games together, even when we couldn't be in the same room.
8:33
A few months after that, I discovered a new obsession: puzzle cubes! So this year, I want to make an app that's going to help me practice solving mine.
8:42
8:46
8:49
I based this symbol off of the system-provided cube symbol, and notice how I've left some of the details of the puzzle cube out.
8:57
9:02
9:08
As I make changes to the annotation, I can see how my custom symbol looks in all the different rendering modes at a glance.
9:15
And when I switch rendering modes by clicking here or picking a different option in the picker, the annotation controls in the list change accordingly.
9:25
9:30
9:35
You can see that these new layers automatically get switched to the less-prominent secondary and tertiary levels.
9:42
9:46
And remember that the Hierarchical annotation that we create is also used to support Palette rendering mode.
9:53
9:58
10:02
Notice that when I switch to Multicolor mode, I still see the same layers that I separated out in Hierarchical mode.
10:09
Remember, in unified annotation, changes made to the layer structure in one rendering mode will carry through to all the others.
10:17
10:25
10:27
But the most important part of learning to solve a puzzle cube is practice, practice, and more practice.
10:34
So, I would love to use my cube symbol as a timer, and have it fill up with color as I spend more time practicing.
10:41
10:45
These separate pieces in the front face look like a great place to add some variable color for our timer.
10:51
10:55
10:59
The layers that I want to fill in first go on the bottom, and the layers I want to fill in last go on top.
11:08
Then, we'll select all of these layers and click on this button, which will enable Variable Color on all of them.
11:15
11:20
Remember to keep an eye on the preview area to see what's happening in all the different rendering modes.
11:26
You can see that, as we change the percentage used in Variable Color, the front face adjusts its color in every rendering mode.
11:34
11:36
11:41
In many cases, you only need to do work once or twice to get great results in all four rendering modes.
11:47
11:52
11:56
Here's my cube symbol again, but this time, it's set inside of a circle, like many of the .circle.fill symbols in the system library.
12:05
12:08
12:13
My symbol looks great in Multicolor and Hierarchical modes, but in Monochrome, there's not much contrast between the cube and the circle behind it.
12:23
When all the paths in the symbol were in one layer, the cube paths created holes in the circle path, which looked great in Monochrome.
12:33
12:40
12:45
12:48
12:54
12:59
13:01
13:03
This time, I'll just select all of the pieces of the front face and choose Split into New Layers from the contextual menu.
13:13
13:18
And I'm done! And by the way, the paths are split up using the order that they appear in your symbol template, so if you pay attention to the order of your symbol's paths as you're drawing, you can save some time later.
13:31
13:35
13:39
13:44
13:49
13:53
The z-order of the layers determines the order that they will fill in as the passed-in percentage increases, and the thresholds used for each layer are spaced evenly between zero and 100 percent.
14:06
And because it's part of the layer structure, when a layer opts in to Variable Color, this setting is shared across all rendering modes.
14:15
And there are two new layer options in unified annotation that make it easier to work with the new shared layer structure.
14:23
14:28
This is really useful in situations like Monochrome and Hierarchical symbols that have badges with a plus, a minus, or some other shape inside of them.
14:38
14:44
If you're in a situation where a layer truly can't be used across all the rendering modes, you can use this option to only apply that layer to certain modes.
14:54
14:59
When you're exporting a symbol from the SF Symbols app to import into Xcode, make sure that you export a 4.0 template to control Monochrome rendering and use Variable Color.
15:10
If you already have custom symbols that you annotated last year, they will be automatically updated to use unified annotation.
15:17
Your Hierarchical and Multicolor annotations will be brought in with no extra work required from you.
15:24
And, if you need to support earlier platforms, the previous 3.0 and 2.0 formats are still available for use.
15:32
15:35
I've had a lot of fun learning about how to solve puzzle cubes, but the best part so far is that my daughter saw me solving them and wanted to learn too.
15:44
15:50
15:55
16:00
16:03
Text and numbers are descriptive and helpful, but they could be intimidating for someone like her who's still learning or is unable to read the text.
16:13
But seeing a puzzle cube that looks just like the one she's holding, and seeing it fill up with color as time passes, is friendly and intuitive.
16:22
I don't even need to change my timer code; all I need to do is change the name of the symbol I'm using and keep passing in the same percentage values I used for my bigger cube symbol, and SF Symbols takes care of the rest.
16:35
16:37
16:42
16:45
And Variable Color in both system-provided symbols and your custom symbols gives us even more expressive power for concepts like progress, signal strength, and time.
16:56
17:00
17:01
17:06
-