-
Metal Shader Debugging and Profiling
Metal provides powerful tools for analyzing shader behavior and optimizing performance. Dive into troubleshooting vertex-stage problems with new geometry viewing capabilities in Xcode. Use the shader debugger to step through vertex, fragment, and compute shader execution line-by-line. Get details about analyzing GPU workload, and check out shader profiler enhancements for A11 Bionic.
Resources
- Optimizing GPU performance
- Debugging the shaders within a draw command or compute dispatch
- Analyzing resource dependencies
- Presentation Slides (PDF)
Related Videos
WWDC20
WWDC18
-
Search this video…
Hello, everybody. Welcome.
I'm really excited to be here today. So let's get started.
Shaders are an important part of graphics, and they help you create great-looking games and apps. Given the massively parallel execution environment, working with shaders is not easy. There are a number of things that can go wrong during development, and even when you get it right, they have to perform really fast.
My name is Alp and today I am going to show you great tools and workflows to help you debug and profile Metal shaders. Let's talk about Metal first.
Metal is not just about the framework and the language. We have MetalKit, Metal Performance Shaders, and we have great tools to make your development process efficient and easy.
With Metal System Trace, fully integrated into Instruments, you get visibility into how your CPU and GPU work in parallel and the runtime performance of your app.
It's a great first tool to start profiling your apps, and seeing your bottlenecks. But today, my focus is going to be on Metal Frame Debugger.
Metal Frame Debugger lets you capture Metal work with a frame of a game, or a compute workload, and step through your calls.
Inspect state and resources.
And it provides great profiling features, giving you access to GPU counters and pipeline statistics. It is fully integrated into Xcode, providing you one place to debug and profile your Metal workloads. And this year, we have some great additions to Metal Frame Debugger. With the dependency viewer, now you get visibility into how your encoders are working together and connected through the use of resources. It's a great tool to navigate your workload and just understand how your render passes are working together to create that frame. Tomorrow at 10:00 a.m., we have the Metal Game Performance Optimization talk, and part of it, we will be covering the dependency viewer.
But today I will be focusing on geometry viewer, shader debugger, and enhanced shader profiler. And I will be showing you workloads that will help you in your day-to-day shader development. So, let's start with the geometry viewer.
Vertex stage is the first stage of the graphics pipeline. And when you get it wrong, it can mess up your entire scene. So it is important to rule out some of the vertex issues before moving on to debugging your shaders. In Vertex Stage, there are several things to check. Mainly, your vertex inputs, your indices, and your vertex outputs.
Last year, with Xcode 9, we introduced input attribute view where we can see all this data combined in a table view format.
But it is still hard to debug such visual data without really correlating back to 3D. So that's why this year we combined all this data and created one place you can visualize and inspect it. Now, I would like to introduce you to Geometry Viewer.
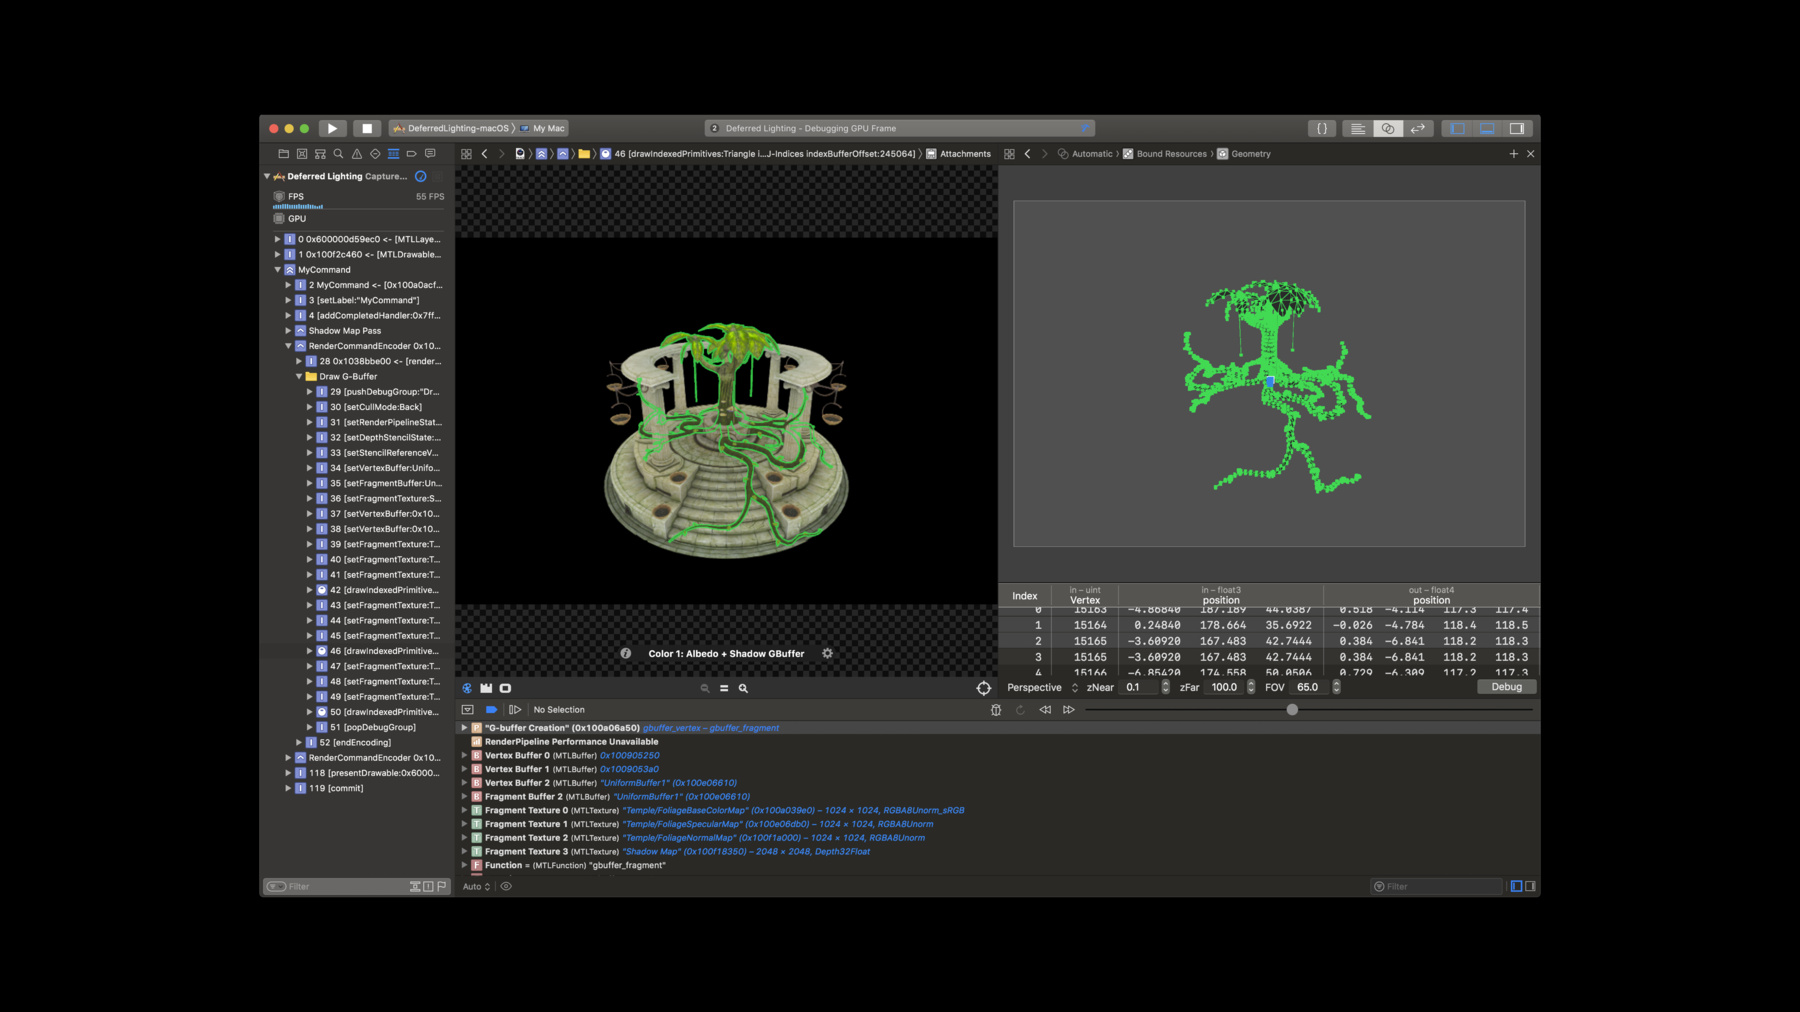
Geometry Viewer is a new tool that visualizes the post-transform vertex data in 3D so that you can actually see what your vertex output is.
Alongside, it provides you your data input indices and output, so that you can actually correlate that back to 3D.
It is available per draw call just like your attachments and bond resources, so you'll have one place to investigate all your vertex issues.
Now, let's take a look at three common vertex problems, and let's see how you can use geometry viewer to tackle them. So this is the first problem, and I am going to draw call, drawing the tree, and as you can see, some of the vertices of the triangle is off screen, causing this triangle to get skewed.
Just using the Geometry Viewer, you can click on the visibly wrong triangle. And just using the viewer below, you can see all the data that these vertices are taking in and outputting.
And in our second case, I'm on the same draw call, but this time, the tree is completely missing. Just using the Geometry Viewer and the free fly camera, you can see that the tree is drawn completely outside of the frustum.
So it makes sense that it is not rendered on screen. So it is really easy to use Geometry Viewer to detect cases like this. And on to our last case, sometimes it's not even possible to form triangles to visualize in 3D. And these are tricky to debug. You might have degenerate triangles, where you have multiple of your vertices going into the same location. Or you might have infinites and NaNs in your vertex output position, which is undefined behavior for the GPU.
Thankfully, Geometry Viewer detects these cases and provides an issue button for you. With a single click to that, you can get a list of issues it finds. In this case, it found several degenerate triangles.
Clicking one, you can directly see the data.
And just looking at this data, I can clearly tell that two of my vertices are going to the origin, so it's a degenerate triangle.
And so as you've seen in all these examples, Geometry Viewer is a powerful tool to quickly investigate all your geometry-related issues, and if the problem is in your inputs, then you have to go back and check your model. But if the problem is in your output, then you have to debug vertex shaders. Which brings us to our next topic.
Debugging shaders, using the new Shader Debugger.
Shaders are hard to debug.
They have math-heavy code, with lots of vector operations. And they are highly parallel. The shader code you are writing gets executed millions of times, every single frame. Here is a scene from Unity's Book of the Dead demo, that we've seen in the Keynote and State of the Union earlier this week. In a single frame of this scene makes 10 million vertexing locations, and rendering into 60 million triangles, every single frame, in all the different passes.
So when you have a problem with your shaders, it's not going to be easy to find where the problem is, which shader it is, and what part of the shader code. So to help you debugging your shaders, now I'm really excited to introduce to you the new Shader Debugger .
Shader Debugger is a new tool for debugging all Metal shaders, providing you rich visualization across thousands of threads at once, and it shows you the real data from the GPU, not from emulator. It provides you a flexible way of stepping, so that you can follow your execution easily, without needing to have breakpoints at all.
And it is fully integrated into Metal Frame Debugger, so that you have everything you need to debug your shaders. Now, I would like to bring my colleague, Xavier, to the stage, to show you Shader Profiler in action. Xavier? Thank you, Alp, and good afternoon everyone. For today's demo, I wanted to create a cool-looking water simulation, but as you can see, there are some geometry problems. My name is Xavier, and I am really excited to show you how to use the new Shader Debugger and geometry viewer to identify and fix geometry issues. So we are going to start by taking our frame capture. You can easily do this by clicking on the GPU Capture button here in the debug bar. Now that we have captured our frame, we can start debugging our issue. Since we are having geometry problems, we are going to use the new Geometry Viewer.
The Geometry Viewer allows you to navigate and inspect the geometry of your draw call.
The water surface should be smooth, but as we can see, there is a steep cliff. So let's pick one of the triangles that looks wrong. For example, this one. And now, let's select the broken vertex that is the one here at the bottom. You can easily do this, by using this table here. So now that we have found our broken vertex, let's take the input positions. As we can see here, all of the input positions are very similar for all of the vertices of this triangle, and in fact, the white coordinate is exactly the same. So this looks correct, and it was expected. Seeing the input is correct, but as we can see here, in the 3D view, the output is wrong, then the problem has been our vertex shader. So let's use the new Shader Debugger to debug and fix this issue, just by clicking on the Debug button that you can find here in the bottom right corner. And just like that, we are now in the Shader Debugger. It is that easy.
The first thing that you will notice in the Shader Debugger is that alongside your source code, you have access to all the variables that were modified on each line, and if you want more details about your variables, you can just open the detail views by clicking in this detail view button here.
The detail view will show you in language of source code the full value of the variable. And not just that, but also the value of the variable across all the vertices of the triangle that you are debugging. Here in the Debug Navigator, you have access to the shader code history, which shows you what your shader did from the very beginning to the very end, and as you can see, it's really easy to step through your code by just using the arrow keys.
As you may have noticed, as I navigate through the navigator, its position in the source code is highlighted. And this works in both directions. You can select one line in your source code and its position in the Debug Navigator will be selected. And at any point, you have access to all the variables that are alive in a scope by just checking the variables view, here at the bottom. So now that we are more familiar with the Shader Debugger, let's debug our issue.
The water is calculated by generating a displacement vector that is later added to our final position. So let's get more information about this displacement vector just by opening this detail view.
As we can see here in the detail view, the right coordinate for the vertex that we are debugging is a big, negative number, compared to its more positive one in the other vertices that were correct. Then the issue must be in how we are calculating this displacement vector. So let's use the debug navigator to go through the function and investigate what is happening.
And here, without even having to read the code, we can already tell that there is something going wrong. One of our variables has a value that is not a number, and this is likely corrupting further math. So let's check why this is happening. If we check here in the debugger, it turns out that we are doing this operation on this negative number, and this is what is causing the NaN. So now that we have found the cause of our issue, let me quickly fix this just by swapping those two lines, so that we don't do operation on a negative number. And now that we have done our changes to the shader, let's try out those changes just by clicking in the reload shaders button, here in the debug bar. Reloading the shaders will run your full capture using the new shaders, so that you can check the results right away.
And as we can see here now our water surface is smooth.
But let's check it in action, just by clicking on the continue button here in the debug bar. And, as we can see [applause begins] now our water simulation is correct.
In this ex-- in this demo, we have seen how to take a frame capture, how to use the new geometry viewer to find broken vertices, and how to use the new Shader Debugger to debug and fix your vertex shaders. Thank you, and back to Alp. Pretty cool, huh? Thank you, Xavier.
Now that you have seen Shader Debugger in action, let's take a closer look at how you can use this tool for your debugging needs. First things first, though. Let's talk about how you can get into the Shader Debugger. Here I already captured a frame, and am on the last draw call, and then you will have draw or dispatch call selected, the debug shader button on the debug bar will be enabled for your easy access to the Shader Debugger.
Clicking that will show a view for you to select the thread you're interested in.
And selecting threads means different things depending on the type of shader you are debugging.
For fragment shaders, you will be using the pixel inspector to select the pixel you want to debug.
For vertex shaders , you will be using the geometry viewer we have just seen to select the vertex you want to focus on. And for compute, you will be using the controls to select the thread you are interested in. And then, just click the debug button, and that's it. You are in the Shader Debugger.
And whilst you're in the Shader Debugger, it is so easy to inspect any variable you are interested in.
You just need to go to the source line you have the variable, and that is all you have to do. You don't need any break points, you don't need to step through your code. The values of the modified variables in the line are going to be available on the side bar.
And as you have seen in the demo, we highlight NaNs and infinite values in there, so that it's really easy to spot common mistakes.
You can just use the button on the side bar to enable the detail views, and get full details about your variables. This is pretty handy, especially if you want to inspect the complex struct and want to dive into different components.
Or you can just hover on any variable you have in your source code, and you will instantly see the value of the variable at that point. And this is partially useful if you are sampling from a texture, like in this example, and you want to quickly check whether this is the right texture. And just like in the CPU debugger, you have access to your variables view, showing you all your variables in scope. So inspecting variables is a core part of debugging your shaders, but that is only half of the story. You also want to know what is the order of your code getting executed? And Shader Debugger makes this really easy as well. When you get into Shader Debugger, in the Debug Navigator, you will see all your source line execute by your shader for your selected threads.
And you can select any line you want and directly navigate to that.
This also provides a unique stepping experience where you can just use your cursor keys to step through your code. Functions are groups in the navigator, so that you can just expand them and step into them. This also enables backward debugging, which is a really powerful way of debugging your shaders. Just find the variable that has the wrong value, and just work your way backward to see where it got wrong, and why. Also you can use the filtering. Filtering is a great way to focus, and you can filter for anything you are interested in your shader code. Filter will be matching with function calls, variables, resources. And your shader code might span across many different files, but if you use filter, it will only match with what your shader executed, so it's a really great way to focus. So far, what we have seen is great for debugging a single thread, but what about other threads? Shader Debugger also gives you access to other threads based on the initial thread you selected.
What this means is, for vertex, you'll get the primitive of your selected vertex. For fragment, you'll get direct angle area, and on your selected pixel.
For compute, you'll be getting the full thread group of your selected compute thread, so that you have access to all variables interacting with the thread group memory. Now, let's look at how accessing other threads can help you debug fragment shaders. So while your code executes millions of different pixels, seeing a single variable for a single pixel may not help you in all the cases. Here, I have an example, I'm calculating a gradient, and I can't see the single gradient value. But I can't really tell whether this gradient value is good for my pixels, or bad for my pixels.
With a single click, to bring up the detail views, I can see this gradient value across thousands of other pixels around my pixel, and now I can tell this gradient is not correct because I can clearly see it's not smooth.
As you've seen, detail views help you understand your shader, and identify good and bad values for your shaders. You can quickly hover into any other pixel to instantly see the value of that variable for that pixel. And you can also use this view to switch threads. Switching threads is great for comparing cases where you can clearly see good and bad pixels. You can quickly switch between them and see what the bad pixel is doing.
Once we switch threads, we update the execution history and the variable views, so that you can fully debug your newly-selected threads.
This gets even better.
Detail views also help you understand your divergence.
So whenever you enable detail view, the mask on the right-hand side will always show you what other threads executed the same line of code.
In this example, I have a conditional, and just looking at the mask, I can clearly tell that roughly half of my threads executed inside this if conditional, in a diagonal shape.
So now, to show you how you can use detail views to fix problems in fragment shaders, I would like to invite Xavier back to the stage. Xavier? Thank you, Alp. After fixing our geometry problems in the first demo, I added highlights as a post processing ef fect. But the results were not as expected. So I took a frame capture to debug the issue.
It was here in the attachments view, we can see that our highlights are actually generating dark areas in the bottom parts. So let's use the Shader Debugger to debug and fix this issue.
By long pressing, I'm bringing up the pixel inspector, which allows you to select the pixel that you want to debug. So here, we are going to select one of the dark pixels, for example this one, and to start the Shader Debugger, you have to click the debug button here on the bottom right corner.
And now, we are debugging the frame and shader.
As we can see here, the highlights are generated in three different steps. So let's use the detail views to quickly understand what is happening. Let's start at the beginning on this close first one. As we can see here, we are just sampling from our original color, and this looks correct. So let's see what is next. Here, we are accumulating highlights in one of the directions, so let's check the results by opening the detail view. And as we can see here in the detail view, there is already dark areas in the bottom part, right here, so then the problem must be in how we are accumulating those highlights. As you can see, detailed views are a powerful tool to understand your shader without even having to read the code.
So let's use the Debug Navigator to go to that function and investigate what is happening. As we can see here, this function is mainly a loop that iterates a few times, accumulating samples from a brightness map. Loops are high-level objects in the Shader Debugger, which means that you can navigate through your iterations using the Debug Navigator, and you will get, alongside with your source code, the value of the variables at each one of the iterations. If we focus here, we can see that as I navigate through the different iterations, the values change.
But what is really powerful is combining this with detail views. So here, we are going to bring up the detail view for finalColor, that this is where we are accumulating our highlights.
And now let's iterate using the Debug Navigator. As we can see, as I iterate, we are starting to accumulate highlights in our final color. But as I continue iterating toward the end of the loop, we are actually seeing this dark pattern. So let's investigate why this is happening.
As we see here in the Debugger, we can actually see that our weight is negative. And this is what is causing the color to be subtracted rather than accumulated in our final color.
So now that we have found the cause of our issue, let me quickly fix this.
And now, let's check the results, just by checking in the reload shaders button, here in the debug bar. And as we can see here, now there is no more dark areas, but let's see it in action, just by clicking on the Continue button.
And indeed, now our highlight looks correct. This is just an example of how you can use the Shader Debugger and its powerful detail views to debug and fix your shaders. Thank you. And back to Alp.
Thank you, Xavier.
Now that you have seen everything about Shader Debugger, let's recap what we've talked about so far. Shader Debugger is specifically designed for debugging Metal shaders, taking into account the highly parallel nature of GPUs, and as you've seen, it's great for fixing bugs with the highlights to NaNs and infinites, it is so easy to spot common mistakes, and also it's great for understanding your shader. With the detail views, you don't even need to read the code to understand what your shader is doing.
And also it provides excellent environment to develop your shaders in. Just get into Shader Debugger and start editing, and reload to quickly iterate all your results. Shader Debugger supports iOS, Mac, OS and tvOS with the recent hardware.
And it is yours to enjoy with Xcode 10.
And now that we've seen how you can use geometric viewer and the Shader Debugger to debug your shader problems, now let's focus on how we can make your shaders run faster.
So optimizing your use of GPU is important, because you want your apps to run fast, and consume less battery for a great user experience. But before starting to optimize, it is important to know what to optimize. If you are GPU bound, a typical Metal workload has many different passes. And knowing which pass to focus on is quite important. The good news is we have great profiling tools built into Metal frame debugger to help you with this. GPU counters gives you high level performance overview of your app. There you can see, time encoders or draw calls, and also providing you different counters showing you bottlenecks.
And from here, once you know your expe nsive pass, you can just move to pipeline statistics. And here you get great compile metrics for your shaders, giving you an overview of the type of instructions you have. And using the Shader Profiler, you get visibility into timings per draw call or per pipeline states. So today, I'll be focusing on Shader Profiler, and I will show you work flows that will help you optimize your shaders. So once you are in the Metal Frame D ebugger, going to read by performance navigator, you will see all your pipeline states sorted by the time it takes to execute them. This is a great place to see all your expe nsive pipelines that we are optimizing.
And here, you also have access to your draw calls, using these pipeline states, so that you can directly navigate to one and see what it is drawing. And if you're in iOS or tvOS, just going to the Shader Source, you'll get the per-line execution cost. This is a great place to see where you are spending the most time in your shaders, per-line basis.
And once you are in your shader source, you can just start editing your code, and reload to see if it makes any difference in timing.
Or you can just get into Shader Debugger.
This is a great workflow if you are trying to optimize an algorithm or want to just get through this control flow, and want to understand whether you can. So Shader Profiler helps you a lot trying to optimize your shaders, but we made this even better for A11. Now, with A11 bionic chip, being the completely Apple-designed GPU, now we have hardware support to give you even more insight in what your shaders are doing. Now with A11, you get this chart, per line, showing you the cost breakdown of the executed line. So a shader consists of different execution units, and if you are using one of them heavily, you might be bottlenecked by that.
So seeing ALU and memory breakdown gives you visibility into time spent in different execution units.
We did a lot of work for half precision instructions to be much more efficient in A11. So using half, over float, might bring significant gains on your GPU budget. And another category now you have visibility into is synchronization, which is an important category to look at because you want your shader code to be busy doing work, not waiting for synchronization. And in your shader code, if you are reading from texture buffers, or using atomics or barriers, you might have stalls waiting for synchronization.
And also now we provide you ability to see cost of in-line functions, you are calling from your shaders. This way you can directly navigate to your most expensive function, and start optimizing that .
Welcome to the Apple-designed A11 bionic chip. We can provide better profiling data than ever. This year, we are introducing per-line timing information and instruction categories, even in inline functions. My name is Max, and I am going to help you max out your Shader performance .
So I've captured the same water simulation again, but this time, on my iPhone.
Let's begin by change to View Frame by P erformance. We now see a list of pipelines being used in our frame, ordered by time, and we can easily see that the noise pipeline is taking a significant amount of time.
Disclosing this, we can see that we spent nearly all the time in our fragment Shader. But this year, we can go deeper. We can see the time we are spending each inside of each of the functions that this shader is calling. Just clicking here goes to the source code file, and directly jumps to the right line. And that is the start of our investigation.
So what we see here right now on the right-hand side is a percentage of time we are spending inside of this function, and further down the percentage of time we spend in each file-- each line.
Be aware the Shader Profiler works on optimized code, so the compiler can reorder the instructions and there might be no timing information for some lines. Next to the timing information, we have the instruction categories. Let's take a look. We can see that we spend time in ALU doing math operations, we are reading from memory, from textures, but what raises my concern is the time we are spending in synchronization, specifically, waiting on memory here. That means our GPU could not read data fast enough, and it could not hide this latency by doing ALU work in other threads.
So let's figure out why. Just following the performance numbers, we will arrive at this line, where we spent over 50% of our entire shader time. Taking a look into the instruction categories again, we can see that we spend a significant amount in synchronization. But why? We are using a color value here that we have read from a color texture here using an offset.
This offset was read from a noise texture here. So we have a dependent texture read. The GPU could not process until data from the texture read became available. So what can we do about this? Well, instead of reading from a noise texture, we could just simply calculate a noise value on our GPU. Let me do that. Now, let me update my Shader. The shader is now sent to the device as we compiled, and then the entire frame is rerun and reprofiled, because changing a single shader or pipeline might influence your entire GPU timing.
Once that is done, let's take a look.
We can see that we now spend just three milliseconds in the shader down from over 20. But let's also take a look into the instruction categories. Here we can see that we nearly eliminated the entire time in synchronization, and we keep our GPU busy doing work for us.
So, as a summary, when you detect the bottleneck in your shader, the per-line timing information tells you exactly where your problem is, and the instruction categories help you to understand why. That's it for me. Back to my colleague, Alp. Thank you, Max. And before closing, I would like to talk about one last thing to make it easier for you to work with these new great tools.
Hopefully all of you are already compiling your shaders offline, so that you are not paying the runtime cost of online compilation. And if you are c ompiling your shaders offline, now we have a new compiler option to save shader sources into the built Metallib so that you have access to your shader sources from anywhere using these tools.
If you are compiling your shaders using Xcode project, you can just go to Build Settings, and Enable this option. Or if you are compiling using command line, you can just pass ‘-MO’ option to the Metal compilers.
But please remember to only enable this in debug builds so that you don't mistakenly ship your shader sources alongside your app. All right.
Let's recap what we talked about today. We started with geometric viewer, providing you one place to investigate all your vertex related issues, and debugging visual problems, please remember to check with geometric viewer first, and make sure that your geometry is right before moving on to debugging your shaders. And then we have seen shader debuggers, powerful tools to debug all your Metal shaders. Great for fixing bugs, understanding your shaders, and just developing your shaders in. And with the enhanced shader profiler, now you get even more vis ibility into what your GPU is doing with the power of A11 bionic chip. For more information, please check the link.
Tomorrow at 10:00 a.m., we have a great talk on Metal game performance optimization, where we will be talking about common performance problems that we found in games and tools available for you to detect and fix them. Thank you .
-