Managing QTCompressionOptions - An overview of the QTCompressionOptionsWindow sample
This Technote describes some of the techniques used in building the QTCompressionOptionsWindow code sample. Notably, the sample demonstrates a singular technique for managing user-configurable compression settings when using the capture methods and classes available in the QuickTime Kit framework (QTKit.framework).
Download the QTCompressionOptionsWindow code sample to follow along.
Introduction
If you're a QuickTime or Cocoa developer working with audio and video capture, you'll want to take advantage of the new capture classes and methods introduced in Mac OS X v10.5 and the latest release QuickTime. There are now 15 new capture classes available in the QTKit framework that are designed to expand the range of media services developers can incorporate in their multimedia applications.
These new capture classes and methods provide your application with pro-grade, frame-accurate capture of audio and video media from one or more external sources. Your captured media can be record to a QuickTime movie (.mov) file or displayed in a Cocoa view and may also be compressed using a common set of compression formats. You can also directly access decompressed capture buffers for custom processing.
This Technote describes the compression features of QTKit Capture using the QTCompressionOptionsWindow code sample that demonstrates how to capture video media to a movie file using the methods available in the QTKit capture classes while also allowing the user to select how that video will be compressed.
After a quick read of the QTKit Capture Programming Guide the task may seem very easy to do, requiring usage of only a few capture classes; QTCaptureDevice, QTCaptureDeviceInput, QTCaptureSession, QTCaptureView and QTCaptureMovieFileOutput. Instances of these objects all fit together like a set of lego pieces creating a "Capture Graph" that performs the operation.
That being said, what if you not only want to specify the compression method for the media being captured but also want to manage a list of compression settings via a user interface. How can those tasks be accomplished?
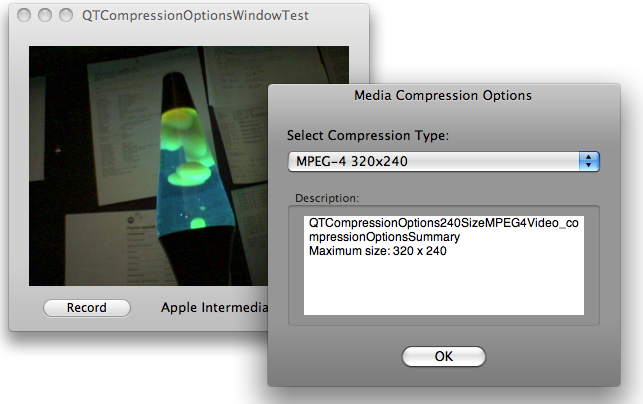
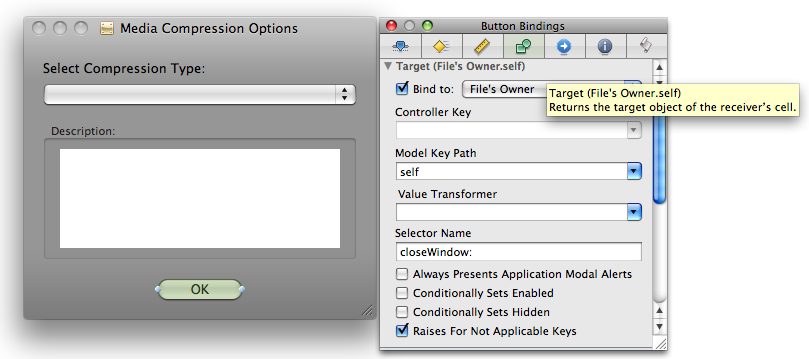
The QTCompressionOptionsWindow code sample demonstrates a technique you can use to manage compression settings. This is achieved by using a self-contained re-usable class that provides a user interface for selecting different compression settings via a Media Compression Options Window, as shown in Figure 1.
You can accomplish this with less than 30 lines of Objective-C code by taking advantage of Cocoa bindings. Download the QTCompressionOptionsWindow sample and follow along.
The sample contains three files that are discussed in this Technote:
Class Header File -
QTCompressionOptionsWindow.hClass Implementation File -
QTCompressionOptionsWindow.mClass NIB File -
QTCompressionOptionsWindow.nib
The QTCompressionOptions Class
Compression settings are represented in the QTKit Capture Framework by the QTCompressionOptions class. QTCompressionOptions objects represent a set of compression settings for a specific type of media; QTMediaTypeVideo or QTMediaTypeSound. Each instance of QTCompressionOptions is used to describe a single compression setting and are created using a set of presets keyed by a named compression identifier.
To create a QTCompressionOptions object describing H.264 compression with a maximum size of 320x240, you use the NSString identifier QTCompressionOptions240SizeH264Video with the class method compressionOptionsWithIdentifier: (Listing 1).
Listing 1 Create compression settings describing H.264 320x240.
QTCompressionOptions *myCompressionOptions;

myCompressionOptions = [QTCompressionOptions compressionOptionsWithIdentifier:
                                   QTCompressionOptions240SizeH264Video];

[mCaptureMovieFileOutput setCompressionOptions:myCompressionOptions
forConnection:mVideoConnection]; |
While this is very easy to do, the compression settings are hardcoded and therefore the practical uses limited. To present a user interface, you need to dynamically build a list of all the compression options currently available for a given media type and display them appropriately.
The QTCompressionOptions class method compressionOptionsIdentifiersForMediaType: is ideal since it returns an array of compression identifiers which can be used to create QTCompressionOptions instances. Only identifiers which are valid on the current system will be returned, for example if the Apple Intermediate Codec is not available on the current system the QTCompressionOptionsLosslessAppleIntermediateVideo identifier will not be returned in the array.
The QTCompressionOptionsWindow Class Interface
Now that you have an idea of how QTKit Capture manages compression settings and how to create these settings objects dynamically, you can define a simple class that manages both an arbitrary number of QTCompressionOptions instances and a Window.
@interface QTCompressionOptionsWindow : NSWindowController {
@private
    IBOutlet NSArrayController  *mOptionsArray;
    NSString                    *mMediaType;

    IBOutlet id                  delegate;
}

// designated initializer
- (id)initWithMediaType:(NSString *)inMediaType;

// compression options of this media type are being managed by the controller
- (NSString *)mediaType;

// manage compression options for the media type passed in, should only be
// QTMediaTypeVideo or QTMediaTypeSound, nil is equivalent to QTMediaTypeVideo
- (OSStatus)setMediaType:(NSString *)inMediaType;

// returns the selected QTCompressionOptions instance
// that may be used with -setCompressionOptions:forConnection:
- (QTCompressionOptions *)compressionOptions;

// closes the window and notifies the client of the class via delegation
- (IBAction)closeWindow:(id)sender;

// manages controller delegate
- (id)delegate;
- (void)setDelegate:(id)value;

@end

// a client of this class should implement this delegate method
// which is called when the compression options window is closed
// the client may ask the sender for the selected QTCompressionOptions instance
@interface NSObject (QTCompressionOptionsWindowDelegate)

- (void)compressionOptionsWindowDidClose:(id)sender;

@end |
Since NSWindowController can manage a window stored in a nib file and will take care of loading and displaying the window, closing it when appropriate handling Window placement and so on, the QTCompressionOptionsWindow class will be a subclass of NSWindowController and gain all this functionality for free.
An NSArrayController referenced by mOptionsArray will be used to manage a collection of QTCompressionOptions objects. NSArrayController is a bindings compatible class that manages a collection of objects. By taking advantage of bindings you are able to mediate between the model (that is, the array of QTCompressionOptions objects) and the user interface without having to write any code.
Since the class manages an array of QTCompressionOptions objects specific to a media type (either QTMediaTypeVideo or QTMediaTypeSound), the class keeps track of this media type string in mMediaType.
Finally, an id is required for the delegate object. A delegate is an object that acts on behalf of, or in coordination with, another object when that object encounters an event. In our case, when the Media Compression Options Window is closed, a compressionOptionsWindowDidClose: message is sent to the object registered as the delegate. This message allows the delegate to ask for and use the selected compression setting in an application-specific manner.
The QTCompressionOptionsWindow user interface
Now that the Objective-C class is defined, you use Interface Builder to build the user interface as shown in Figure 2.
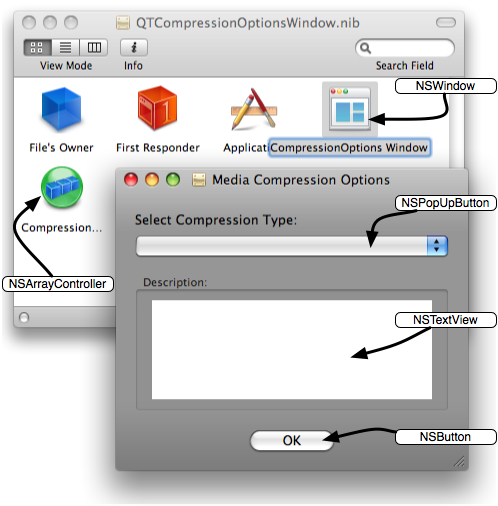
All the interface elements in Figure 2 are common and should easily be recognized. The key elements are; An NSPopUpButton, used to list the localized display names for each compression selection, and a NSTextView used to display the localized compression options summary text for the currently selected compression option. An NSButton is used to dismiss the Window preserving the selected compression option.
The NSArrayController in the nib is called "CompressionOptions Array Controller" and is the object that will manage the collection of QTCompressionOptions instances for us and mediate between this collection and our user interface elements. When the nib file is loaded, it will automatically be connected to the mOptionsArray outlet.
File's Owner
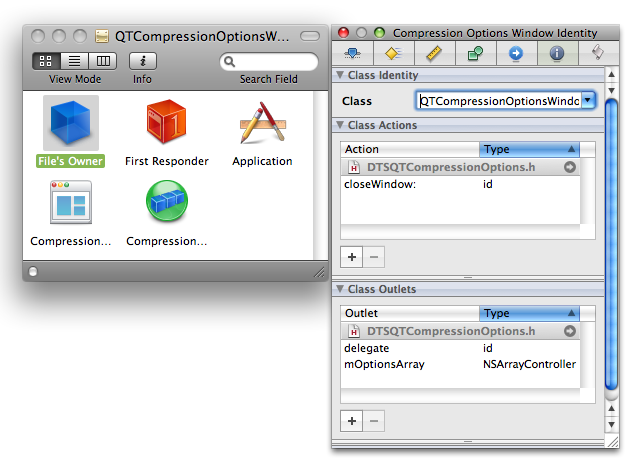
Note the class of the File's Owner object in Figure 3. It has been set to reflect that it will represent an instance of the QTCompressionOptionsWindow class.
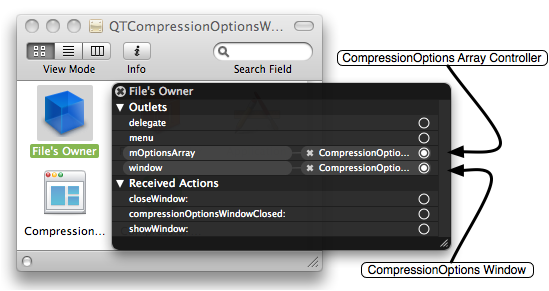
The File’s Owner acts as a placeholder for the object that will manage the contents of the nib file after it is loaded. Our nib file contains two objects that must be referred to by instances of QTCompressionOptionsWindow; the NSWindow named "CompressionOptions Window" and the NSArrayController named "CompressionOptions Array Controller".
The File's Owner object provides a way to make connections to objects in the nib file like the NSArrayController and the QTCompressionOptionsWindow class. When the nib file is loaded, File's Owner will be set to be the instance of QTCompressionOptionsWindow.
Figure 3 shows that the Class field has been changed to "QTCompressionOptionsWindow" as the File's Owner Class Identity.
Once File's Owner is configured, connections may be made between outlets (IBOutlet) in the class and objects in the nib file. Figure 4 shows the connections for the NSArrayController which is connected to mArrayController as mentioned previously and the NSWindow which is connected to window.
When the nib file is loaded, objects in the nib file are created, initialized and connected properly.
The QTCompressionOptionsWindow Class Implementation
If you take a quick tour of the methods used to work with QTCompressionOptionsWindow instances (the code in QTCompressionOptions.m), you'll see how this is implemented.
The initWithMediaType: method is used to initialize the QTCompressionOptionsWindow object. This method accepts either the QTMediaTypeVideo or QTMediaTypeSound media type identifier depending on the list of compression settings you want the Media Compression Options Window to present to a user.
Listing 2 initWithMediaType: method.
// designated initializer
// call with QTMediaTypeVideo or QTMediaTypeSound to initalize
- (id)initWithMediaType:(NSString *)inMediaType
{
    // call NSWindowController designated initializer
    if (self = [super initWithWindow:nil]) {
        // inappropriate media types will bail on init
        if ([self setMediaType:inMediaType]) {
            [self release];
            return nil;
        }
    }

    return self;
} |
The setMediaType: method is invoked during object initialization (and may also be used after initialization to change media types). This method does most of the work in this class. It accepts a media type identifier, performs some basic checks to make sure the media type is valid and the nib file is loaded then asks the QTCompressionOptions class for all the available compression type identifiers for the specified media type. By iterating though the returned array of compression option identifiers the method creates instances of QTCompressionOptions for each identifier and simply populates the NSArrayController.
Listing 3 setMediaType: method.
// set the media type of the compression options you want managed
- (OSStatus)setMediaType:(NSString *)inMediaType
{
    // accept nil as a request for the default - the more common vide options
    if (nil == inMediaType) inMediaType = QTMediaTypeVideo;

    // only accept Video or Audio since they are the only valid compression option media types at this time
    if ((NO == [inMediaType isEqualToString:QTMediaTypeVideo])
          && (NO == [inMediaType isEqualToString:QTMediaTypeSound])) return invalidMedia;

    // only do the set up if the media type has changed
    if ([mMediaType isEqualToString:inMediaType]) return noErr;

    [mMediaType release];
    mMediaType = [inMediaType retain];

    // make sure the nib is actually loaded at this time,
    // required for our connections to the array controller and so on
    if (![self isWindowLoaded]) { [self window]; }

    // make sure the array controller is empty
    [mOptionsArray removeObjects:[mOptionsArray arrangedObjects]];

    // load it up with the currently chosen compression options objects
    NSArray *optionsIdentifiers = [QTCompressionOptions
                                   compressionOptionsIdentifiersForMediaType:inMediaType];
    NSEnumerator *enumerator = [optionsIdentifiers objectEnumerator];

    UInt8 index;
    UInt8 count = [optionsIdentifiers count];
    for (index = 0; index < count; index++) {
        QTCompressionOptions *options = [QTCompressionOptions
                                         compressionOptionsWithIdentifier:[enumerator nextObject]];
        [mOptionsArray addObject:options];
    }

    [mOptionsArray setSelectionIndex:0];

    return noErr;
} |
The setDelegate: method is used to register a controller class as delegate. The delegate will get called when the Media Compression Options Window is closed.
Listing 4 setDelegate method.
- (void)setDelegate:(id)inDelegate { delegate = inDelegate; } |
showWindow: is a method inherited from NSWindowController a client of this class will call to display the Media Compression Options Window. This allows a user to select a compression setting from a pop-up list. No code needed here.
The closeWindow: action is automatically sent to the QTCompressionOptionsWindow instance via the binding mechanism (see below) when the 'OK' button is clicked. The Media Compression Options Window is then closed preserving the users selected compression setting.
Listing 5 closeWindow action.
- (IBAction)closeWindow:(id)sender { [self close]; } |
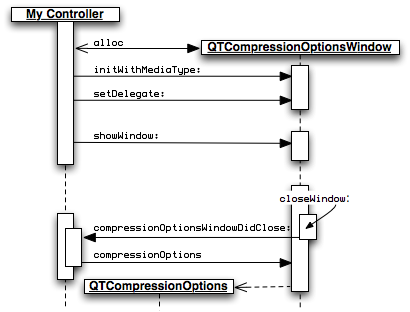
After the window is closed a compressionOptionsWindowDidClose: message is sent to the object registered as the delegate. Listing 6.
Listing 6 Sending compressionOptionsWindowDidClose: to the delegate.
// inform the client of this class that the window has been closed
// the client will then be able to ask for the currently selected
// compression options object
- (void)close
{
    [super close];

    if (nil != delegate && [delegate respondsToSelector:@selector(compressionOptionsWindowDidClose:)] ) {

        [delegate compressionOptionsWindowDidClose:self];
    }
} |
The delegate may then retrieve the currently selected compression settings by sending a compressionOptions: message to the sender.
Figure 5 is a visual representation of a typical calling sequence when using the QTCompressionOptionsWindow class.
Using Cocoa Bindings
Bindings are a way to connect user interface elements to their underlying data without writing a lot of (or any) glue code to synchronize the two.
To implement the user interface, a connection called a binding is created between the NSArrayController (which is managing the collection of QTCompressionOptions objects) and the user interface elements (NSPopUpButton and NSTextView) where we want the information returned by each QTCompressionOptions instance displayed.
QTCompressionOptions has two methods that return the strings used to populate both the pop-up and the text view.
Listing 7 QTCompressionOptions display methods.
- (NSString *)localizedDisplayName; - (NSString *)localizedCompressionOptionsSummary; |
The content of the pop-up is provided by sending the localizedDisplayName message to each QTCompressionOptions instance in the array managed by the NSArrayController. When an item is selected, the localizedCompressionOptionsSummary message is sent to the selected QTCompressionOptions instance and the returned NSString is displayed in the text view. This mediation between the user interface and the contents of the array is performed automatically for us by the NSArrayController.
Here's how this is set up in Interface Builder:
NSPopUpButton
Content Values
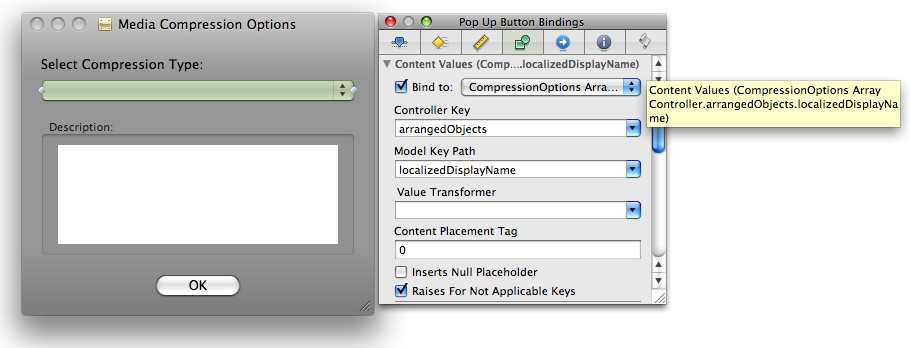
In the Value Selection section of the Bindings Inspector for NSPopUpButton, bind Content Values to the NSArrayController. This is done by checking the "Bind to:" checkbox and selecting "CompressionOptions Array Controller" from the list.
Content Values are arrays of strings that are displayed as the items in the NSPopUpButton.
The Controller Key is set to arrangedObjects which returns the array from the controller and the Model Key Path is localizedDisplayName.
Establishing this binding in Interface Builder is equivalent to programatically sending the localizedDisplayName message each of the managed QTCompressionOptions instances and will populate the pop-up with the returned string values.

Selected Index
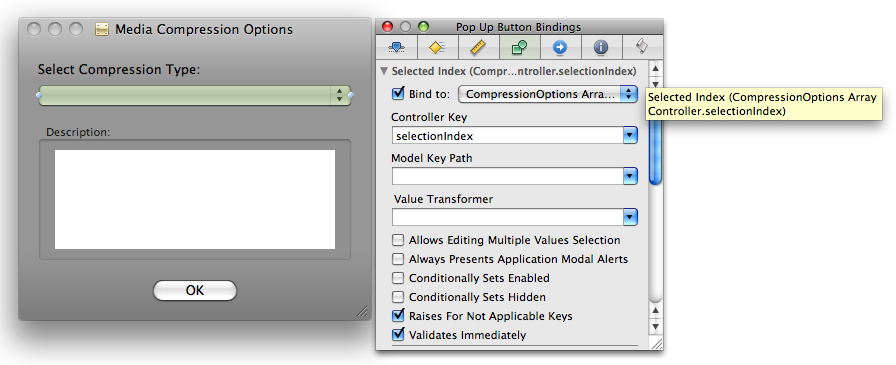
In the Value Selection section of the Bindings Inspector for NSPopUpButton, bind Selected Index to the NSArrayController. This is done by checking the "Bind to:" checkbox and selecting "CompressionOptions Array Controller" from the list.
Selected Index is an integer value that specifies the index of the selected item in the NSPopUpButton. When the selection changes in the NSPopUpButton, this value is updated with the index of the newly selected item.
The Controller Key is set to selectionIndex which returns the index value of the first object in the selection.

NSTextView
Value
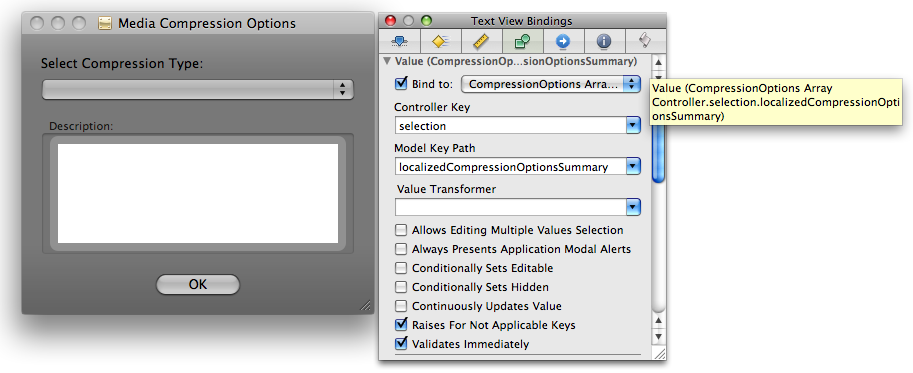
In the Value Selection section of the Bindings Inspector for NSTextView, bind Value to the NSArrayController. This is done by checking the "Bind to:" checkbox and selecting "CompressionOptions Array Controller" from the list.
Value is the NSString that is displayed as the content of the NSTextView.
The Controller Key is set to selection which returns the currently selected object and the Model Key Path is localizedCompressionOptionsSummary.
Establishing this binding in Interface Builder is equivalent to programatically sending the localizedCompressionOptionsSummary message to the currently selected QTCompressionOptions instance and displaying the returned string in the text view. We know what the index is for the currently selected item because of the above Selected Index binding.

NSButton
Target
In the Target section of the Bindings Inspector for NSButton, bind Target to File's Owner (remember File's Owner represents QTCompressionOptionsWindow). This is done by checking the "Bind to:" checkbox and selecting "File's Owner" from the list.
Target is the object that receives a message corresponding to the selector name when the NSButton is clicked.
The Model Key Path is self and the Selector Name is closeWindow:.
Establishing this binding in Interface Builder is equivalent to programatically sending the closeWindow: message to an instance of QTCompressionOptionsWindow when the 'OK' button is clicked.

Using QTCompressionOptionsWindow In Your Application
Using the QTCompressionOptionsWindow takes very little code. Here's an example of some typical code that may be used to create and use an instance of QTCompressionOptionsWindow.
Declare a reference to a QTCompressionOptionsWindow instance in your controller class.
Listing 8 MyController.h.
#import <QTCompressionOptionsWindow.h> @interface MyController : NSObject { ... // the Compression Options Window QTCompressionOptionsWindow *mCompressionOptionsWindow; } ... |
Allocate an instance of the QTCompressionOptionsWindow and initialize it with a media type, in this case QTMediaTypeVideo. Then set the delegate (most likely your custom controller, i.e. self).
Listing 9 MyController.m awakeFromNib.
- (void)awakeFromNib
{
    // code to initialize capture objects

    ...

    // ******** Compression Options Window *****

    // create our window with the media type and set ourselves as the delagate
    // you could also instantiate the window directly in the nib and hook up the deleate
    // then simply call showWindow or setMediaType if you want to change the list of compression options shown
    mCompressionOptionsWindow = [[QTCompressionOptionsWindow alloc] initWithMediaType:QTMediaTypeVideo];
    if (nil == mCompressionOptionsWindow) {
        NSLog(@"Compression Options Window did not load!\n");
        return;
    }
    [mCompressionOptionsWindow setDelegate:self];

    ...
} |
Display the window at some future time as required.
Listing 10 MyController.m showCompressionOptionsWindow:.
- (IBAction)showCompressionOptionsWindow:(id)sender { [mCompressionOptionsWindow showWindow:sender]; } |
Implement a delegate method called compressionOptionsWindowDidClose: which is called when the Media Compression Options Window is closed.
This delegate method can retrieve the compression settings selected from the pop-up list by sending the message compressionOptions to the sender(the QTCompressionOptionsWindow instance) which will return the QTCompressionOptions instance selected in the pop-up. This returned QTCompressionOptions instance is then used to set the desired compression settings for the media being saved to the file.
Send the QTCaptureFileOutput instance a setCompressionOptions:forConnection: message and pass it the returned QTCompressionOptions instance for the appropriate connection, thereby setting the user chosen compression settings for that media stream.
Listing 11 MyController.m delegate method.
// when the options window is closed this delegate method gets called
// ask for the chosen QTCompressionOptions object and configure the file output
// object accordingly
- (void)compressionOptionsWindowDidClose:(id)sender
{
    // get the selected compression setting
    QTCompressionOptions *myCompressionOptions = [sender compressionOptions];

    if (nil != myCompressionOptions) {
        [mCaptureSession stopRunning];

        // configure the file output to compress this connection using the chosen
        // compression settings
        [mCaptureMovieFileOutput setCompressionOptions:myCompressionOptions
        forConnection:[[mCaptureMovieFileOutput connections] lastObject]];

        [mCaptureSession startRunning];

        // update the UI so it displays the chosen compression type
        self.displayName = [myCompressionOptions localizedDisplayName];

        NSLog(@"%@\n", [myCompressionOptions localizedDisplayName]);
    } else {
        NSLog(@"Bad Compression Options Object Returned!\n");
    }
} |
Conclusion
By taking advantage of Cocoa bindings and standard user interface elements, you saw how to create a user interface to use with the QTKit Capture framework with less than 30 lines of Objective-C code. This of course just scratches the surface of what can be done with QTKit and Cocoa.
Experiment with the code, expand on it, make it unique to your application and most of all, have fun.
References
Document Revision History
| Date | Notes |
|---|---|
| 2008-03-11 | Editorial |
| 2008-03-04 | New document that introductory overview of the QTCompressionOptionsWindow sample demonstrating one way to manage QTCompressionOptions objects. |
Copyright © 2008 Apple Inc. All Rights Reserved. Terms of Use | Privacy Policy | Updated: 2008-03-11