Retired Document
Important: This legacy document includes the full history of “What’s New in Xcode” revisions for Xcode 4, from Xcode 4.1 to Xcode 4.6.3.
New Features in Xcode 4.2
Xcode 4.2 adds features to support iOS 5 as well as other enhancements to the application.
This article describes the new features in Xcode 4.2.
Automatic Reference Counting
Xcode 4.2 includes a menu item to convert targets to use Automatic Reference Counting (ARC), which automates memory management for Objective-C objects. ARC makes memory management much easier, greatly reducing the chance that your program will have memory leaks. First, Xcode reviews your project to determine whether there are items that cannot be converted (and that you must therefore change manually). Then, Xcode rewrites your source code to use ARC.
To initiate the process, enable Continue building after errors in the General Preferences pane, then choose Edit > Refactor > Convert to Objective-C ARC. The targets that you convert are updated to build using the Apple LLVM compiler. Xcode attempts to build your target and to determine what changes must be made to use ARC. If it finds any issues that prevent conversion, Xcode displays a dialog directing you to review the errors in the Issue navigator. After you correct the errors, choose the Convert to Objective-C Automatic Reference Counting menu item again to restart the ARC-conversion workflow.
When Xcode successfully builds your application, it takes a snapshot of the current code so that you can revert later if you want to. Then Xcode displays a preview dialog showing the changes it’s going to make. When you accept the changes, Xcode converts your code to use ARC.
For more information on ARC, see Transitioning to ARC Release Notes.
Default Compiler
The default compiler for iOS development in Xcode 4.2 is LLVM 3.0. Compared with the GCC compiler that was the default in Xcode 4.0 and the LLVM-GCC compiler in Xcode 4.1, LLVM provides better code generation and optimization than GCC, along with newer language support than LLVM-GCC, including support for ARC in Objective-C and for the new C++ standard, C++0x.
Storyboards
In Xcode 4.2, the Interface Builder user interface for iOS app UI design is based on using storyboards, that is, images of view controllers populated with user interface objects and connected together with segues. Storyboards enable you to use Interface Builder to specify all the screens in your application, including the transitions between them and the controls used to trigger the transitions. With storyboards, you can lay out every possible path through your application graphically, greatly reducing the amount of code you need to write for a complex multiscreen application.
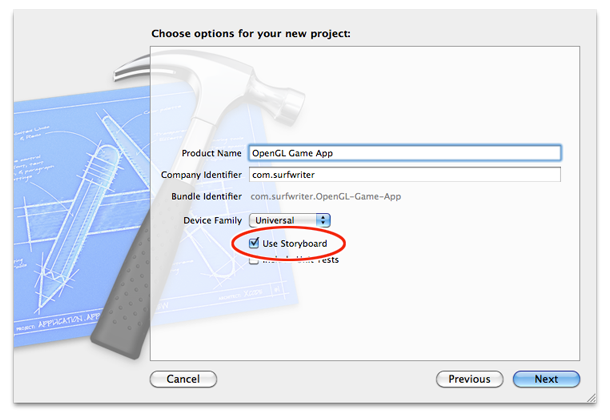
To create a project that uses view controllers, choose File > New > New Project and select the Use Storyboard checkbox in the options dialog (Figure 1).
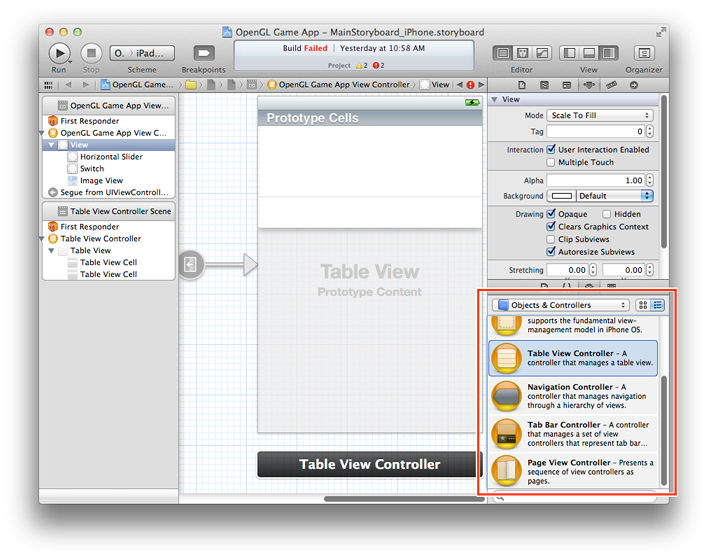
You start with a view controller object that represents your first scene (the initial view controller). To get view controllers for your storyboard, select Objects and Controllers from the Object library (Figure 2) and drag the view controllers you want onto the canvas. Each view controller manages a single scene. On the iPhone, each scene represents the contents of a single screen. For iPad applications, a screen can be composed of the contents of more than one scene.

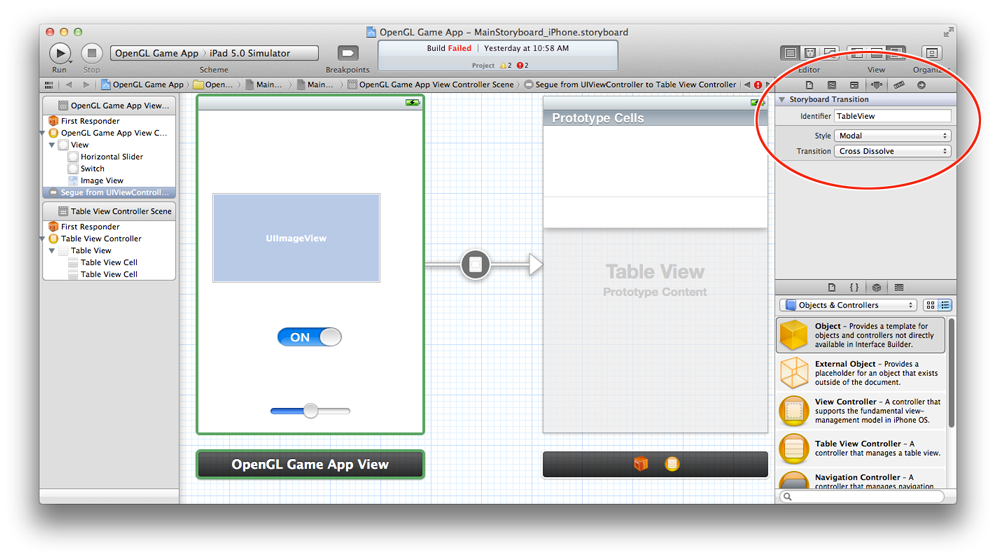
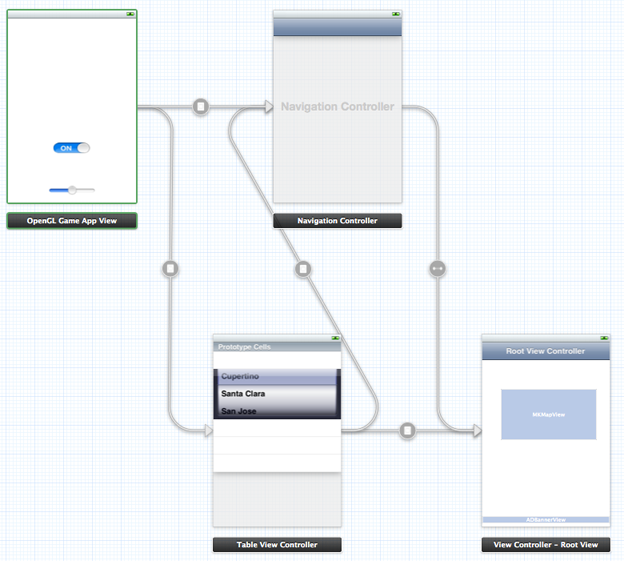
To storyboard your application, you link each object that’s in a view controller and that can cause a change in the display, to another view controller that configures and implements the new scene (Figure 3). As you can see in the figure, the initial view controller has a green outline. You link the various view controllers in Interface Builder by Control-dragging between controls and view controllers. You can drag from any control that has an output to the header of any other view controller. You can add controls and views to each view controller’s view just as you would add objects to a window or a view in the nib file of an Xcode 3 or Xcode 4.0 application.

The arrows between view controllers represent the segues from one scene to another. To configure a segue—for example, to specify the kind of transition to use between scenes—click the arrow and open the Attributes inspector (Figure 4). To define a custom transition, select Custom for the style of the segue and fill in the name of your custom segue class. Standard segue classes are in UIKit (see UIKit Framework Reference). For information about implementing the methods in the UIViewController class, see UIViewController Class Reference.

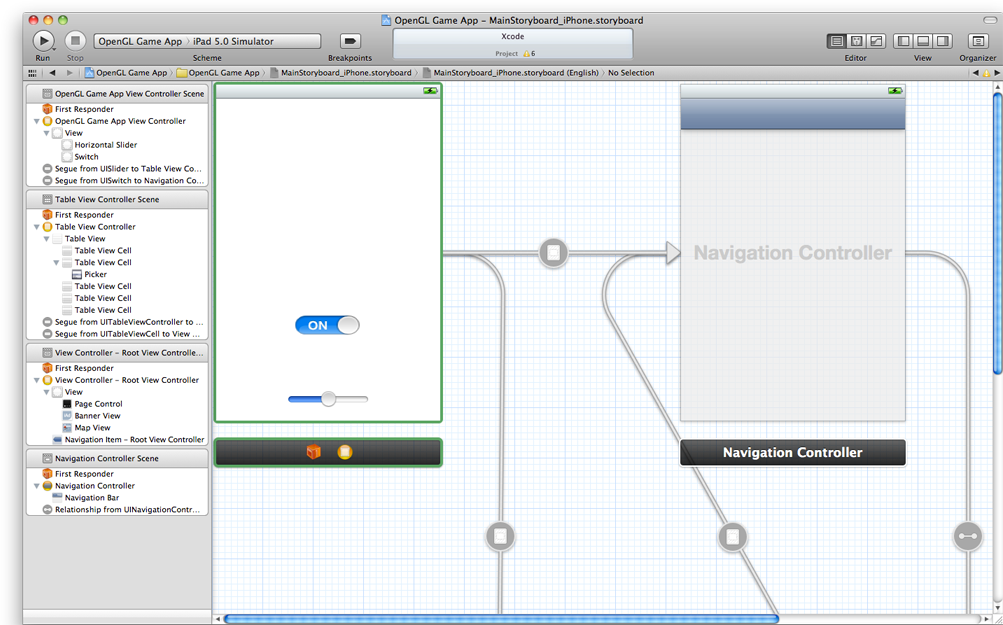
The result is a storyboard that graphically represents every screen of your application and the flow of control among the screens. Double-click the canvas to zoom out to see the entire storyboard (Figure 5).
OpenGL ES Frame Capture
The debugging experience has been updated to include a new workflow for debugging iOS OpenGL ES applications. When frame capture is enabled in the scheme for the application, the debug bar provides a new control for entering the OpenGL ES frame debugging view.
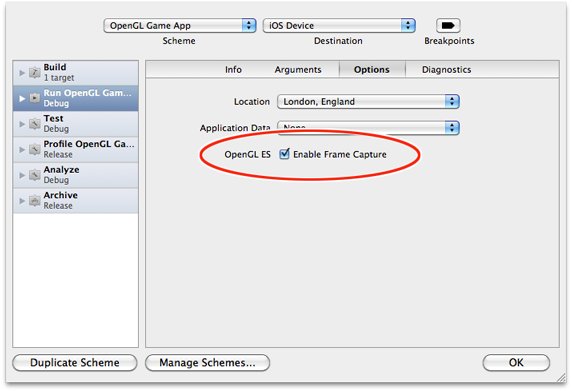
To enable this feature, you must run the application on a device and the device must be running iOS 5.0 or later. Set the destination in the scheme menu to an iOS device and choose Edit Scheme from the scheme selector in the toolbar. Select the Run action, click the Options tab, and select the OpenGL ES Enable Frame Capture checkbox (Figure 6).
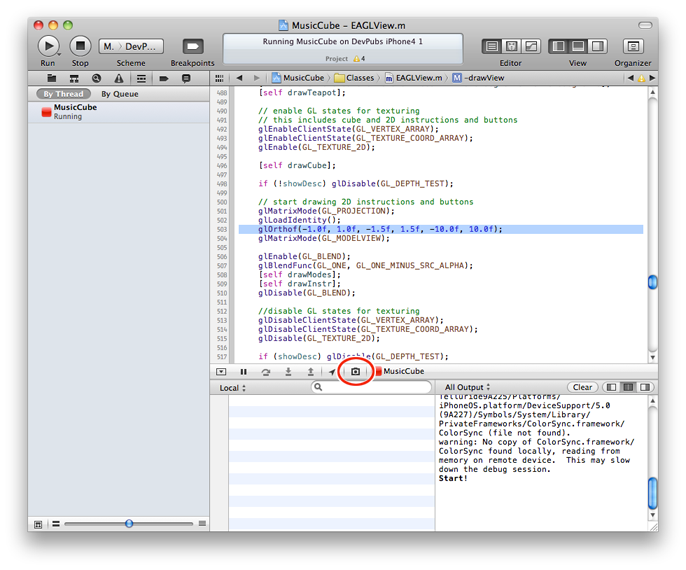
When you build and run your OpenGL ES application, the debug bar includes a frame capture button (Figure 7). Click that button to capture a frame.

You can use Xcode 4.2 to:
Inspect OpenGL ES state information.
Introspect OpenGL ES objects such as view textures and shaders.
Step through draw calls and watch the changes with each call.
Step through the state calls that precede each draw call to see exactly how the image is constructed.
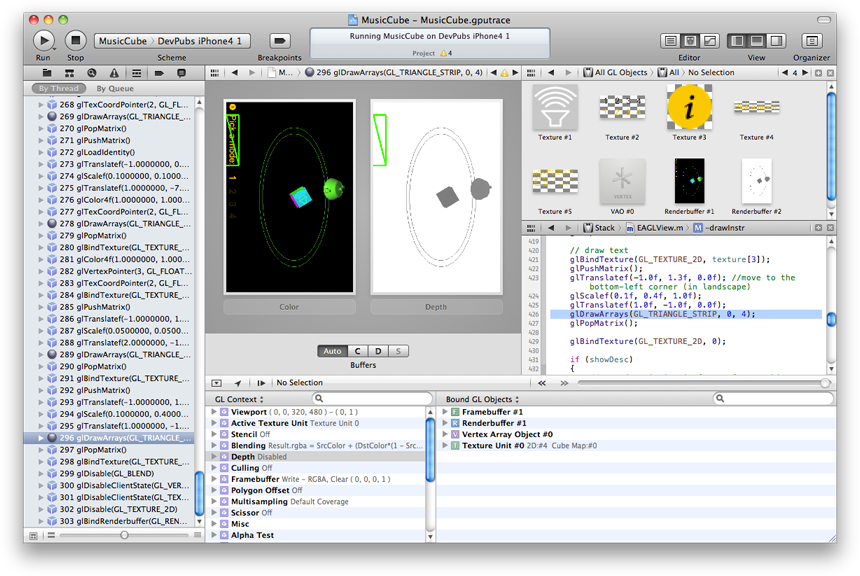
Figure 8 shows a captured frame. The debug navigator has a list of every draw call and state call associated with that frame. The buffers associated with the frame are shown in the editor pane, and the state information is shown in the debug pane.
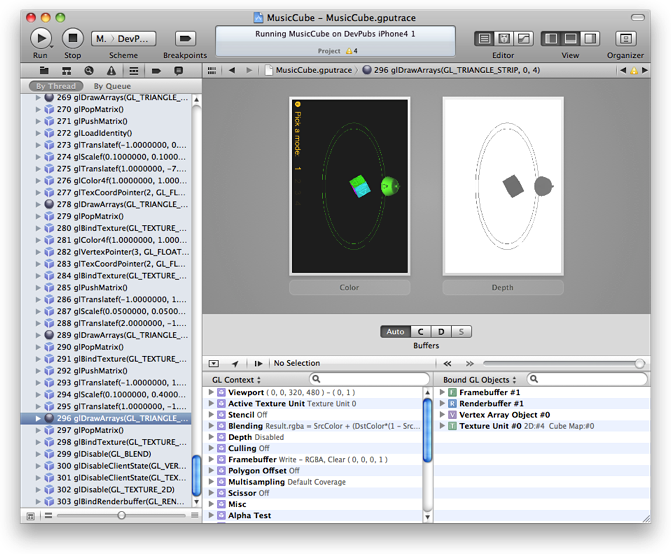

You can step through draw calls in the debug navigator, or by using the double arrows and slider in the debug bar (Figure 9).
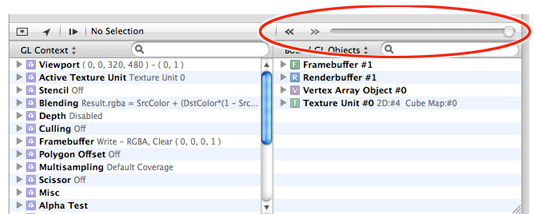
When you use the draw call arrows or slider, you can have Xcode select the stepped-to draw call in the debug navigator. To do so, Control-click below the captured frame and choose Reveal in Debug Navigator from the shortcut menu (Figure 10).
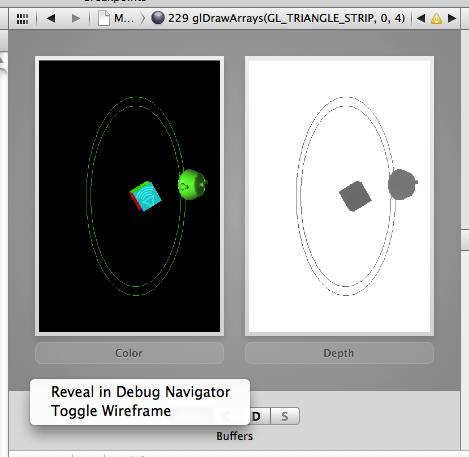
You can also use the shortcut menu to toggle between a standard view of the drawing and a wireframe view (Figure 11). The wireframe view highlights the element being drawn by the selected draw call.

Open the Assistant editor to see the objects associated with the captured frame. In the Assistant editor you can choose to see all the objects, only bound objects, or the stack. Open a second Assistant editor pane to see both the objects and the stack for the frame at the same time (Figure 12).

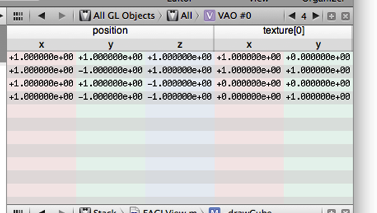
Double-click an object in the Assistant editor to see details about that object. For example, if you double-click a texture object, you can see the texture in detail. Figure 13 shows the data in a vertex array (VAO) object.
Location Simulation
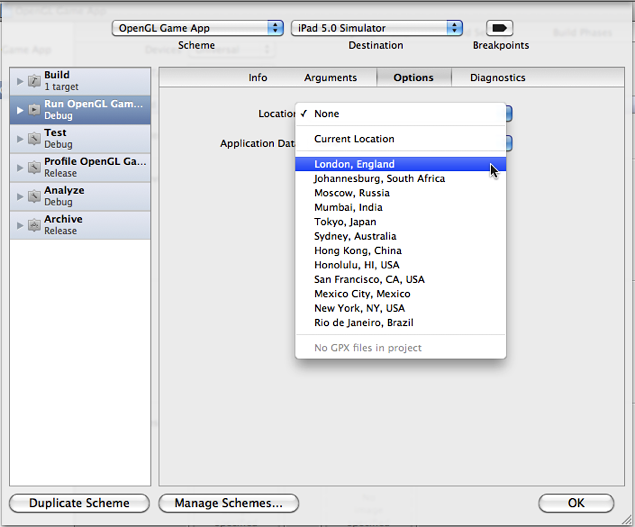
In Xcode 4.0 and 4.1, you could simulate only the current location in your application. As of Xcode 4.2, you can simulate locations other than your current location in iOS applications that use Core Location. To set a location, choose Edit Scheme from the scheme selector in the toolbar, select the Run action, and click the Options tab. You can then choose a location from the Location menu (Figure 14).
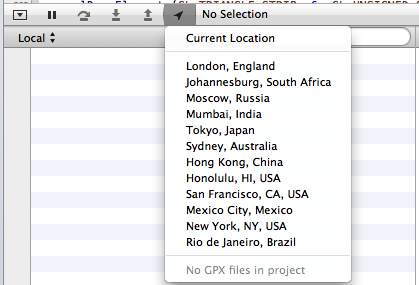
In addition, if you are running an application for iOS 5.0 or later that uses Core Location, the debug bar has the same location drop-down menu (Figure 15).
Application Data Management
In Xcode 4.2, you can save and restore application data files on a simulator or iOS device when debugging or running unit tests.
Downloading Components
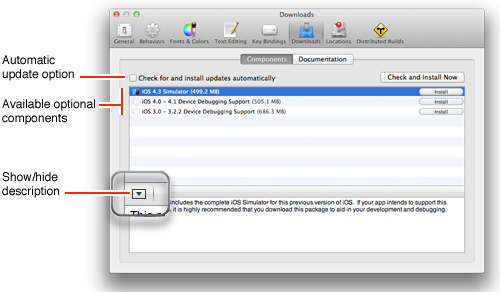
To improve download time and installation efficiency with Xcode 4.2, the standard Xcode installer excludes some large tool components, such as older simulators, that are not essential to the current development toolset. Xcode presents you with a dialog when the simulator needs to be downloaded. Documentation preferences has consequently been replaced with Downloads preferences, including both documentation and components (simulators and SDKs). Using the Components tab of the Downloads preferences pane, you can view a description of each available component, download and install it.
Copyright © 2013 Apple Inc. All Rights Reserved. Terms of Use | Privacy Policy | Updated: 2013-09-18