Retired Document
Important: This document may not represent best practices for current development. Links to downloads and other resources may no longer be valid.
Common Rules
This chapter provides examples of some common rules you can use to customize applications. It first provides a section listing common left-hand side qualifier keys. You use these keys to tell the rule system which part of an application to affect with a particular rule.
Left-Hand Side Qualifier Keys
Most rules that you write are likely to use the following keys in the left-hand side qualifier:
task: A name of the task for which information is requested from the rule system. The values used in the default rule system areform(editing an enterprise object)list(listing multiple enterprise objects)query(qualifying enterprise objects for a search)identify(describing enterprise objects in a short form)select(a combination of query and list)editor(a combination of list and form)queryWindow(the task for requesting the complete query window)enumerationWindow(the task for requesting the complete enumeration window)
entity: The entity the rule system works on for a particular rule. You most often identify an entity using the key pathentity.name.propertyKey;attribute;relationship: The property key the rule system works on for a particular rule. You can useattribute.nameorrelationship.namerather thanpropertyKey. You’d likely do this if an entity contains ambiguously named property keys, such as an attribute and relationship that have the same name.
You can further restrict a left-hand side qualifier using these keys:
question: A question the rule system is supposed to answer. The most important question keys in the rule system arecontrollerType: An indication of what kind of controller the rule system works on for a particular rule. The values in the default rule system areisRootController: Specifies whether the rule system is working on the root controller (in which case this key evaluates tonull) or a subcontroller (in which case this key evaluates tofalse).rootQuestion,rootTask,rootEntity: These represent copies of thequestion,task, andentityvalues of the original request triggered by the controller factory. For example, throughrootTaskyou can find out whether you are in aformwindow.
Confirmation Dialog
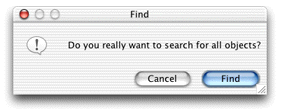
Problem: By default when you query on an entity without supplying a qualifier, you are presented with a dialog to confirm the action, as shown in Figure 15-1. This behavior is intended to warn users about performing unqualified queries of the data store, which could fetch hundreds or thousands of records.

Solution: Use the rule system to override the default behavior.
The confirmation dialog appears when a user invokes an unqualified query (a query with no search criteria). Whenever you want to modify the behavior of a controller in a Direct to Java Client application, you should first consult Controllers and Actions Reference. If you look for EOQueryController, you’ll find an XML attribute called runsConfirmDialogForEmptyQualifiers. This is the switch you’re looking for. So to disable the confirmation dialog, add this rule to your application’s d2w.d2wmodel file:
- Left-Hand Side:
*true*- Key:
runsConfirmDialogForEmptyQualifiers- Value:
"false"- Priority:
50
Window Size
Problem: You want to specify a minimum width and height for all windows in your application.
Solution: Use the rule system.
To set the minimum width of all windows in your application to 512 pixels, use this rule:
- Left-Hand Side:
(controllerType='windowController')- Key:
minimumWidth- Value:
512- Priority:
50
To set the minimum height of all windows in your application to 350 pixels, use this rule:
- Left-Hand Side:
(controllerType='windowController')- Key:
minimumHeight- Value:
350- Priority:
50
Widget Alignment
Problem: You want to right-align all widgets that contain numbers.
Solution: Write a rule.
To right-align all widgets in your application whose attribute’s value class is a number type, use this rule:
- Left-Hand Side:
((not (attribute= nil)) and (attribute.valueClassName='NSNumber') or (attribute.valueClassName='NSDecimalNumber'))- Key:
alignment- Value:
"Right"- Priority:
50
Custom Controllers
Problem: You’ve subclassed one of the core controller classes (EOFormController, EOListController, EOQueryController) and you want to use it in place of the default controller throughout the application.
Solution: Write a rule.
To use a custom subclass of EOQueryController called QueryController in the package com.mypackage, use this rule:
- Left-Hand Side:
((task='query')and (controllerType='entityController'))- Key:
className- Value:
"com.mypackage.QueryController"- Priority:
50
To use the custom subclass only for a specific entity, use this rule:
- Left-Hand Side:
((task='query') and (entity.name="<entity name>"))- Key:
className- Value:
"com.package.CustomQueryController"- Priority:
50
Custom Class for Widgets
Problem: You want to use a custom widget class for a particular widget in your application.
Solution: Write a rule.
To use a custom widget class for the creditCardNumber attribute of a Person entity, use this rule:
- Left-Hand Side:
((entity.name='Person') and (attribute.name="creditCardNumber"))- Key:
widgetController- Value:
"com.client.CustomController"- Priority:
50
CustomController is a subclass of EOWidgetController:
package com.client; |
import javax.swing.*; |
import com.webobjects.foundation.*; |
import com.webobjects.eogeneration.*; |
import com.webobjects.eointerface.swing.*; |
public class CustomController extends EOWidgetController { |
public CustomController(EOXMLUnarchiver unarchiver) { |
super(unarchiver); |
} |
protected JComponent newWidget() { |
return new JPasswordField(""); |
} |
} |
Custom Attributes for Controllers
Problem: You want to set custom attributes for a particular type of controller throughout your application.
Solution: Write a rule.
The Direct to Java Client Assistant allows you to set attributes for controllers such as horizontallyResizable, editability, and label. The attributes for each controller are listed in Controllers and Actions Reference. To disable horizontal resizing for all modal dialogs in an application, use this rule:
- Left-Hand Side:
(controllerType = "modalDialogController")- Key:
horizontallyResizable- Value:
"false"- Priority:
50
Continuous Change Notification
Problem: You want to implement continuous change notification for a particular controller.
Solution: Write a rule.
Starting with WebObjects 5.2, some controllers can implement continuous change notification. To implement continuous change notification for a dynamically generated controller using rules, you must first identify the controller and then write a rule with a right-hand side key of prefersContinuousChangeNotification and value of true.
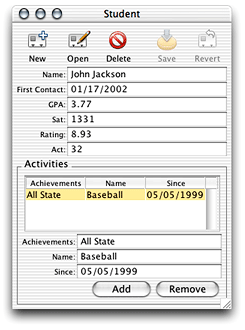
The example application Admissions in Enhancing the Application could benefit from continuous change notification. In the section Add Custom Code, you added custom business logic that calculates a rating for a particular student record. By default, the rating is updated after the user tabs out of one of the fields that is part of the rating calculation. By applying continuous change notification to one of those fields, however, the rating updates each time a user makes a change in one of those fields.
The user interface element to which you’ll add continuous change notification is the Student form window, as shown in Figure 15-2.

The first step is to identify the form controller in the rule system. The best way to do this is to open Assistant and make a trivial change to that controller, such as changing the default window location. Doing so writes a rule to the application’s user.d2wmodel file. That rule’s left-hand side is how the controller is identified in the rule system. By copying the left-hand side of that rule to the application’s d2w.d2wmodel file, you can customize its behavior and characteristics by adding right-hand side keys and values.
Here is the rule to implement continuous change notification in this example:
- Left-Hand Side:
((task = 'form') and (entity.name = 'Student'))- Key:
prefersContinuousChangeNotification- Value:
"true"- Priority:
50
If you implemented the validation methods in Validation, you may see many validation exception dialogs when you implement continuous change notification, depending on what kind of validation you implement.
Copyright © 2002, 2005 Apple Computer, Inc. All Rights Reserved. Terms of Use | Privacy Policy | Updated: 2005-08-11