Retired Document
Important: Apple recommends that developers explore QTKit and Core Video for new development in this technology area. See QTKit Framework Reference and Core Video Programming Guide for more information.
How To Add QuickTime Video Effects
This chapter discusses how QuickTime video effects are implemented and how you can add effects to QuickTime movies.
The first step in adding effects to a QuickTime movie is to create an effects track. This is accomplished by using the standard QuickTime API for track creation, as explained in this chapter.
You can also use QuickTime video effects to transition between two graphics worlds. Your application does not have to generate a QuickTime movie to use the video effects.
Effect Tracks
QuickTime video effects are implemented as components, which are the standard mechanism used to extend QuickTime. Effect components are actually a specialized type of image decompressor component.
To use an effect component in a QuickTime movie, you add an effect track to the movie. The size and duration of the track determines the area of the movie that is affected and how long the effect runs.
The effect track has two important attributes: the effect description and the input map. The effect description is a sample, added to the media of the effects track, that selects which effect to use and contains the parameters for that effect. The input map describes the sources that the effect works on. Effect components use whole tracks as sources. A track reference redirects the output of the source track to the effect track. You may need to make new tracks, referencing parts of existing video tracks, to act as sources for your effects.
Once you have arranged your source tracks and added the effects track to your movie, QuickTime automatically executes the effect when the movie plays. QuickTime generates as many frames per second as possible for the effect, so the effect will run as smoothly as the CPU and display hardware of the target machine permit.
You can also use the QuickTime video effects outside the context of a QuickTime movie. You still supply an effect description, but instead of creating an effect track, you write code that executes the individual steps of the effect. For details, see the section Using Video Effects Outside a QuickTime Movie.
Adding Video Effects to a QuickTime Movie
This section explains the steps you need to take in order to add video effects to a QuickTime movie. In brief, you proceed as follows:
You create and arrange any source tracks that will be used by the effect.
You add a new effect track to your movie: the offset and duration of the track determine when the effect takes place.
You create an effect description that selects the particular effect you want and supplies values for any parameters the effect has.
You create an input map that defines which tracks in the movie serve as sources for the effect.
Finally, you add the effect description as a new sample to the media of the effect track. As part of this process, you create a sample description, which describes the sample being added.
There are high-level routines that can be used to greatly simplify this process. For example, QTCreateStandardParameterDialog can automatically obtain a list of available effects, allow the user to choose an effect and set its parameters, and return an effect description for the chosen effect.
Preparing an Effect for Direct Execution
The code that prepares the data structures required to directly execute an effect is broadly similar to the code to set up effects within a QuickTime movie.
You first provide an effect description and sample description for the effect component you are going to use. Then you prepare a decompression sequence that will actually playback the effect.
Executing the Decompression Sequence
With the effect and sample descriptions built and the decompression sequence prepared, you can now execute the effect. The function shown in Listing 1-1 executes a single frame of a decompression sequence.
The parameter theTime contains the number of the frame to be executed. The parameter theNumberOfSteps contains the total number of frames that will be used to run the effect.
Listing 1-1 Defining the RunEffect function, which executes one frame of an effect
// Decompress a single step of the effect sequence at time. |
OSErr RunEffect(TimeValue theTime, int theNumberOfSteps) |
{ |
OSErr err = noErr; |
ICMFrameTimeRecord frameTime; |
// Set the timebase time to the step of the sequence to be rendered |
SetTimeBaseValue(gTimeBase, theTime, theNumberOfSteps); |
frameTime.value.lo = theTime; |
frameTime.value.hi = 0; |
frameTime.scale = theNumberOfSteps; |
frameTime.base = 0; |
frameTime.duration = theNumberOfSteps; |
frameTime.rate = 0; |
frameTime.recordSize = sizeof(frameTime); |
frameTime.frameNumber = 1; |
frameTime.flags = icmFrameTimeHasVirtualStartTimeAndDuration; |
frameTime.virtualStartTime.lo = 0; |
frameTime.virtualStartTime.hi = 0; |
frameTime.virtualDuration = theNumberOfSteps; |
HLock(myEffectDesc); |
DecompressSequenceFrameWhen(gEffectSequenceID, |
StripAddress(*myEffectDesc), |
GetHandleSize(myEffectDesc), |
0, |
0, |
nil, |
&frameTime); |
HUnlock(myEffectDesc); |
} |
The code in Listing 1-2 executes this effect in 30 steps.
Listing 1-2 Executing an effect directly by calling the RunEffect function
for (currentTime = 0; currentTime < 30; currentTime++) |
{ |
myErr = RunEffect(currentTime, 30); |
if (myErr != noErr) |
goto bail; |
} |
Creating an Effects Track
The first step in adding effects to a QuickTime movie is to create an effects track. This is accomplished by using the standard QuickTime API for track creation, for example:
theEffectsTrack = NewMovieTrack(theMovie, kTrackWidth, kTrackHeight, 0); |
You then call the NewTrackMedia function to add a media to the track. The type of the media for an effects track should always be VideoMediaType, and the media should have whatever duration you want the effect to have. Here is a sample call to NewTrackMedia :
theEffectsMedia = NewTrackMedia(theEffectsTrack, VideoMediaType, 600, nil, 0); |
Creating an Effect Description
An effect description tells QuickTime which effect to execute and contains the parameters that control how the effect behaves at runtime. You create an effect description by creating an atom container, inserting a QT atom that specifies the effect, and inserting a set of QT atoms that set its parameters.
There are support functions you can call to assist you in this process. QTCreateStandardParameterDialog returns a complete effect description that you can use, including user-selected settings; you only need to add kEffectSourceName atoms to the description for effects that require sources. At a lower level, QTGetEffectsList returns a list of the available effects and ImageCodecGetParameterList will return a description of the parameters for an effect, including the default value for each parameter in the form of a QT atom that can be inserted directly into an effect description.
Structure of an Effect Description
An effect description is the sole media sample for an effect track. An effect description is implemented as a QTAtomContainer structure, the general QuickTime structure for holding a set of QuickTime atoms. All effect descriptions must contain the set of required atoms, which specify attributes such as which effect component to use. In addition, effect descriptions can contain a variable number of parameter atoms, which hold the values of the parameters for the effect.
Each atom contains either data or a set of child atoms. If a parameter atom contains data, the data is the value of the parameter, and this value remains constant while the effect executes. If a parameter atom contains a set of child atoms, they typically contain a tween entry so the value of the parameter will be interpolated for the duration of the effect.
You assemble an effect description by adding the appropriate set of atoms to a QTAtomContainer structure.
You can find out what the appropriate atoms are by making an ImageCodecGetParameterList call to the effect component. This fills an atom container with a set of parameter description atoms. These atoms contain descriptions of the effect parameters, such as each parameter’s atom type, data range, default value, and so on. The default value in each description atom is itself a QuickTime atom that can be inserted directly into your effect description.
You can modify the data in the parameter atoms directly, or let the user set them by calling QTCreateStandardParameterDialog, which returns a complete effect description (you need to add kEffectSourceName atoms for effects that require sources).
You then add the effect description to the media of the effect track, as described in the section Adding the Sample to the Media.
Adding the Sample to the Media
Once you have the sample description prepared, you can call AddMediaSample to add the effect description to the media. Listing 1-3 shows a sample call.
Listing 1-3 Calling AddMediaSample to add an effect description
// Always call BeginMediaEdits before adding sample to a media |
BeginMediaEdits(theEffectsMedia); |
// Add the sample to the media |
AddMediaSample(theEffectsMedia, |
(Handle) theEffectDescription, |
0, |
GetHandleSize((Handle) theEffectDescription), |
600, |
(SampleDescriptionHandle) sampleDescription, |
1, |
0, |
&sampleTime); |
// End the media editing session |
EndMediaEdits(theEffectsMedia); |
Required Atoms of an Effects Description
There are several required atoms that an effect description must contain. The first is the kParameterWhatName atom, which contains the name of the effect. This specifies which of the available effects to use.
The code snippet shown in Listing 1-4 adds a kParameterWhatName atom to the atom container effectDesc. The constant kCrossFadeTransitionType contains the name of the cross-fade effect. The cross-fade effect is described in detail in Example: Cross Fade.
Listing 1-4 Adding a kParameterWhatName atom with the value kCrossFadeTransitionType to the QTAtomContainer effectDesc
effectCode = kCrossFadeTransitionType; |
QTInsertChild(effectDescription, |
kParentAtomIsContainer, |
kParameterWhatName, |
kParameterWhatID, |
0, |
sizeof(effectCode), |
&effectCode, |
nil); |
In addition to the kParameterWhatName atom, the effect description for an effect that uses sources must contain one or more kEffectSourceName atoms. Each of these atoms contains the name of one of the effect’s sources. An input map is used to map these names to the actual tracks of the movie that are the sources. Creating an Input Map describes how to create the input map.
Example: Cross Fade
kCrossFadeTransitionType ('dslv')
A “cross fade” or “dissolve” provides a smooth alpha blending between two video sources, changing over time to give a smooth fade out from the first source into the second.
This effect takes a maximum of two sources and has a single parameter.
Use the description below to help you understand what the parameter does. To learn how to use parameter atoms, see Adding Video Effects to a QuickTime Movie.
Name |
Code |
QTAtom Type |
Description |
|---|---|---|---|
Percentage |
|
|
This parameter contains a tween. As the effect progresses, QuickTime renders the frame of the effect indicated by the tween's current value as a percentage of the whole effect. For example, if the tween goes from 0 to 100, the effect renders completely; if the tween goes from 25 to 75, rendering begins 25% into the effect and terminates 75% through the effect. |
Creating an Input Map
The input map is another QTAtomContainer structure that you attach to the effects track. It describes the sources used in the effect and gives a name to each source. This name is used to refer to the source in the effect description.
An input map works in concert with track reference atoms in the source tracks. A track reference atom of type kTrackModifierReference is added to each source track, which causes that source track’s output to be redirected to the effects track. An input map is added to the effects track to identify the source tracks and give a name to each source, such as 'srcA' and 'srcB'. The effect can then refer to the sources by name, specifying that 'srcB' should slide in over 'srcA', for example.
Parameter Atoms of an Effects Description
In addition to the required atoms, the effects description contains a variable number of parameter atoms. The number and types of parameter atoms vary from effect to effect. For example, the cross fade effect has only one parameter, while the general convolution filter effect has nine. Some effects have no parameters at all, and do not require any parameter atoms. The chapter Built-in QuickTime Video Effects describes the parameters expected by the built-in effects.
You can obtain the list of parameter atoms for a given effect by calling the effect component using the ImageCodecGetParameterList function. The parameter description atoms it returns include default settings for each parameter in the form of parameter atoms that you can insert into your effect description.
The QTInsertChild function is used to add these parameters to the effect description, as seen in the code example in Listing 1-4 above.
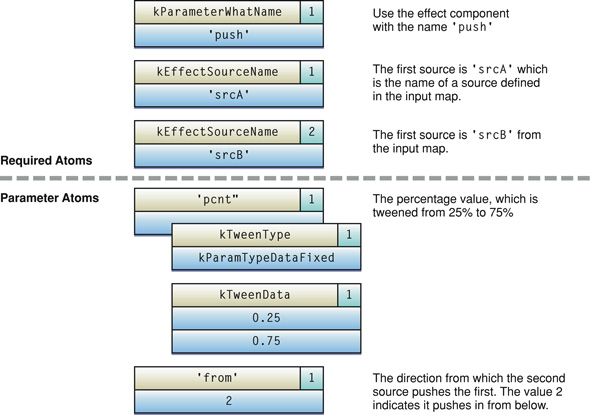
Consider, for instance, the push effect. It’s effect description contains a kParameterWhatName atom, two kEffectSourceName atoms, and two parameter atoms, one of which is a tween.
The kParameterWhatName atom specifies that this is a 'push' effect.
The two kEffectSourceName atoms specify the two sources that this effect will use, in this case 'srcA' and 'srcB'. The names correspond to entries in the effect track’s input map.
The 'pcnt' parameter atom defines which frames of the effect are shown. This parameter contains a tween entry, so that the value of this parameter is interpolated as the effect runs. The interpolation of the 'pcnt' parameter causes consecutive frames of the effect to be rendered, creating the push effect.
The 'from' parameter determines the direction of the push. This parameter is set from an enumeration list, with 2 being defined as the bottom of the screen.
In this example, the source 'srcB' will push in from the bottom, covering the source 'srcA'.
The 'pcnt' parameter is normally tweened from 0 to 100, so that the effect renders completely, from 0 to 100 percent. In this example, the 'pcnt' parameter is tweened from 25 to 75, so the effect will start 25% of the way through (with 'srcB' already partly on screen) and finish 75% of the way through (with part of 'srcA' still visible).
Figure 1-1 shows the set of atoms that must be added to the entry description.
An important property of effect parameters is that most can be tweened (and some must be tweened). Tweening is QuickTime’s general purpose interpolation mechanism. For many parameters, it is desirable to allow the value of the parameter to change as the effect executes.
Working with Source Tracks
You will probably need to do some track-level editing on the tracks your effect will use as sources, depending mainly on the type of effect you choose. There are different considerations for an effect that requires no sources, such as the cloud effect, an effect that requires one source, such as the blur filter, or an effect that requires two or more sources, such as a wipe effect.
An effect component can use any track with video output as a source. Effects are normally applied to video tracks, but a sprite track or a text track can also be a source for an effect. It is even possible to “stack” effects, simply by making one effect track a source for another. Stacking effects this way will make serious real-time demands on the target system’s processor, however, and the end result may not be satisfactory on all machines.
Generally speaking, an effect uses an entire video track as a source. A track reference atom of type kTrackModifierReference is added to the source track, causing the output of the source track to be redirected through the effect.
To make a video track into a source track, for example, you call the AddTrackReference function, as shown below.
long addedIndex; |
AddTrackReference(theEffectTrack, theSourceTrack, |
kTrackModifierReference, &addedIndex); |
The kTrackModifierReference track reference sends all of the source track’s output to an effect track, even if the effect track has a smaller duration than the source. If you want to apply an effect to just part of a track, you need to create a new track that references the portions of source media that you want the effect to use. This is explained in more detail in the examples below.
Zero-Source Effects
Effects that don’t require a source, such as the fire or cloud effect, are free-standing special effects that can be added anywhere in a movie. Just set the offset and duration of the effects track to the part of the movie where you want the effect to appear. If there is already an active video track at that point in the movie, you control the interaction between the video track and the effects track in the usual ways: putting one track in front of the other, using an alpha channel to allow one track to be partly visible through the other, and so on.

One-Source Effects (Filters)
Effects that require a source, such as a blur filter, steal the output of a video track by using an input map. The video track’s output is sent to the effects track, and the effect component acts as a special kind of codec to convert the video into the desired effect.
If you want to apply a filter effect to a whole video track, create an effects track with the same offset and duration as the source track. The input map does the rest.
If you want to apply a filter effect to part of a video track, make a new track that references the desired part of the video, then create an effects track with the same offset and duration as this new track. The new track is the source for the effect. You normally want to put the effects track in front of the original track.

Two-Source Effects (Transitions)
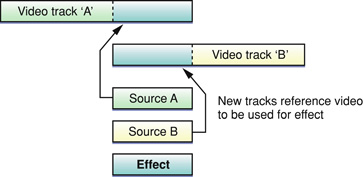
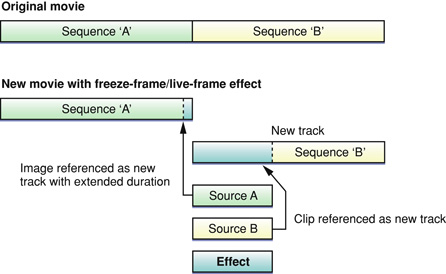
An effect that requires two sources, such as a wipe transition, requires some forethought when setting up the source tracks. If you want to create a transition effect between two video clips, you normally make each clip a separate video track, setting the offset of the second track so that it overlaps the end of the first track by the duration of the transition (see the illustration below). You then make two new tracks that reference the end of the first clip and the beginning of the second clip. These new tracks will act as sources for the effect. The effects track and both source tracks should share the same offset and duration, which correspond to the overlap between the two original tracks, as shown in Figure 1-4.
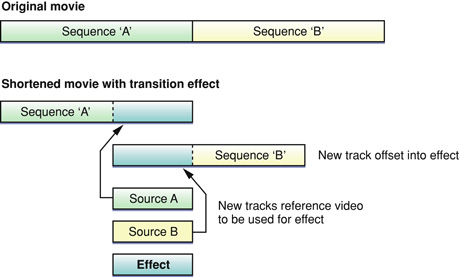
If you want to insert an effect between a sequence of images that now follow each other directly, you face some choices. One choice is to create an effect that overlaps the end of the first sequence with the beginning of the second sequence, making the movie shorter by the length of the effect. This is the usual approach to take, and is illustrated in Figure 1-5.
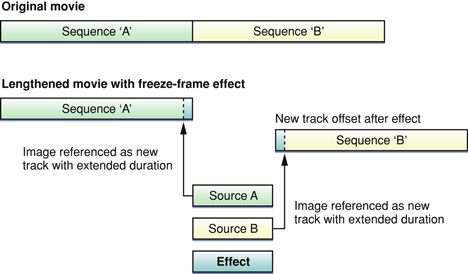
Alternately, you can create an effect that transitions between the last image of the first sequence and the first image of the following sequence, freezing both sequences during the transition, and making the movie longer by the duration of the effect, as shown in Figure 1-6. You would normally use this approach to create a transition between two still images, and you could then restore the movie length by shortening the duration of one or both images.
Either shortening or lengthening a movie can cause problems, particularly if there is a single continuous sound track. To add a transition between two elements that are now sequential, without changing the length of the movie or removing part of the original tracks, you create one frozen source track and one moving source track. In traditional movie editing, this type of transition freezes the first clip, while the second clip is active during the transition, but you can reverse this for a more unusual effect. This technique is illustrated in Figure 1-7.
Sources Other Than Video Tracks
Any track that produces video output, such as a sprite track, a text track, or another effect track, can be used as the source for an effect. Generally speaking, you use these track types as sources in the same way you use a video track, but some special considerations apply.
If you use sprite tracks as sources, and the sprites can move as a result of user interaction, it may be difficult to accurately predict what a transition effect will look like when it executes at run time.
If you “stack” effects, by using an effects track as a source, the target system must have enough speed to render the source frames for the original effect, then render the effect that is acting as a source, then render the stacked effect, while maintaining a reasonable frame rate. For example, the target system might need to decode a pair of Sorenson frames from two video source tracks, apply a cross-fade transition effect between them, and then apply a ripple effect to the final output. This will only give good results on a fast system.
Similarly, you can use an effect as the source for a sprite track, making the cloud effect a sprite, for example. Build the effect description and sample description as described later in this section, then add the effect description to the sprite track as a media sample, just as you would add an ordinary video sample.
Using Video Effects Outside a QuickTime Movie
Adding video effects to a QuickTime movie, as discussed in this chapter, is straightforward enough. You can also use QuickTime video effects to transition between two graphics worlds. Your application does not have to generate a QuickTime movie to use the video effects. This section deals with the task of running an effect that transitions between two graphics worlds. The general principles also apply to filtering a single image held in a graphics world.
Preparing to execute an effect outside the context of a QuickTime movie is similar to preparing to add a video effect to a movie: you provide an effect description and a sample description. The main difference is that instead of building an input map to describe the sources used by the effect, you use the function CDSequenceNewDataSource to use a graphics world as the source for the effect.
As well as setting up the effect, you must provide code to run it, since QuickTime cannot directly control the playback of the effect. Because effects are just a type of image decompressor, the code to execute an effect is the same code you would use to decompress and display an image sequence.
Copyright © 2005, 2009 Apple Inc. All Rights Reserved. Terms of Use | Privacy Policy | Updated: 2009-06-01