Retired Document
Important: This document is retired because the content has been migrated to SpriteKit reference.
Working with Sprites
Sprites are the basic building blocks used to create the majority of your scene’s content, so understanding sprites is useful before moving on to other node classes in SpriteKit. Sprites are represented by SKSpriteNode objects. An SKSpriteNode object can be drawn either as a rectangle with a texture mapped onto it or as a colored, untextured rectangle. Textured sprites are more common, because they represent the primary way that you bring custom artwork into a scene. This custom artwork might represent characters in your game, background elements, or even user interface elements, but the basic strategy is the same. An artist creates the images, and your game loads them as textures. Then you create sprites with those textures and add them to the scene.
Creating a Textured Sprite
The simplest way to create a textured sprite is to have SpriteKit create both the texture and the sprite for you. You store the artwork in the app bundle, and then load it at runtime. Listing 2-1 shows how simple this code can be.
Listing 2-1 Creating a textured sprite from an image stored in the bundle
SKSpriteNode *spaceship = [SKSpriteNode spriteNodeWithImageNamed:@"rocket.png"]; |
spaceship.position = CGPointMake(100,100); |
[self addChild: spaceship]; |
When you create a sprite in this fashion, you get a lot of default behavior for free:
The sprite is created with a frame that matches the texture’s size.
The sprite is rendered so that it is centered on its position. The sprite’s
frameproperty holds the rectangle that defines the area it covers.The sprite texture is alpha blended into the framebuffer.
An
SKTextureobject is created and attached to the sprite. This texture object automatically loads the texture data whenever the sprite node is in the scene, is visible, and is necessary for rendering the scene. Later, if the sprite is removed from the scene or is no longer visible, SpriteKit can delete the texture data if it needs that memory for other purposes. This automatic memory management simplifies but does not eliminate the work you need to do to manage art assets in your game.
The default behavior gives you a useful foundation for creating a sprite-based game. You already know enough to add artwork to your game, create sprites, and run actions on those sprites to do interesting things. As sprites move onscreen and offscreen, SpriteKit does its best to efficiently manage textures and draw frames of animation. If that is enough for you, take some time to explore what you can do with sprites. Or, keep reading for a deeper dive into the SKSpriteNode class. Along the way, you'll gain a thorough understanding of its capabilities and how to communicate those capabilities to your artists and designers. And you will learn more advanced ways to work with textures and how to improve performance with texture-based sprites.
Customizing a Textured Sprite
You can use each sprite’s properties to independently configure four distinct rendering stages:
Move a sprite’s frame so that a different point in the texture is placed at the sprite node’s position. See Using the Anchor Point to Move the Sprite’s Frame.
Resize a sprite. You control how the texture is applied to the sprite when the size of the sprite does not match the size of the texture. See Resizing a Sprite.
Colorize a sprite’s texture when it is applied to the sprite. See Colorizing a Sprite.
Use other blend modes in a sprite to combine its contents with that of the framebuffer. Custom blend modes are useful for lighting and other special effects. See Blending the Sprite into the Framebuffer.
Often, configuring a sprite to perform these four steps—positioning, sizing, colorizing, and blending—is based on the artwork used to create the sprite’s texture. This means that you rarely set property values in isolation from the artwork. You work with your artist to ensure that your game is configuring the sprites to match the artwork.
Here are some of the possible strategies you can follow:
Create the sprites with hardcoded values in your project. This is the fastest approach, but the least desirable in the long term, because it means that the code must be changed whenever the art assets change.
Create your own tools using SpriteKit that lets you fine tune the sprite’s property values. When you have a sprite configured the way you want it, save the sprite to an archive. Your game uses the archive to create sprites at runtime.
Store the configuration data in a property list that is stored in your app bundle. When the sprite is loaded, load the property list and use its values to configure the sprite. Your artist can then provide the correct values and change them without requiring changes to your code.
Using the Anchor Point to Move the Sprite’s Frame
By default, the sprite’s frame—and thus its texture—is centered on the sprite’s position. However, you might want a different part of the texture to appear at the node’s position. You usually do this when the game element depicted in the texture is not centered in the texture image.
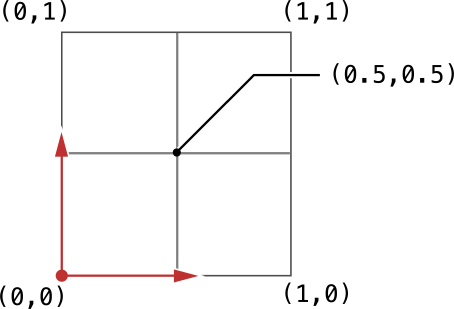
A sprite node’s anchorPoint property determines which point in the frame is positioned at the sprite’s position. Anchor points are specified in the unit coordinate system, shown in Figure 2-1. The unit coordinate system places the origin at the bottom left corner of the frame and (1,1) at the top right corner of the frame. A sprite’s anchor point defaults to (0.5,0.5), which corresponds to the center of the frame.

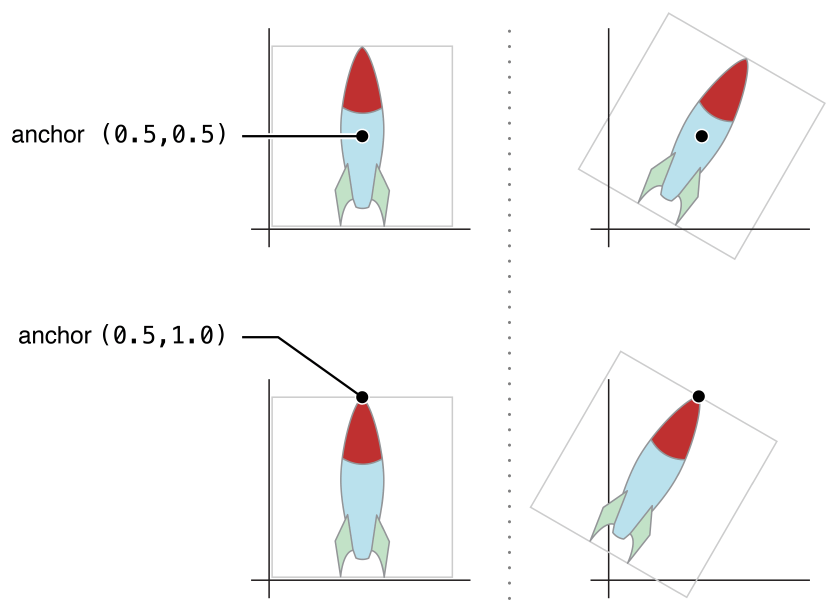
Although you are moving the frame, you do this because you want the corresponding portion of the texture to be centered on the position. Figure 2-2 shows a pair of texture images. In the first, the default anchor point centers the texture on the position. In the second, a point at the top of the image is selected instead. You can see that when the sprite is rotated, the texture image rotates around this point.

Listing 2-2 shows how to place the anchor point on the rocket’s nose cone. Usually, you set the anchor point when the sprite is initialized, because it corresponds to the artwork. However, you can set this property at any time. The frame is immediately updated, and the sprite onscreen is updated the next time the scene is rendered.
Listing 2-2 Setting a sprite’s anchor point
rocket.anchorPoint = CGPointMake(0.5,1.0); |
Resizing a Sprite
The size of the sprite’s frame property is determined by the values of three other properties:
The sprite’s
sizeproperty holds the base (unscaled) size of the sprite. When a sprite is initialized using the code in Listing 2-1, the value of this property is initialized to be equal to the size of the sprite’s texture.The base size is then scaled by the sprite’s
xScaleandyScaleproperties inherited from theSKNodeclass.
For example, if the sprite’s base size is 32 x 32 pixels and it has an xScale value of 1.0 and a yScale value of 2.0, the size of the sprite’s frame is 32 x 64 pixels.
When a sprite’s frame is larger than its texture, the texture is stretched to cover the frame. Normally, the texture is stretched uniformly across the frame, as shown in Figure 2-3.

However, sometimes you want to use sprites to build user interface elements, such as buttons or health indicators. Often, these elements contain fixed-size elements, such as end caps, that should not be stretched. In this case, use a portion of the texture without stretching, and then stretch the remaining part of the texture over the rest of the frame.
The sprite’s centerRect property, which is specified in unit coordinates of the texture, controls the scaling behavior. The default value is a rectangle that covers the entire texture, which is why the entire texture is stretched across the frame. If you specify a rectangle that only covers a portion of the texture, you create a 3 x 3 grid. Each box in the grid has its own scaling behavior:
The portions of the texture in the four corners of the grid are drawn without any scaling.
The center of the grid is scaled in both dimensions.
The upper- and lower-middle parts are only scaled horizontally.
The left- and right-middle parts are only scaled vertically.
Figure 2-4 shows a close-up view of a texture you might use to draw a user interface button. The complete texture is 28 x 28 pixels. The corner pieces are each 12 x 12 pixels and the center is 4 X 4 pixels.

Listing 2-3 shows how this button sprite would be initialized. The centerRect property is computed based on the design of the texture.
Listing 2-3 Setting the sprite’s center rect to adjust the stretching behavior
SKSpriteNode *button = [SKSpriteNode spriteNodeWithImageNamed:@"stretchable_button.png"]; |
button.centerRect = CGRectMake(12.0/28.0,12.0/28.0,4.0/28.0,4.0/28.0); |
Figure 2-5 shows that the corners remain the same, even when the button is drawn at different sizes.

Colorizing a Sprite
You can use the color and colorBlendFactor properties to colorize the texture before applying it to the sprite. The color blend factor defaults to 0.0, which indicates that the texture should be used unmodified. As you increase this number, more of the texture color is replaced with the blended color. For example, when a monster in your game takes damage, you might want to add a red tint to the character. Listing 2-4 shows how you would apply a tint to the sprite.
Listing 2-4 Tinting the color of the sprite
monsterSprite.color = [SKColor redColor]; |
monsterSprite.colorBlendFactor = 0.5; |

You can also animate the color and color blend factors using actions. Listing 2-5 shows how to briefly tint the sprite and then return it to normal.
Listing 2-5 Animating a color change
SKAction *pulseRed = [SKAction sequence:@[ |
[SKAction colorizeWithColor:[SKColor redColor] colorBlendFactor:1.0 duration:0.15], |
[SKAction waitForDuration:0.1], |
[SKAction colorizeWithColorBlendFactor:0.0 duration:0.15]]]; [monsterSprite runAction: pulseRed]; |
Blending the Sprite into the Framebuffer
The final stage of rendering is to blend the sprite’s texture into its destination framebuffer. The default behavior uses the alpha values of the texture to blend the texture with the destination pixels. However, you can use other blend modes when you want to add other special effects to a scene.
You control the sprite’s blending behavior using the blendMode property. For example, an additive blend mode is useful to combine multiple sprites together, such as for fire or lighting. Listing 2-6 shows how to change the blend mode to use an additive blend.
Listing 2-6 Using an additive blend mode to simulate a light
lightFlareSprite.blendMode = SKBlendModeAdd; |
Working with Texture Objects
Although SpriteKit can create textures for you automatically when a sprite is created, in more complex games you need more control over textures. For example, you might want to do any of the following:
Share a texture between multiple sprites.
Change a sprite’s texture after it is created.
Animate a sprite through a series of textures.
Create textures from data that is not directly stored in the app bundle.
Render a node tree into a texture. For example, you might want to take a screenshot of your gameplay to show to the player after he or she completes the level.
Preload textures into memory before presenting a scene.
You do all of these things by working directly with SKTexture objects. You create an SKTexture object and then use it to create new sprites or change the texture of an existing sprite.
Creating a Texture from an Image Stored in the App Bundle
Listing 2-7 shows an example similar to Listing 2-1, but now the code explicitly creates a texture object. The code then creates multiple rockets from the same texture.
Listing 2-7 Loading a texture from the bundle
SKTexture *rocketTexture = [SKTexture textureWithImageNamed:@"rocket.png"]; |
for (int i= 0; i< 10; i++) |
{ |
SKSpriteNode *rocket = [SKSpriteNode spriteNodeWithTexture:rocketTexture]; |
rocket.position = [self randomRocketLocation]; |
[self addChild: rocket]; |
} |
The texture object itself is just a placeholder for the actual texture data. The texture data is more resource intensive, so SpriteKit loads it into memory only when needed.
Using Texture Atlases to Collect Related Art Assets
Art assets stored in your app bundle aren’t always unrelated images. Sometimes they are collections of images that are being used together for the same sprite. For example, here are a few common collections of art assets:
Animation frames for a character
Terrain tiles used to create a game level or puzzle
Images used for user interface controls, such as buttons, switches, and sliders
If each texture is treated as a separate object, then SpriteKit and the graphics hardware must work harder to render scenes—and your game’s performance might suffer. Specifically, SpriteKit must make at least one drawing pass per texture. To avoid making multiple drawing passes, SpriteKit uses texture atlases to collect related images together. You specify which assets should be collected together, and Xcode builds a texture atlas automatically. Then, when your game loads the texture atlas, SpriteKit manages all the images inside the atlas as if they were a single texture. You continue to use SKTexture objects to access the elements contained in the atlas.
Creating a Texture Atlas
Xcode can automatically build texture atlases for you from a collection of images. The process is described in detail in Texture Atlas Help.
When you create a texture atlas, you want to strike a balance between collecting too many textures or too few. If you use too few images, SpriteKit may still need many drawing passes to render a frame. If you include too many images, then large amounts of texture data may need to be loaded into memory at once. Because Xcode builds the atlases for you, you can switch between different atlas configurations with relative ease. So experiment with different configurations of your texture atlases and choose the combination that gives you the best performance.
Loading Textures from a Texture Atlas
The code in Listing 2-7 is also used to load textures from a texture atlas. SpriteKit searches first for an image file with the specified filename. If it doesn’t find one, it searches inside any texture atlases built into the app bundle. This means that you don’t have to make any coding changes to support this in your game. This design also offers your artists the ability to experiment with new textures without requiring that your game be rebuilt. The artists drop the textures into the app bundle. When the app is relaunched, SpriteKit automatically discovers the textures (overriding any previous versions built into the texture atlases). When the artists are satisfied with the textures, you then add those textures to the project and bake them into your texture atlases.
If you want to explicitly work with texture atlases, use the SKTextureAtlas class. First, create a texture atlas object using the name of the atlas. Next, use the names of the image files stored in the atlas to look up the individual textures. Listing 2-8 shows an example of this. It uses a texture atlas that holds multiple frames of animation for a monster. The code loads those frames and stores them in an array. In the actual project, you would add a monster.atlas folder with the four image files.
Listing 2-8 Loading textures for a walk animation
SKTextureAtlas *atlas = [SKTextureAtlas atlasNamed:@"monster"]; |
SKTexture *f1 = [atlas textureNamed:@"monster-walk1.png"]; |
SKTexture *f2 = [atlas textureNamed:@"monster-walk2.png"]; |
SKTexture *f3 = [atlas textureNamed:@"monster-walk3.png"]; |
SKTexture *f4 = [atlas textureNamed:@"monster-walk4.png"]; |
NSArray *monsterWalkTextures = @[f1,f2,f3,f4]; |
Creating a Texture from a Subsection of a Texture
If you already have an SKTexture object, you can create new textures that reference a portion of it. This approach is efficient because the new texture objects reference the same texture data in memory. (This behavior is similar to that of the texture atlas.) Typically, you use this approach if your game already has its own custom texture atlas format. In this case, you are responsible for storing the coordinates for the individual images stored in the custom texture atlas.
Listing 2-9 shows how to extract a portion of a texture. The coordinates for the rectangle are in the unit coordinate space.
Listing 2-9 Using part of a texture
SKTexture *bottomLeftTexture = [SKTexture textureWithRect:CGRectMake(0.0,0.0,0.5,0.5) inTexture:cornerTextures]; |
Other Ways to Create Textures
In addition to loading textures from the app bundle, you can create textures from other sources:
Use the
SKTextureinitializer methods to create textures from properly formatted pixel data in memory, from core graphics images, or by applying a Core Image filter to an existing texture.The
SKViewclass’stextureFromNode:method can render a node tree’s content into a texture. The texture is sized so that it holds the contents of the node and all of its visible descendants.
Changing a Sprite’s Texture
A sprite’s texture property points to its current texture. You can change this property to point to a new texture. The next time the scene renders a new frame, it renders with the new texture. Whenever you change the texture, you may also need to change other sprite properties—such as size, anchorPoint, and centerRect—to be consistent with the new texture. Usually, it is better to ensure that all the artwork is consistent so that the same values can be used for all of the textures. That is, the textures should have a consistent size and anchor point placement so that your game does not need to update anything other than the texture.
Because animation is a common task, you can use actions to animate a series of textures on a sprite. The code in Listing 2-10 shows how to use the array of animation frames created in Listing 2-8 to animate a sprite’s texture.
Listing 2-10 Animating through a series of textures
SKAction *walkAnimation = [SKAction animateWithTextures:monsterWalkTextures timePerFrame:0.1] |
[monster runAction:walkAnimation]; |
// insert other code here to move the monster. |
SpriteKit provides the plumbing that allows you to animate or change a sprite’s texture. It doesn’t impose a specific design on your animation system. This means you need to determine what kinds of animations that a sprite may need and then design your own animation system to switch between those animations at runtime. For example, a monster might have walk, fight, idle, and death animation sequences—and it’s up to you to decide when to switch between these sequences.
Preloading Textures Into Memory
A major advantage to SpriteKit is that it performs a lot of memory management for you automatically. When rendering a new frame of animation, SpriteKit determines whether a texture is needed to render the current frame. If a texture is needed but is not prepared for rendering, SpriteKit loads the texture data from the file, transforms the data into a format that the graphics hardware can use, and uploads it to the graphics hardware. This process happens automatically in the background, but it isn’t free. If too many unloaded textures are needed at once, it may be impossible to load all the textures in a single frame of animation, causing the frame rate to stutter. To avoid this problem, you need to preload textures into memory, particularly in larger or complex games.
Listing 2-11 shows how to preload an array of SKTexture objects. The preloadTextures:withCompletionHandler: method calls the completion handler after all of the textures are loaded into memory. In this example, all of the textures for a particular level of the game are preloaded in a single operation. When the textures are all in memory, the completion handler is called. It creates the scene and presents it. (You need to add code to provide these texture objects to the scene; that code isn’t shown here).
Listing 2-11 Preloading a texture
[SKTexture preloadTextures:textureArrayForLevel1 withCompletionHandler:^ |
{ |
// The textures are loaded into memory. Start the level. |
GamePlayScene* gameScene = [[GamePlayScene alloc] initWithSize:CGSizeMake(768,1024)]; |
SKView *spriteView = (SKView *) self.view; |
[spriteView presentScene: gameScene]; |
}]; |
Because you are intimately familiar with the design of your game, you are the best person to know when new textures are needed. The exact design of your preloading code is going to depend on your game engine. Here are a few possible designs to consider:
For a small game, you may be able to preload all of its textures when the app is launched, and then keep them in memory forever.
For a larger game, you may need to split the textures into levels or themes. Each level or theme’s textures are designed to fit in a specific amount of memory. When the player starts a new level, you preload all of that level’s texture objects. When the player finishes playing the level, the textures not needed for the next level are discarded. By preloading the levels, the load time is all up front, before gameplay starts.
If a game needs more textures than can fit into memory, you need to preload textures dynamically as the game is being played. Typically, you preload some textures at the start of a level, and then load other textures when you think they will be needed soon. For example, in a racing game, the player is always moving in the same direction, so for each frame you might fetch a new texture for content the player is about to see. The textures are loaded in the background, displacing the oldest textures for the track. In an adventure game that allows for player-controlled movement, you might have to provisionally load textures when a player is moving in a particular direction.
Removing a Texture From Memory
After a texture is loaded into the graphics hardware’s memory, it stays in memory until the referencing SKTexture object is deleted. This means that between levels (or in a dynamic game), you may need to make sure a texture object is deleted. Delete a SKTexture object object by removing any strong references to it, including:
All texture references from
SKSpriteNodeandSKEffectNodeobjects in your gameAny strong references to the texture in your own code
An
SKTextureAtlasobject that was used to create the texture object
Creating Untextured Sprites
Although textured sprites are the most common way to use the SKSpriteNode class, you can also create sprite nodes without a texture. The behavior of the class changes when the sprite lacks a texture:
There is no texture to stretch, so the
centerRectparameter is ignored.There is no colorization step; the
colorproperty is used as the sprite’s color.The color’s
alphacomponent is used to determine how the sprite is blended into the buffer.
The other properties (size, anchorPoint, and blendMode) work the same.
Try This!
Now that you know more about sprites, try some of the following activities:
Add artwork to your project in a texture atlas. (Hint: Creating a Texture Atlas)
Load the texture atlas and use it to create new sprites. (Hint: Loading Textures from a Texture Atlas)
Animate sprites through multiple frames of animation. (Hint Listing 2-10)
Change the properties of your sprites and see how their drawing behavior changes. (Hint: Customizing a Textured Sprite)
Try out some of the other node classes to see what other kinds of drawing options are available to you. (Hint: SKNode Class Reference)
Advanced: Use OpenGL ES shaders to customize how your sprites are rendered. (Hint: SKShader Class Reference)
Advanced: Add lights to interact with your sprites. (Hint: SKLightNode Class Reference)
You can find useful code in the Sprite Tour sample.
Copyright © 2015 Apple Inc. All Rights Reserved. Terms of Use | Privacy Policy | Updated: 2015-03-09