Retired Document
Important: This document has been replaced by App Distribution Guide. App Distribution Guide offers step-by-step instructions for configuring, testing, and submitting your app for approval. This new document describes how to use Xcode and other Apple developer tools to create and configure your project, request signing certificates, create provisioning profiles, configure special App Store technologies, test your app on devices, create your app record in iTunes Connect, and submit your app for approval to Apple. If you have a company Apple Developer Program membership, you’ll also learn how to manage your team’s certificates and provisioning assets.
Creating a Project
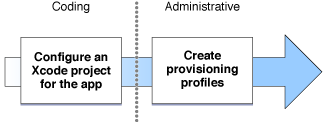
When you are building apps to learn more about app development or to experiment with a concept, you might not follow the formal process listed here. When your app is destined for the App Store, you should do more work up front. Figure 3-1 shows the steps you should perform when starting work on a new app. This chapter explains the steps you should follow to organize your project and other related items you need in order to distribute your app. It then explains many of the important concepts related to those steps.

Configuring an Xcode Project for an App
When you create a new Xcode project, you are presented with settings to configure the new project; you can find more information about these settings in Tools Workflow Guide for iOS and Tools Workflow Guide for Mac. You should carefully consider the template you use to create an app and the settings used to configure the project; starting with the right template helps speed the development process. For example, if you were planning to write an iOS game using the OpenGL ES graphics framework, the OpenGL ES Application template is an ideal starting point, because it provides a lot of initialization code required by all OpenGL ES apps.
One of the settings you provide when you create a new project is the bundle ID for your app. When you set the bundle ID, it is automatically inserted into your project’s information property list file.
Creating Provisioning Profiles for Your App
If you intend to ship your app on the App Store, a team admin should perform these steps after your project is created:
Create an explicit app ID whose bundle ID search string exactly matches the new app’s bundle ID.
Use the new app ID to create a development provisioning profile.
Use the new app ID to create one or more distribution provisioning profiles.
Although an explicit app ID is not strictly required for all projects, having one, and the related provisioning profiles, gives you finer control over who can build and run each app you create. An explicit app ID is also necessary for many Apple services; creating it early means you are always ready to implement those services in the app.
Similarly, a distribution provisioning profile isn’t necessary until you are ready to distribute your app, but creating those profiles at the start of the project makes it easier for you to verify that your signing and provisioning is set up correctly. Creating an ad hoc distribution profile at the start of your project also allows you to build a release version of the app at any time and send it to external testers using nondevelopment devices.
App Concepts
When you create a project, you use a bundle ID to identify a specific app, and an app ID to match that bundle ID. The app ID is used as part of a provisioning profile that authorizes an app to launch. The next few sections describe these three concepts in detail.
A Bundle ID Uniquely Identifies an App
A bundle ID is a string used to precisely identify a single app. Bundle IDs are not used just during the development process; when your app is installed on a device, it is also used by the operating system. For example, the preferences system uses this string to identify the app for which a given preference applies. In contrast, Launch Services uses the bundle ID to locate an app capable of opening a particular file, using the first app it finds with the given identifier. And, in iOS, the bundle ID is used in validating the app’s signature.
The bundle ID string must be a uniform type identifier (UTI) that contains only alphanumeric (A-Z,a-z,0-9), hyphen (-), and period (.) characters. The string should be in reverse-DNS format. For example, if your company’s domain is Ajax.com and you create an app named Hello, you could assign the string com.Ajax.Hello as your app’s bundle ID.
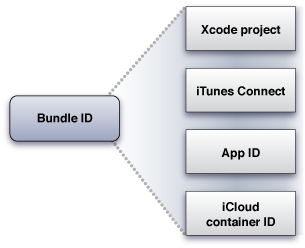
During the development process, you use an app’s bundle ID in many different places to identify the app. Figure 3-2 shows the most common places where an app’s bundle ID is used during the development process.

The bundle ID itself is stored in the information property list file (
Info.plist) inside your project. This file is later copied into your app’s bundle when you build the project.When you are ready to publish an app, you use the bundle ID to identify the app in iTunes Connect. The App Store submission process correlates the bundle ID from the app you submit with the data you provide in iTunes Connect. See Configuring App Data in iTunes Connect.
When developing your app, you need a development provisioning profile with an app ID that is compatible with the app’s bundle ID.
When you implement iCloud support in your app, the container IDs you specify are based on the bundle IDs of one or more apps.
App IDs Are Used to Match Apps to Services and Development Teams
App IDs are strings and share some characteristics with bundle IDs. But app IDs differ in two important ways. First, app IDs are not required to identify a specific app—an app ID can instead identify a collection of apps. Second, an app ID contains additional information that allows it to be associated with a specific development team. Although the convention for bundle IDs starts each with a company identifier in reverse DNS format, that convention is not strictly enforced, and it cannot be used to identify your development team. App IDs are primarily used when creating development and distribution provisioning profiles, both described later in this chapter.
An app ID is a string containing two parts, a team ID and a bundle ID search string, with a period (.) separating the two parts. Each part of an app ID has different and important uses for your app.
The team ID is a unique 10-character string generated by Apple. The team ID is what associates an app ID with a specific team. Apps that share the same team ID can also share keychain data, such as user names and passwords.
Two kinds of app IDs are supported: wildcard app IDs and explicit app IDs. The bundle ID search string determines the type of an app ID.
Explicit App IDs Match a Single App
An explicit app ID uses a search string that exactly matches the bundle ID of an app you are building. Because the exact bundle ID is specified, the app ID matches only that app.

Wildcard App IDs Match Multiple Apps
A wildcard app ID allows you to use an app ID to match multiple apps; wildcard app IDs are useful when you first start developing new apps because you don’t need to create a separate app ID for each app. However, wildcard app IDs can’t be used to provision an app that uses APNS, In-App Purchase, or Game Center.
A wildcard app ID omits some or all of the bundle ID in the search string and replaces that portion with an asterisk character (*). The asterisk must always appear as the last character in the search string.

When you use a wildcard app ID, characters preceding the asterisk (if any) must match the characters in the bundle ID, exactly as they would for an explicit app ID. The asterisk matches all remaining characters in the bundle ID. Further, the asterisk must match at least one character in the bundle ID. Figure 3-5 shows an example search string and shows that it matches some bundle IDs but not others.

If an app ID uses an asterisk (*) as the bundle ID, then the search string matches any bundle ID.
Provisioning Profiles Authorize an App to Launch
In the chapter Setting Up a Developer for Code Signing, you learned how signing certificates are created and used to sign app. Now, you need to learn about the other half of the process, the provisioning profiles used to authorize signing and execution of an app.
There are two kinds of provisioning profiles:
A development profile, used during development, can be used to authorize apps only on devices configured for development.
A distribution profile is used to distribute apps. There are multiple kinds of distribution profiles, each associated with a specific method of distribution.
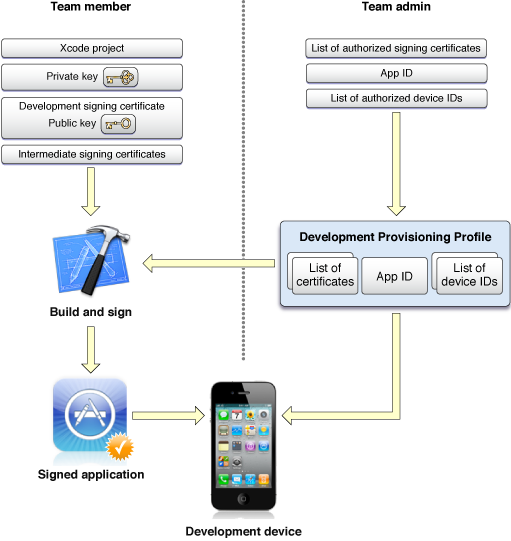
Figure 3-6 shows the development provisioning process for iOS development again.

When you add devices and signing certificates to a development team, Xcode automatically creates a profile named iOS Team Provisioning Profile. This profile is automatically updated when new signing certificates or devices are added to the team. This profile has three major characteristics:
It includes all code signing certificates associated with the team.
It includes all devices associated with the team.
The app ID in the profile uses an asterisk as the bundle ID.
In other words, the iOS Team Provisioning Profile allows any app to be signed by any team member with a signing certificate and installed on any team device. Because the iOS Team Provisioning Profile is automatically updated, this profile is very helpful when programmers on your team want to install sample code or simple test apps on development devices. However, when you are developing an app for the App Store, you may want to create a development provisioning profile instead. When you create your own profile, you can limit any of the three areas to provide additional security:
You can use an app ID that allows a subset of the team’s apps to be launched; with an explicit app ID, you can limit the profile to a single app.
You can restrict the developers allowed to sign app authorized by the profile.
You can restrict the devices that apps authorized by the profile may be installed onto.
Distributing an App Requires a Distribution Profile
When you are ready to distribute an iOS or Mac app, you not only need the distribution signing certificate created when you organized your team, you also need a distribution profile that authorizes the app to run. If you are developing an iOS app, signing the app and distributing it with the appropriate profile is the only way to install the app on a device not specially configured for development.
The exact contents of a distribution profile differ from the contents of a development profile, and each kind of distribution profile may have slightly different contents. A common requirement limits code signing to the team’s distribution signing certificate. That said, a distribution profile for distributing an app on the App Store doesn’t restrict the app to a limited set of devices.
To Learn More
If you are on an iOS team, to learn more about the different kinds of distribution profiles and to learn how to configure a new project, read the following documents:
If you are a team admin, read iOS Team Administration Guide.
If you are a team member, read Tools Workflow Guide for iOS.
If you are on an OS X team, learn more about the different kinds of distribution profiles how to configure a new project by reading Tools Workflow Guide for Mac.
Copyright © 2013 Apple Inc. All Rights Reserved. Terms of Use | Privacy Policy | Updated: 2013-04-23