Retired Document
Important: This document may not represent best practices for current development. Links to downloads and other resources may no longer be valid.
Data Modeling With Xcode
The purpose of the data modeling tool is to create a data model (or schema) for use with the Core Data framework. Rather than dealing with classes, instance variables, and methods, you use the tool to define entities, the attributes they have, and the relationships between them. For more about entity-relationship modeling, object modeling, why these are important, and definitions of terms (inverse relationship, optional attribute, and so on), see Object Modeling. For more about specific Core Data classes, see the relevant API reference documentation.
Ultimately, at runtime, the model is turned into an instance of NSManagedObjectModel with a collection of NSEntityDescription, NSAttribute, NSRelationship, and NSFetchRequest objects. In some respects this is analogous to the behavior of Interface Builder. With Interface Builder, you graphically create a collection of objects that are then saved in a file (a nib file) and recreated at runtime. As with user interface elements, it is possible to create a model directly in code at runtime; however it is typically easier to do so graphically using the appropriate tool. Similarly, just as it is possible to modify the user interface after it has been loaded, it is also possible to customize a model after it has been loaded. (Note that a model does have a constraint not shared with a nib file: once loaded, a model cannot be modified after it has been used.)
The tool’s basic features and behavior are described in Common Features of the Xcode Design Tools. This chapter describes features and behavior that are unique to the data modeler.
The Diagram View for Data Modeling
The diagram view for the data modeler contains the same sort of graphic elements as the class modeler, as illustrated in Figure 12-1. The semantics of the elements, however, are different:
Nodes are entities, not classes.
Compartments within a node show attributes and relationships.
Lines represent relationships between entities.
Arrowheads on lines also have meaning. A single arrowhead denotes a to-one relationship; a double arrowhead denotes a to-many. The direction of an arrow indicates the direction of the relationship—the arrow points to the destination entity. Figure 12-1 shows an example of the diagram view of a data model, with all compartments expanded.
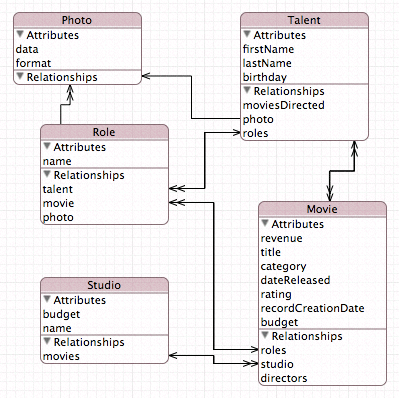
You can edit the model directly from the diagram using contextual menus. To add a new entity, you Control-click the background of the diagram. To add properties to an entity, you Control-click within its node. You can also delete entities and properties using the Delete key. Finally, you can use the line tool to establish new relationships. You select the line tool, then drag from the source node to the destination node.
Note that although relationships are typically implicitly bidirectional, relationships do not have to be modeled in both directions. If do you want to specify a bidirectional relationship, you must model both sides of the relationship—the reasons for this are given in the Core Data documentation. Moreover, within the model you must specify which relationships are the inverse of each other. To do this you need to use the model browser.
The Model Browser for Data Modeling
The data modeling tool browser’s three parts are the entities pane, the properties or fetch requests pane, and the detail pane. The detail pane itself has three separate views: the General pane, the User Info pane, and the Configurations pane.


The Entities Pane
The table in the entities pane lists all the entities in the model, either as a flat list or in an inheritance hierarchy. The table has three columns, showing the entity name, the class used to represent the entity, and a checkbox that indicates whether the entity is abstract.
You can edit the entity and class names directly in the text field cells—double click the text to make it editable—and toggle the abstract setting of an entity by clicking the checkbox.
To add a new entity to the model, you click the plus sign to the left of the horizontal scroll bar, or choose Design > Data Model > Add Entity. You delete a selected entity or selected entities by clicking on the minus sign, or by pressing the Delete key.
The Properties Pane
The table in the properties pane lists the properties or fetch requests associated with the selected entities. You choose what features you want to view by choosing from the pop-up menu available from the button with the “v” to the left of the horizontal scroll bar, as shown in Figure 12-3.
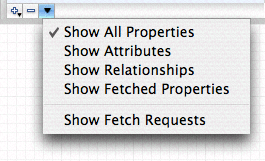
Note that the properties table shows the set of all properties of all entities selected in the entities table. Moreover, you can select and edit multiple properties at the same time. If several entities have a similar property, you can change them all simultaneously if you wish.
Properties View
The properties table has five columns showing the name of the property, a checkbox that indicates whether the property is optional, a checkbox that indicates whether the property is transient, the kind of property (attribute, relationship, or fetched), and the type (for example, date or integer if the property is an attribute) or destination entity (if the property is a relationship) of the property (see Figure 12-4).
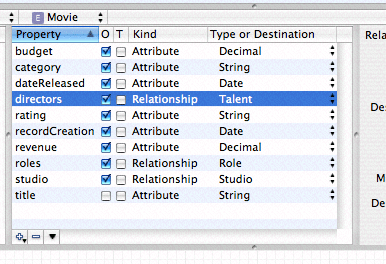
You can edit most property values directly in the properties table—the exception is the property type (“Kind”) which you specify when you first add the property. You typically edit the predicate associated with fetched properties from the detail pane, using the predicate builder(see The Predicate Builder).
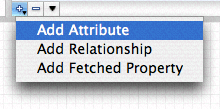
You add new properties using the pop-up menu from the plus sign to the left of the horizontal scroll bar (as shown in Figure 12-5), or by using the Design > Data Model menu. From the pop-up menu, you choose what sort of property you want to add—an attribute, a relationship, or a fetched property.
Fetch Requests View
The fetch requests view displays the fetch requests associated with an entity as shown in Figure 12-6. You add fetch requests using the plus sign button. You can edit the name of the fetch request and the predicate directly in the table view; however you typically construct the predicate graphically using the predicate builder from the detail pane.
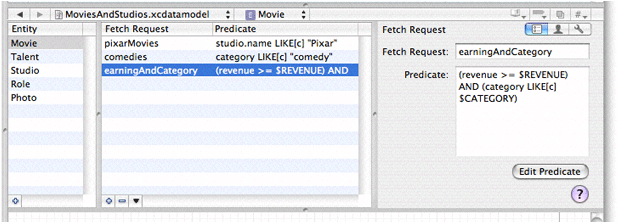
When you add a fetch request to an entity, you are specifying that that entity is the one against which the fetch will be performed. For example, if you add a fetch request called “comedies” to the Movie entity, in code you would retrieve it from the model using:
NSFetchRequest *fetchRequest = [managedObjectModel |
fetchRequestTemplateForName:@"comedies"]; |
The returned fetch request’s entity is set to Movie. Since fetch requests are nevertheless general to the model, fetch request names must be unique across all entities. If you try to set a duplicate name, you get a warning sheet and you must choose a unique name before you can proceed.
The Detail Pane
The detail pane itself has three panes, the General pane, the User Info pane, and the Configurations pane. You choose which pane to display by clicking on the corresponding element in the segmented control in the upper right of the pane, shown in Figure 12-7.

General Pane
The general pane is different for entities, attributes (and for different types of attribute), relationships, and fetch requests. It changes automatically to the appropriate view depending on the last selection. Each view shows, and allows you to edit, details of the selected element.
For entities, you can edit the entity name, the name of the class used to represent the entity, and the parent entity, and you can specify whether or not the entity is abstract.
For attributes, you can specify the name and type, and whether it is optional or transient. When you specify the type, the pane updates to allow you to specify various constraints on the values the attribute may take. For example, for numeric and date attributes you can specify maximum, minimum, and default values, and for string attributes you can specify maximum and minimum length, a default value, and a regular expression that the string must match.
For relationships, you can specify the name, cardinality, and destination of the relationship. You can also specify a delete rule, and—for to-many relationships—maximum and minimum counts.
For fetched properties, you specify the name, the destination entity, and the predicate to be used for the fetch. You edit the predicate using the predicate builder by clicking the Edit Predicate button. For more details about the predicate builder, see The Predicate Builder.
For fetch requests, you specify the name and the predicate. As with fetched properties, you edit the predicate using the predicate builder by clicking the Edit Predicate button—see The Predicate Builder.
User Info Pane
The user info pane shows the info dictionary associated with the currently selected model element. Most elements in the model (entities, attributes, and relationships, but not fetch requests) may have an associated info dictionary that you can retrieve at runtime. The dictionary comprises key-value pairs. Using the info dictionary pane, you can specify any keys and string values you wish that may be of use in your application.
Configurations Pane
A configuration is a named collection of entities in the model. The configuration pane (show in Figure 12-8) therefore applies only to entities. You use it to add and remove configurations and to associate entities with configurations.
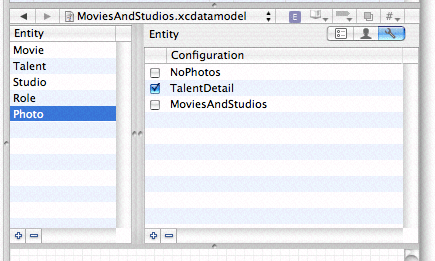
A model may have an arbitrary number of configurations. You add configurations using the plus sign button. Configurations appear in the list for all entities. The checkbox specifies whether or not the currently selected entity is associated with the given configuration.
The Predicate Builder
You use the predicate builder to create predicates for fetched
properties and for fetch request templates. For more about predicates,
see NSPredicate and
for more about fetched properties, see NSFetchedPropertyDescription.
Fetch request templates allow you to create predefined instances
of NSFetchRequest that are stored in the model. You can either define
all aspects of a fetch, or you can allow for runtime substitution
of values for given variables. Fetch templates are associated with
the entity against which the fetch will be made, that is, instances
of which the fetch will return. For more about fetch templates,
see NSManagedObjectModel.
With the predicate builder, you can build predicates of arbitrary complexity. The initial display shows a simple comparison predicate. The left-hand side is pop-up menu that allows you to choose the key used in a key path expression; the right-hand side is a text field that allows you to specify a constant value; and between them is a pop-up menu that allows you to choose a comparison operator.
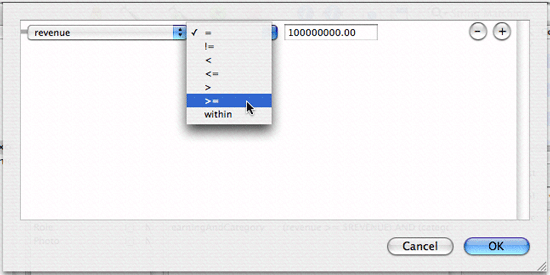
As with the rest of the modeling tool, the predicate builder
simply provides a graphical means of defining a collection of objects
that you could otherwise create programmatically. The code equivalent
of the predicate revenue >= 100000000 is
as follows.
NSExpression *lhs = [NSExpression expressionForKeyPath:@"revenue"]; |
NSExpression *rhs = NSExpression *rhs = [NSExpression expressionForConstantValue:[NSDecimalNumber numberWithInt:100000000]]; |
NSComparisonPredicate *predicate = [NSComparisonPredicate |
predicateWithLeftExpression:lhs |
rightExpression:rhs |
modifier:NSDirectPredicateModifier |
type:NSGreaterThanOrEqualToPredicateOperatorType |
options:0]; |
Right-Hand Side
In addition to a constant value, you can also define the right-hand
side of a comparison predicate to be a variable or another key.
This is necessary if you are creating either fetch request templates
that require substitution variables or defining fetched properties
and need to use the $FETCH_SOURCE variable
in the predicate.
You change the type of the right hand side expression using the contextual menu shown in Figure 12-10 (you must Control-click “empty space” in the line of the criteria—for example, at the end or between the pop-up menus). This changes the constant value field into a variable field or a key pop-up menu as appropriate.
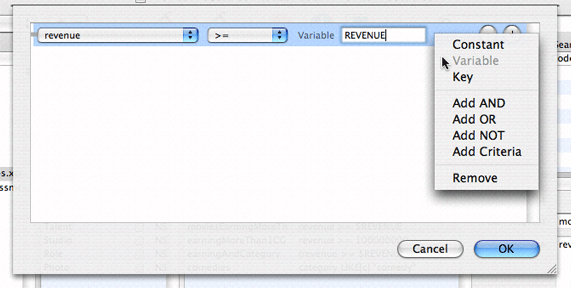
Left-Hand Side
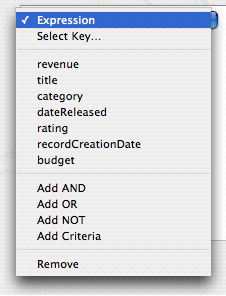
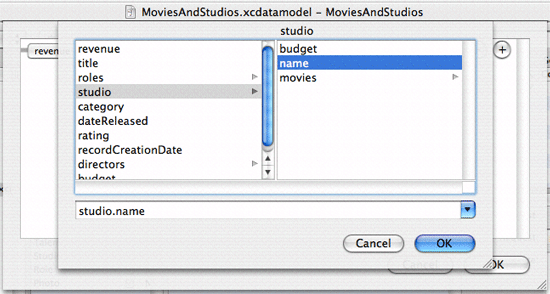
The key pop-up menu, shown in Figure 12-11, displays only attributes of the entity with which the predicate is associated. To use a key path (that is, to follow relationships), choose the Select Key item in the key pop-up menu. This displays a browser, shown in Figure 12-12, from which you can choose the key or key path you want.
Compound Predicates
You can add logical operators (AND, NOT, and OR) to create compound predicates of arbitrary depth and complexity. To add a specific logical operator, use the contextual menu, shown in Figure 12-13.
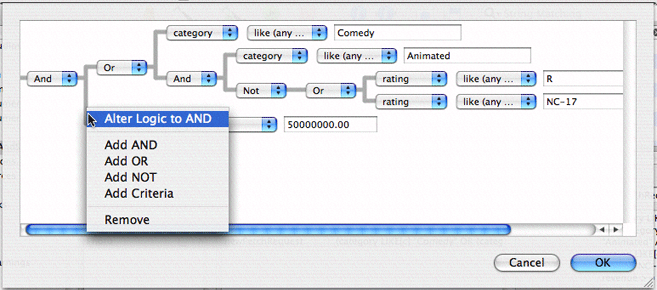
You can also add peer predicates by clicking the round button with the plus sign, or using the Add Criteria command in the contextual menu—these add an AND operator. You can change a logical operator using the pop-up menu. You can rearrage the predicate hierarchy by dragging. To remove a predicate, click the round button with the minus sign, or use the contextual menu. The predicate builder will try to rebuild the remaining predicate as it can, removing comparison operators where appropriate.
Workflow
The typical steps you take are defining your entities, specifying the attributes they have; specifying relationships between them; and adding business logic in the form of default values and value constraints. You may also define fetch templates for an entity. Although you can edit the model in the diagram view, it is more usual to do so in the browser, since it gives you more detail and greater flexibility. Creating a Managed Object Model Using Xcode provides a task-based approach to creating an entire model, from start to finish.
Creating a Model
If you create a Core Data–based project, a data model is automatically created for you and added to the project. If you need to create a new model, from the File menu choose New File and add a file of type Data Model (from the Design list). In the pane that appears (see Figure 12-14), give the file a suitable name and ensure that the file is added to your application target.
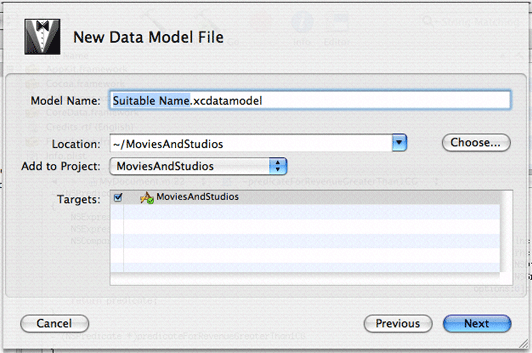
Click Next, and in the following pane select any groups or files that you want to be parsed for inclusion in the model (if any), then click Finish.
Custom Classes
For each entity in the model, you specify a class that will be used to represent it in your application. By default the class is set to NSManagedObject, which is able to represent any entity. Typically, at the begnining of a project, you just use NSManagedObject for all your entities. Later, as your project matures, you define custom subclasses of NSManagedObject to provide custom functionality.
If you create a custom subclass of NSManagedObject to represent an entity, you typically implement custom accessor methods for the class’s properties. This is generally tedious, repetitive work, so the data modeling tool provides menu items to automatically generate declarations and implementations for these methods and put them on the Clipboard so you can paste them into the appropriate source file.
Compiling a Data Model
A data model is a deployment resource. A data model must not only be a project file, it must be associated with the target that uses it . In addition to details of the entities and properties in the model, the model contains information about the diagram, its layout, colors of elements, and so on. This latter information is not needed at runtime. The model file is compiled to remove the extraneous information and make runtime loading of the resource as efficient as possible.
The model compiler is momc in /Library/Application
Support/Apple/Developer Tools/Plug-ins/XDCoreDataModel.xdplugin/Contents/Resources/.
If you want to use it in your own build scripts, its usage is: momc source destination,
where source is the path of the Core
Data model to compile, and destination is
the path of the output mom file.
Copyright © 2004, 2006 Apple Computer, Inc. All Rights Reserved. Terms of Use | Privacy Policy | Updated: 2006-11-07