Retired Document
Important: This document does not represent best practices for current development. You should convert your app to use AVFoundation instead. See Transitioning QTKit Code to AV Foundation.
QTKit Capture
This chapter defines the conceptual outlines of the QTKit capture architecture, its class hierarchy and underlying object behavior. The classes that make up this portion of the QTKit API are described in a collection of tables that group the capture classes according to tasks performed and most commonly used methods. If you need to work with media capture in your Cocoa application, you may want to read this chapter for a better understanding of how you can use capture objects and their associated methods to accomplish a variety of recording tasks.
In particular, the chapter discusses how the QTKit capture API works in processing audio and video data. Typically, clients of the API make use of three essential types of objects: capture inputs, capture outputs and a capture session. These are fundamental to understanding the methodology and high-level workings of the API.
The chapter also discusses a number of use cases and scenarios for dealing with capture and recording issues in your application development cycle. Code snippets highlight various techniques that may be useful in programming with the capture portion of the QTKit API.
Overview
The 17 classes in the QTKit capture API are specifically designed to handle a wide range of basic as well as professional-level image-processing chores in the capture and recording of audio/video media content. The classes are, at once, robust and powerful, yet easy to use, with more than 250 methods, notifications, and attributes.
In OS X v10.6, movies you create using QTKit capture are built with and thus compatible with QuickTime X. This results in more efficient rendering and playback of captured media. In addition, 64-bit capture is now native in OS X v10.6 and therefore much more efficient than the server-using implementation in OS X v10.5.
Using these classes and methods, you can record professional-quality audio and video content from one or more cameras and microphones, including USB and Firewire devices, as well as DV media devices. The input and output classes included with the framework are designed to provide all of the components you need to implement the most common use case for a media capture system, that is, recording from a camera to a QuickTime file.
Real-Time Media Capture
The QTKit capture API is optimized to provide capturing real-time media from devices such as iSight cameras, camcorders and tape decks, microphones and audio interfaces. The captured media can then be outputted to QuickTime movies, audio and video previews, as well as raw decompressed frames for further processing.
Capture Capabilities
The capture capability provided by QTKit capture API includes frame-accurate, audio/video synchronization, in addition to enabling you to preview captured content and save it to a file. Frame-accurate capture means you can specify that capture and recording of media will occur with specific timecodes and other per-sample metadata. For example, using the QTKit capture APIs, you can specify precisely the number of frames in a file that you want to write out.
The QTKit capture API also provides access to transport controls, such as fast-forward and rewind, on a video camcorder. In addition, you can write captured QuickTime data to a file while providing an onscreen preview.
In addition, the QTKit API provides you with the ability to share the iSight and other webcams between multiple applications.
Capture Class Hierarchy
Figure 2-1 illustrates the class hierarchy for the classes that comprise the portion of the QTKit API dedicated to audio and video capture. The ordering and logical structure of this hierarchy are discussed in the next section.
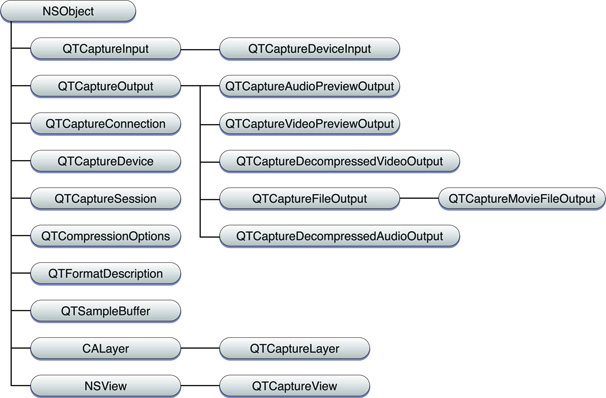
Capture Ordering and Logic
For purposes of better conceptual understanding, the classes that form the capture architecture of the QTKit API can be grouped as follows:
Core
Input/Output
Utility
User Interface
Device Access
For a complete description of all the QTKit capture classes and their associated methods, refer to the QTKit Framework Reference. The reference is current and up to date for OS X v10.6 and QuickTime 7.6.3.
Core Classes
There are four classes in this group that can best be described as core classes, as shown in Table 2-1. Understanding how these classes work and which methods to use in your application development is essential to taking full advantage of the QTKit capture API.
Of the classes in this group, the most useful is QTCaptureSession. This class provides an interface for connecting input sources to output destinations. The method used most commonly in this class is startRunning, which tells the receiver to start capturing data from its inputs and then to send that data to its outputs. Notably, if you’re using this method, when data does not need to be sent to file outputs, previews, or other outputs, your capture session should not be running, so that the overhead from capturing does not affect the performance of your application.
The other classes in this group, QTCaptureInput and QTCaptureOutput, which are both abstract classes, provide interfaces for connecting inputs and outputs. An input source can have multiple connections, which is common for many cameras that have both audio and video output streams. When you use QTCaptureOutput objects, you don’t need to have a fixed number of connections, but you do need a destination for your capture session and all of its input data.
The last of the four classes in this group, QTCaptureConnection, represents a connection over which a single stream of media data is sent from a QTCaptureInput to a QTCaptureSession and from a QTCaptureSession to a QTCaptureOutput.
Class | Group | Tasks | Most commonly used methods |
|---|---|---|---|
| Core | Primary interface for capturing media streams; manages connections between inputs and outputs; also manages when a capture is running. |
|
| Core | Provides input source connections for a |
|
| Core | Provides an interface for connecting capture output destinations, such as QuickTime files and video previews, to a |
|
| Core | Represents a connection over which a single stream of media data is sent from a |
|
Input/Output Classes
There are six concrete output classes and one input class belonging to this group, as shown in Table 2-2.
You can use the methods available in the QTCaptureDeviceInput class, for example, to handle input sources for various media devices, such as cameras and microphones. The six output classes provide output destinations for QTCaptureSession objects that can be used to write captured media to QuickTime movies or to preview video or audio that is being captured. QTCaptureFileOutput, an abstract superclass, provides an output destination for a capture session to write captured media simply to files.
Note that the delegate methods shown in Table 2-2 belong to NSObject and cannot be called on these classes.
Class | Group | Tasks | Most commonly used methods |
|---|---|---|---|
| Input/Output | Represents an output destination for a |
|
| Input/Output | Represents an output destination for a |
|
| Input/Output | Represents an output destination for a |
|
| Input/Output | Represents the input source for media devices, such as iSight and DV cameras and microphones. |
|
| Input/Output | Writes captured media to files and defines the interface for outputs that record media samples to files. |
|
| Input/Output | Represents an output destination for a |
|
| Input/Output | Represents an output destination for a |
|
Utility Classes
There are three classes belonging to this group: QTCompressionOptions, QTFormatDescription, and QTSampleBuffer, shown in Table 2-3. These are best characterized as utility classes, in that they perform tasks related to representing, for example, the compressions for particular media, or describing the formats of various media samples.
Of the classes in this group, one of the most useful is QTCompressionOptions, which lets you describe compression options for all kinds of different media, using the compressionOptionsIdentifiersForMediaType: and mediaType methods. Compression options are created from presets keyed by a named identifier. These preset identifiers are listed in the QTKit Framework Reference in the chapter describing this class.
Using QTSampleBuffer objects, you can get information about sample buffer data that you may need to output or process the media samples in the buffer.
Class | Group | Tasks | Most commonly used methods |
|---|---|---|---|
| Utility | Represents a set of compression options for a particular type of media. |
|
| Utility | Describes the media format of media samples and of media sources, such as devices and capture connections. |
|
| Utility | Provides format information, timing information, and metadata on media sample buffers. |
|
User Interface Classes
There are two classes in this particular group, one devoted to previewing video, another providing support for Core Animation layers. The QTCaptureView and QTCaptureLayer objects are shown in Table 2-4.
You can use the methods available in the QTCaptureView class, which is a subclass of NSView, to preview video that is being processed by an instance of QTCaptureSession. The class creates and maintains its own QTCaptureVideoPreviewOutput to gather the preview video you need from the capture session.
Support for Core Animation is provided by the QTCaptureLayer class, which is a subclass of CALayer.
Class | Group | Tasks | Most commonly used methods |
|---|---|---|---|
| User Interface | Displays a video preview of a capture session. |
|
| User Interface | Provides a layer that displays video frames currently being captured from a device attached to the computer, and is intended to provide support for drawing the contents of a capture session into a layer. |
|
Device Access Class
There is only one class in this particular group, which is devoted to accessing a device, as shown in Table 2-5.
If you’re working with QTCaptureDevice objects, your application can read any number of extended attributes available to this class, using the deviceAttributes and attributeForKey: methods. Beyond that, you can use key-value coding to get and set attributes. If you wish to observe changes for a given attribute, you can add a key-value observer where the key path is the attribute key. Note that you cannot create instances of QTCaptureDevice directly.
Class | Group | Tasks | Most commonly used methods |
|---|---|---|---|
| Device Access | Represents an available capture device. |
|
How QTKit Capture Works
All QTKit capture applications make use of three basic types of objects: capture inputs, capture outputs, and a capture session. Capture inputs, which are subclasses of QTCaptureInput, provide the necessary interfaces to different sources of captured media.
A capture device input, which is a QTCaptureDeviceInput object—a subclass of QTCaptureInput—provides an interface to capturing from various audio/video hardware, such as cameras and microphones. Capture outputs, which are subclasses of QTCaptureOutput, provide the necessary interfaces to various destinations for media, such as QuickTime movie files, or video and audio previews.
A capture session, which is a QTCaptureSession object, manages how media that is captured from connected input sources is distributed to connected output destinations. Each input and output has one or more connections, which represent a media stream of a certain QuickTime media type, such as video or audio media. A capture session will attempt to connect all input connections to each of its outputs.
As shown in Figure 2-2 a capture session works by connecting inputs to outputs in order to record and preview video from a camera.
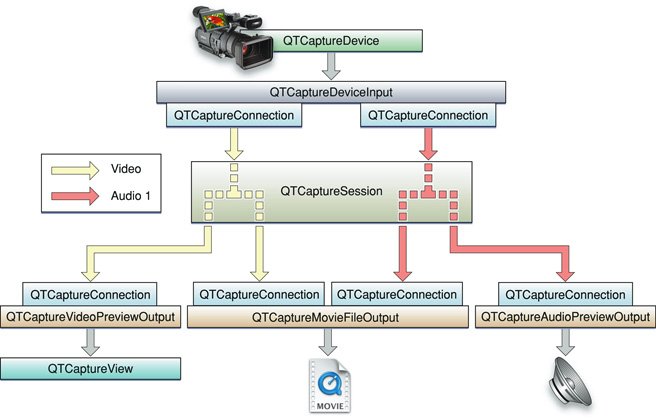
A capture session works by distributing the video from its single video input connection to a connection owned by each output. In addition to distributing separate media streams to each output, the capture session is also responsible for mixing the audio from multiple inputs down to a single stream.
Figure 2-3 shows how the capture session handles multiple audio inputs.
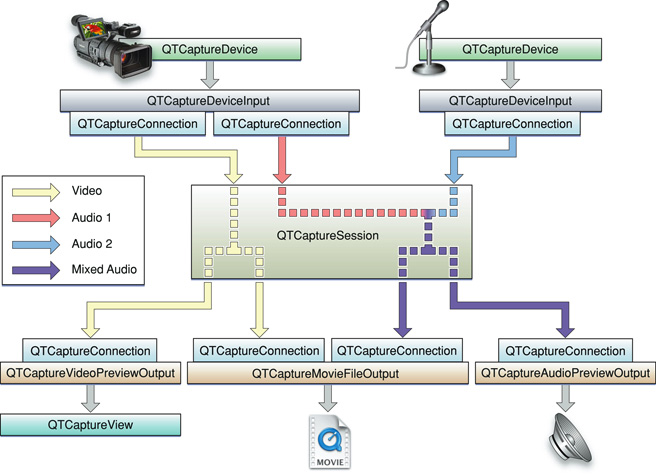
As illustrated in Figure 2-3, a capture session sends all of its input video to each output that accepts video and all of its input audio to each output that accepts audio. However, before sending the separate audio stream to its outputs, it mixes them down to one stream that can be sent to a single capture connection.
A capture session is also responsible for ensuring that all media are synchronized to a single time base in order to guarantee that all output video and audio are synchronized.
The connections belonging to each input and output are QTCaptureConnection objects. These describe the media type and format of each stream taken from an input or sent to an output. By referencing a specific connection, your application can have finer-grained control over which media enters and leaves a session. Thus, you can enable and disable specific connections, and control specific attributes of the media entering (for example, the volumes of specific audio channels).
QTCaptureView in Interface Builder
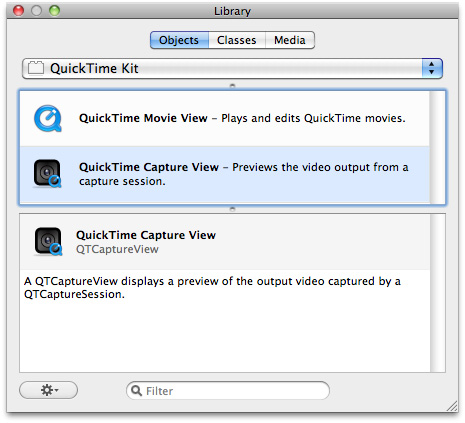
If you work with Xcode and Interface Builder tools, you can take advantage of QTCaptureView in the Interface Builder library, shown in Figure 2-4.
Simply by dragging and dropping QTCaptureView in a window, you can display a preview of the video your application has captured when using a QTCaptureSession object. The QTKit Application Tutorial describes in detail how to use this control in constructing your Cocoa capture application.
Dealing with Thread Safety
The QTKit capture classes introduced in OS X v10.5 and QuickTime 7.3 generally have good thread safety characteristics. To be more specific, these classes may be used from background threads, except for QTCaptureView which inherits from NSView and therefore has a few notable limitations as discussed in the Thread Safety Summary for OS X documentation.
Although capture sessions represented by the QTCaptureSession object and their inputs (for example, QTCaptureDeviceInput) and outputs (for example, QTCaptureMovieFileOutput) can be created, run, and monitored from background threads, any method calls that mutate these objects or access mutable information must be serialized. Therefore, these methods are required to perform their own synchronization (or locking) around any object access. This behavior is no different from any unprotected data structure that needs to be accessed from multiple threads.
Refer to the Threading Programming Guide and the section describing how to use locks in Cocoa for more details regarding what is and what is not considered thread-safe when building Cocoa applications.
Using QTKit Capture
This section discusses a set of use-case scenarios, such as how to build a simple recording application, control media capture, handle dropped late video frames, and control the dimensions of captured video and its output. You use the methods available in the QTKit capture API and the coding techniques described in this section when you are dealing with these various scenarios.
If you need to learn how to build an application that captures and records audio/video from an internal or external source, you should read the chapters devoted to those tasks in the QTKit Application Tutorial. The document, which is intended for new Cocoa and QTKit developers, walks you through the steps you need to follow to construct such an application.
Creating a Simple Capture and Recording Application
If you want to build a simple capture and recording application, these are coding steps and techniques you need to follow. Basically, you work with three capture classes to accomplish this task:
QTCaptureSession. The primary interface for capturing media streams. This object acts as a kind of traffic cop, negotiating and managing the connections between inputs and outputs.QTCaptureMovieFileOutput. This is an output destination forQTCaptureSessionthat writes captured media to QuickTime movie files.QTCaptureDeviceInput. This object provides an input source for media devices, such as cameras and microphones.
Using these three objects, along with their associated methods, your application can perform simple capture and recording of media and then output the recorded content of the media to movie files for playback as QuickTime movies.
You follow these steps, preferably in the order defined below, to construct the application, using Xcode and Interface Builder tools:
Create an Cocoa application project in Xcode named, for example,
MyRecorder.@interface MyRecorder : NSObject
Declare instance variables that point to the capture objects.
QTCaptureSession *mCaptureSession;
QTCaptureMovieFileOutput *mCaptureMovieFileOutput;
QTCaptureDeviceInput *mCaptureVideoDeviceInput;
QTCaptureDeviceInput *mCaptureAudioDeviceInput;
Define an Interface Builder outlet,
mCaptureView, that points to aQTCaptureViewobject.IBOutlet QTCaptureView *mCaptureView;
In your implementation file, do the following:
Create the capture session.
mCaptureSession = [[QTCaptureSession alloc] init];
Find a video device and connect your inputs and outputs to the session.
QTCaptureDevice *videoDevice = [QTCaptureDevice defaultInputDeviceWithMediaType:QTMediaTypeVideo];
success = [videoDevice open:&error];
BOOL success = NO;
NSError *error;
Add the video device to the session as a device input.
mCaptureVideoDeviceInput = [[QTCaptureDeviceInput alloc] initWithDevice:videoDevice];
success = [mCaptureSession addInput:mCaptureVideoDeviceInput error:&error];
Create the movie file output and add it to the session.
mCaptureMovieFileOutput = [[QTCaptureMovieFileOutput alloc] init];
success = [mCaptureSession addOutput:mCaptureMovieFileOutput error:&error];
if (!success) {}
[mCaptureMovieFileOutput setDelegate:self];
Associate your capture view in the UI with the session and start it running.
[mCaptureView setCaptureSession:mCaptureSession];
[mCaptureSession startRunning];
Specify the compression options for the size of your video and the quality of your audio output.
NSEnumerator *connectionEnumerator = [[mCaptureMovieFileOutput connections] objectEnumerator];
QTCaptureConnection *connection;
while ((connection = [connectionEnumerator nextObject])) {NSString *mediaType = [connection mediaType];
QTCompressionOptions *compressionOptions = nil;
if ([mediaType isEqualToString:QTMediaTypeVideo]) {compressionOptions = [QTCompressionOptions compressionOptionsWithIdentifier:@"QTCompressionOptions240SizeH264Video"];
} else if ([mediaType isEqualToString:QTMediaTypeSound]) {compressionOptions = [QTCompressionOptions compressionOptionsWithIdentifier:@"QTCompressionOptionsHighQualityAACAudio"];
}
[mCaptureMovieFileOutput setCompressionOptions:compressionOptions forConnection:connection];
}
Implement start and stop actions, and specify the output destination for your recorded media, in this case a QuickTime movie (
.mov) in your/Users/Sharedfolder.- (IBAction)startRecording:(id)sender
{[mCaptureMovieFileOutput recordToOutputFileURL:[NSURL fileURLWithPath:@"/Users/Shared/My Recorded Movie.mov"]];
}
- (IBAction)stopRecording:(id)sender
{[mCaptureMovieFileOutput recordToOutputFileURL:nil];
}
Output your captured movie at a specified path and open your QuickTime movie at the path you’ve specified at
/Users/Shared/My Recorded Movie.mov.- (void)captureOutput:(QTCaptureFileOutput *)captureOutput didFinishRecordingToOutputFileAtURL:(NSURL *)outputFileURL forConnections:(NSArray *)connections dueToError:(NSError *)error
{[[NSWorkspace sharedWorkspace] openURL:outputFileURL];
}
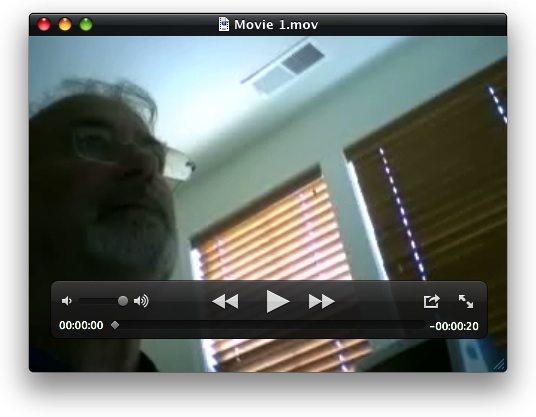
After building and compiling this code, your captured output appears as a movie playing in the QuickTime X Player application, as shown in Figure 2-5.
Specifying Compression Options
Notably, in the last step of constructing your capture and record application (Step 9), you specify a compression option identifier for a particular type of media, in this case, media set to display and playback at a size of 320 x 240, encoded with the H.264 codec. This is important to understand, in that you can use the QTCompressionOptions object to describe compression options for a particular captured media and its subsequent output and rendering. If you do not specify a compression option, your captured media will be outputted as raw, device-native video frames, which may be difficult to display and playback on various devices as QuickTime movies.
Compression options are created from presets keyed by a named identifier and are briefly described in Listing 2-1. Refer to the QTKit Framework Reference for a complete description of these identifiers.
The coding technique you use is to pass these identifiers to the compressionOptionsWithIdentifier: class method to get an instance configured with the compression options for that identifier. Note that each identifier represents a set of options that determine how media will be compressed. Also note that not all identifiers are available in 64-bit, as shown in Listing 2-1.
Listing 2-1 Compression options identifiers
@"QTCompressionOptionsLosslessAppleIntermediateVideo"; //Not available in 64-bit. |
@"QTCompressionOptionsLosslessAnimationVideo"; |
@"QTCompressionOptionsJPEGVideo"; |
@"QTCompressionOptions120SizeH264Video"; |
@"QTCompressionOptions240SizeH264Video"; |
@"QTCompressionOptionsSD480SizeH264Video"; |
@"QTCompressionOptions120SizeMPEG4Video"; //Not available in 64-bit. |
@"QTCompressionOptions240SizeMPEG4Video"; //Not available in 64-bit. |
@"QTCompressionOptionsSD480SizeMPEG4Video"; //Not available in 64-bit. |
@"QTCompressionOptionsLosslessALACAudio"; |
@"QTCompressionOptionsHighQualityAACAudio"; |
@"QTCompressionOptionsVoiceQualityAACAudio"; |
Controlling Video Dimensions
Using compression options identifiers, you can control the dimensions of captured video when it is written to disk. The advantage of doing this is that you save disk space and use less disk bandwidth. This is especially important when using recent generations of built-in iSight cameras, which, at their maximum resolution, output raw video frames at a data rate that is higher than a standard desktop or laptop hard drive can handle.
To control the dimensions of the video written by QTCaptureFileOutput, you set compression options that enforce a specific size (QTCompressionOptionsSD480SizeH264Video, for example, as shown in Listing 2-2). As discussed in Specifying Compression Options, compression options identifiers are one way of controlling video dimensions, when using the file output.
If you are using QTCaptureDecompressedVideoOutput or QTCaptureVideoPreviewOutput, use pixel buffer attributes (setPixelBufferAttributes:) to control video dimensions.
If you want to control file output video dimensions without compressing the video, there are two methods available in QTCaptureFileOutput:
- (NSSize)maximumVideoSize |
- (void)setMaximumVideoSize:(NSSize)maximumVideoSize |
Use these methods to specify a maximum limit on the dimensions of video that is recorded to a file. When a size is set, all video recorded by the receiver will be no larger than the specified size, while still preserving the original aspect ratio of the content.
As is the case with the setPixelBufferAttributes: in QTCaptureDecompressedVideoOutput and QTCaptureVideoPreviewOutput, whenever possible, devices that support different hardware resolutions are automatically reconfigured to use the least bandwidth while still fulfilling the requirements of all outputs in the capture session.
Creating a Single-Frame Grabbing Application
If your application needs to capture single frames of media content—for example, from an internal or external iSight camera—you can do so easily and with a minimum lines of Cocoa code, using the capture classes in the QTKit API.
The technique of single-frame capture is common in the motion picture and television industries and is known as stop motion animation. You grab single frames from a video stream and output those frames, with great accuracy and reliability (avoiding tearing, for example), into a QuickTime movie. When the frames are concatenated into a movie for playback, you create the illusion of motion, and thus, the animation of still images.
To build this type of application, you work essentially with three capture classes:
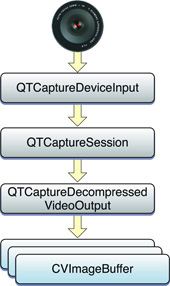
QTCaptureSession. This object is, again, your primary interface for capturing media streams.QTCaptureDecompressedVideoOutput. This is your output destination for aQTCaptureSessionobject that you can use to process decompressed frames from the video that is being captured. Using the methods provided in this class, you can produce decompressed video frames (CVImageBuffer), as shown in Figure 2-6, that are suitable for high-quality video processing.QTCaptureDeviceInput. This object is your input source for media devices, such as cameras and microphones.
You follow these steps, as outlined below, to construct this application:
Create a Cocoa-document based project in Xcode.
Declare three instance variables that point to a
QTMovieobject, one of which point to Interface Builder outlets.IBOutlet QTCaptureView *mCaptureView;
IBOutlet QTMovieView *mMovieView;
QTMovie *mMovie;
Declare instance variables pointing to three objects.
QTCaptureSession *mCaptureSession;
QTCaptureDeviceInput *mCaptureDeviceInput;
QTCaptureDecompressedVideoOutput *mCaptureDecompressedVideoOutput;
Declare an IBAction method.
- (IBAction)addFrame:(id)sender;
Set up a capture session that outputs the raw frames you want to grab.
[mMovieView setMovie:mMovie];
if (!mCaptureSession) {BOOL success;
mCaptureSession = [[QTCaptureSession alloc] init];
Add a device input for that device to the capture session.
QTCaptureDevice *device = [QTCaptureDevice defaultInputDeviceWithMediaType:QTMediaTypeVideo];
success = [device open:&error];
if (!success) {[[NSAlert alertWithError:error] runModal];
return;
}
mCaptureDeviceInput = [[QTCaptureDeviceInput alloc] initWithDevice:device];
success = [mCaptureSession addInput:mCaptureDeviceInput error:&error];
if (!success) {[[NSAlert alertWithError:error] runModal];
return;
}
Add a decompressed video output that returns raw frames to the session.
mCaptureDecompressedVideoOutput = [[QTCaptureDecompressedVideoOutput alloc] init];
[mCaptureDecompressedVideoOutput setDelegate:self];
success = [mCaptureSession addOutput:mCaptureDecompressedVideoOutput error:&error];
if (!success) {[[NSAlert alertWithError:error] runModal];
return;
}
Preview the video from the session in the document window.
[mCaptureView setCaptureSession:mCaptureSession];
Start the session.
[mCaptureSession startRunning];
}
}
Implement a delegate method that
QTCaptureDecompressedVideoOutputcalls whenever it receives a frame. Note that this method is called for each frame that comes in.- (void)captureOutput:(QTCaptureOutput *)captureOutput didOutputVideoFrame:(CVImageBufferRef)videoFrame withSampleBuffer:(QTSampleBuffer *)sampleBuffer fromConnection:(QTCaptureConnection *)connection
Store the latest frame. You must perform this in a
@synchronizedblock because this delegate method is not called on the main thread.{CVImageBufferRef imageBufferToRelease;
CVBufferRetain(videoFrame);
@synchronized (self) {imageBufferToRelease = mCurrentImageBuffer;
mCurrentImageBuffer = videoFrame;
}
CVBufferRelease(imageBufferToRelease);
}
Get the most recent frame. You must perform this in a
@synchronizedblock because the delegate method that sets the most recent frame is not called on the main thread.- (IBAction)addFrame:(id)sender
{CVImageBufferRef imageBuffer;
@synchronized (self) {imageBuffer = CVBufferRetain(mCurrentImageBuffer);
}
Create an
NSImageand add it to the movie.if (imageBuffer) {NSCIImageRep *imageRep = [NSCIImageRep imageRepWithCIImage:[CIImage imageWithCVImageBuffer:imageBuffer]];
NSImage *image = [[[NSImage alloc] initWithSize:[imageRep size]] autorelease];
[image addRepresentation:imageRep];
CVBufferRelease(imageBuffer);
[mMovie addImage:image forDuration:QTMakeTime(1, 10) withAttributes:[NSDictionary dictionaryWithObjectsAndKeys:
@"jpeg", QTAddImageCodecType,
nil]];
[mMovie setCurrentTime:[mMovie duration]];
[mMovieView setNeedsDisplay:YES];
[self updateChangeCount:NSChangeDone];
}
}
Pausing and Resuming Recording
If your application needs to control recording of captured media to a single file, you can take advantage of the enhanced recording functionality provided in OS X v10.6. You use the instance methods available in the QTCaptureFileOutput class that are designed to accomplish this task:
- (BOOL)isRecordingPaused |
- (void)pauseRecording |
- (void)resumeRecording |
You use the isRecordingPaused method to return whether recording to the file returned by outputFileURL has been previously paused using the pauseRecording method. When you pause a recording, your captured samples are not written to the output file, but new samples can be written to the same file in the future by calling resumeRecording. The value of this method is key value observable using the key @"recordingPaused".
The pauseRecording method, as you would expect, causes the receiver to stop writing captured samples to the current output file returned by outputFileURL. However, it leaves the file open so that samples can be written to it in the future, when resumeRecording is called. This allows you to record multiple media segments that are not contiguous in time to a single file.
When you stop recording or change files using recordToOutputFileURL:bufferDestination: or recording automatically stops due to an error condition while recording is paused, the output file will be finished and closed normally without requiring a matching call to resumeRecording. When there is no current output file, or when recording is already paused, this method does nothing. You can call this method within the captureOutput:didOutputSampleBuffer:fromConnection: delegate method to pause recording after an exact media sample.
Dealing with Dropped Late Video Frames
By default, the QTCaptureDecompressedVideoOutput object, a subclass of QTCaptureOutput, handles captured video frames via a delegate method, and sends all captured frames to the delegate, even if they are captured at a higher rate than the delegate is servicing them. If you don’t implement your own threading and frame-dropping strategy so that you don’t block the delegate thread on which you receive new video frames, your application will take a substantial performance hit, as video frames are queued up in memory more quickly than they can be serviced.
But if you don’t need to successfully capture every frame, you can use two methods available in QTCaptureDecompressedVideoOutput that allow you to automatically drop backed up, or late video frames. These methods are
- (BOOL)automaticallyDropsLateVideoFrames |
- (void)setAutomaticallyDropsLateVideoFrames:(BOOL)automaticallyDropsLateVideoFrames |
If you set the setAutomaticallyDropsLateVideoFrames: method to YES, the QTCaptureDecompressedVideoOutput object will discard extra frames that are queued up while you are blocking the delegate callback thread. In conjunction with this property, you can use the following delegate method:
- (void)captureOutput:(QTCaptureOutput *)captureOutput didDropVideoFrameWithSampleBuffer:(QTSampleBuffer *)sampleBuffer fromConnection:(QTCaptureConnection *)connection; |
When you set automaticallyDropsLateVideoFrames to YES, this method is called whenever a late video frame is dropped. The method is called once for each dropped frame and may be called before the call to the outputVideoFrame:withSampleBuffer:fromConnection: or the captureOutput:didOutputVideoFrame:withSampleBuffer:fromConnection: delegate method during which those frames were dropped returns. The QTSampleBuffer object passed to this delegate method will contain metadata about the dropped video frame, such as its duration and presentation time stamp, but contains no actual video data. Delegates should not assume that this method will be called on the main thread. Because this method may be called on the same thread that is responsible for outputting video frames, it must be efficient to prevent further capture performance problems, such as additional dropped video frames.
Controlling the Frame Rate of Captured Video
Many QTKit capture applications need to control the frame rate of captured video largely for performance reasons. For example, you may need to record video at a high resolution but don’t need to record at a high frame rate, so you can save a substantial amount of memory, disk bandwidth, and device bus bandwidth by avoiding capturing the extra frames. Two methods, in particular, both in QTCaptureFileOutput and QTCaptureDecompressedVideoOutput, are useful handling the responsibilities for outputting captured video. They are:
- (NSTimeInterval)minimumVideoFrameInterval |
- (void)setMinimumVideoFrameInterval:(NSTimeInterval)minimumVideoFrameInterval |
You use these methods to specify the minimum amount of time that should separate consecutive frames output by the receiver, which is the inverse of the maximum frame rate. In each case, a value of 0 indicates an unlimited maximum frame rate. The default value is 0. Whenever possible, devices that support different hardware frame rates will be automatically reconfigured to use the least bandwidth while still fulfilling the requirements of all outputs in the capture session.
Capturing a Single Stream from a Muxed Device
Muxed devices such as DV and HDV cameras, where audio and video streams are mixed, are represented in the QTKit capture API by the media type QTMediaTypeMuxed. To capture a single stream from the device (for example, video only), you disable the audio connections on the device input for the capture device by using the QTCaptureConnection setEnabled: method and passing in NO.
In the QTKit capture API, the QTCaptureDevice object, shown in Listing 2-2, represents an available capture device. This means that each instance of QTCaptureDevice corresponds to a capture device that is connected or has been previously connected to the user’s computer during the lifetime of the application. You cannot create instances of QTCaptureDevice directly. A single unique instance is created automatically whenever a device is connected to the computer and can be accessed using the deviceWithUniqueID: class method. An array of all currently connected devices can also be obtained using the inputDevices class method.
Table 2-6 details the media types supported by QTCaptureDevice and examples of devices that support them:
Media Type | Description | Example Devices |
|---|---|---|
| Media that only contains video frames. | iSight cameras (external and built-in); USB and FireWire webcams |
| Multiplexed media that may contain audio, video, and other data in a single stream. | DV cameras |
| Media that only contains audio samples. | Built-in microphones and line-in jacks; the microphone built-in to the external iSight; USB microphones and headsets; any other device supported by Core Audio. |
Listing 2-2 shows how to capture a single stream from a muxed device.
Listing 2-2 Capturing a single stream from a muxed device
QTCaptureDevice *theDefaultMuxedDevice; |
QTCaptureDeviceInput *theDeviceInput; |
BOOL success; |
NSError *error; |
... |
// get the default muxed device |
theDefaultMuxedDevice = [QTCaptureDevice defaultInputDeviceWithMediaType:QTMediaTypeMuxed]; |
// open the device |
success = [theDefaultMuxedDevice open:&error]; |
if (YES == success) { |
// create and associate device input |
theDeviceInput = [QTCaptureDeviceInput deviceInputWithDevice:theDefaultMuxedDevice]; |
// get the list of owned connections |
NSArray *ownedConnections = [theDeviceInput connections]; |
// disable all the audio connections |
for (QTCaptureConnection *connection in ownedConnections) { |
if ( [[connection mediaType] isEqualToString:QTMediaTypeSound] ) { |
[connection setEnabled:NO]; |
} |
} |
} else { |
// do something with the error code |
} |
Configuring Cameras for Capture
If you want to configure your camera directly for capture, QTKit will allow you to specify the output and configure the camera if it can.
QTKit will automatically adjust the camera resolution to best accommodate the requirements of all the outputs connected to a particular session. For example, if you set the compression options of a movie file output or the pixel buffer attributes of a decompressed video output, you can cause the camera resolution to be adjusted for optimal performance. In general, if you are interested in configuring the camera because you want your output video to be at a specific resolution, it makes more sense to configure your outputs directly and not worry about the camera settings, which is the functionality currently provided by QTKit.
In the use case where you need to access the captured frames’ pixel values for pattern recognition to resize the CVImageBuffer, QTKit provides an appropriate API. You can ask for CVImageBuffers of a specific size and pixel format using QTCaptureDecompressedVideoOutput setPixelBufferAttributes:. This is illustrated in the following usage example, shown in Listing 2-3.
Listing 2-3 Capturing decompressed video output frames
[decompressedVideoOutput setPixelBufferAttributes:[NSDictionary |
dictionaryWithObjectsAndKeys: |
[NSNumber |
numberWithDouble:320.0], (id)kCVPixelBufferWidthKey, |
[NSNumber |
numberWithDouble:240.0], (id)kCVPixelBufferHeightKey, |
[NSNumber |
numberWitUnsignedInt:kCVPixelFormatType_32ARGB], |
(id)kCVPixelBufferPixelFormatTypeKey, |
nil]]; |
When appropriate, specifying these pixel buffer attributes will cause the camera to be automatically reconfigured to best match the output format. Conversions still may be necessary. For example, if the camera does not have an RGB mode, then a pixel format conversion will still be required. However, QTKit will perform all conversions for you. In short, using this API allows QTKit to choose the most optimal video pipeline for the requested output.
Copyright © 2016 Apple Inc. All Rights Reserved. Terms of Use | Privacy Policy | Updated: 2016-08-26