Retired Document
Important: This document may not represent best practices for current development. Links to downloads and other resources may no longer be valid.
Carbon Menu Tasks
This chapter describes how to create Carbon menus in Interface Builder and load them into your application.
Creating a Menu Using Nibs
While you can create menus by calling various Carbon Menu Manager functions, it is much easier to create them using the Interface Builder tool included with Xcode.
Interface Builder is Apple’s graphical user interface layout tool. In true WYSIWYG fashion, you simply drag user interface elements onto windows, menus, and controls to create your interfaces. This information is stored in a nib file, which your application can access using a few simple function calls.
Interface Builder has many advantages over other layout methods:
The WYSIWYG interface makes it easy to visualize your interface objects.
Its ease of use allows for experimenting and rapid prototyping.
Special guides makes it easy to conform to Aqua’s layout guidelines.
Simple APIs make it easy to create interface objects from nib files.
You can use Interface Builder’s nib files even if you are working with legacy code. Applications can support both nib-based and older resource-based windows and controls at the same time, so you can make the transition as gradual as you like. Nib file support is available back to Mac OS 8.6 using CarbonLib.
Interface Builder is included on the Xcode CD available with Mac OS X.
The Nib File
Interface Builder stores all the information about your application’s windows, menus, and controls in a nib file (typically named filename.nib ). When creating a new file, Interface Builder gives you the option of selecting what type of nib file you want to create. When creating interfaces for Carbon applications, you should always select one of the Carbon options, as shown in Figure 2-1.
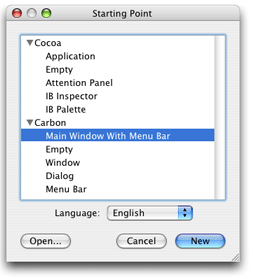
When you select Menu Bar or Main Window With Menu Bar, Interface Builder brings up a default menu bar as shown in Figure 2-2, which you can then populate with your menus and menu items.

Note that this menu bar already contains the standard menus required for applications (File, Edit, Window, and so on). Clicking on any menu opens it, displaying the standard menu items for each menu.
If your application does not require certain menu items (if your application does not require printing, for example), you can simply select the item and hit Delete to remove it. Similarly, if you do not need an entire menu, you can select its title and delete it.
If you select a menu and then select the Show Info menu item in Interface Builder’s Tools menu, you bring up the Info Palette for that menu, as shown in Figure 2-3.
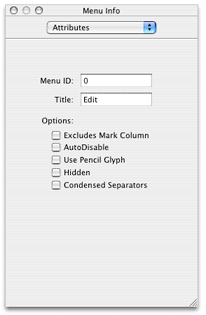
The Info panel allows you to set various menu attributes, such as the title, the menu ID, and so on.
The Menu title is self-explanatory. The Menu ID is used to identify the menu in certain Menu Manager calls. You can also set these fields programmatically by calling the Menu Manager functions in Table 2-1.
Panel Item |
Menu Manager Function Equivalent |
|---|---|
Menu ID |
|
Title |
|
The checkboxes correspond to menu attributes that you can
set or unset using the ChangeMenuAttributes function,
as shown in Table 2-2.
If you select a menu item, the Show Info palette displays appropriate menu item attributes, as shown in Figure 2-4. As with the menu information, the pop up menu lets you select other panes: Control, Size, Layout, and Help. However, except for Help, which lets you assign a help tag (sometimes called a tool tip) to a menu item, none of the other panes apply to menu items.
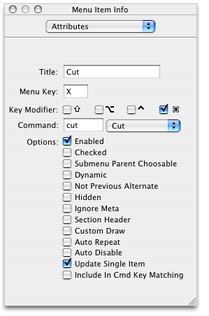
The Menu item title is, again, self-explanatory. The Menu Key is the letter or number in the menu item’s keyboard equivalent (for example, the C in Command-C). You can then check the appropriate checkbox or checkboxes to select the accompanying combination of Shift, Option, Control, or Command keys required to activate the keyboard equivalent.
The Command field is the four-character code that specifies
the menu item’s command ID. This is the ID that the Carbon Event
Manager sends to your application in a kEventCommandProcess event
when the user selects this menu item. The popup menu lists a number
of predefined command IDs for common menu tasks (such as Cut, Copy,
New, and so on).
You can set these fields programmatically by calling the appropriate function in Table 2-3.
Panel Item |
Menu Manager Function Equivalent |
|---|---|
Title |
|
Menu Key and Keyboard Modifier |
|
Command |
|
The checkboxes correspond to various menu item attributes,
most of which you can set or unset using the ChangeMenuItemAttributes function,
as shown in Table 2-4.
Panel Checkbox |
When Checked |
Menu Item Attribute to Set |
|---|---|---|
Enabled |
The menu item is enabled |
Unset |
Checked |
The menu item has a check mark |
No attribute. Use the |
Submenu Parent Choosable |
The user can select this parent of a submenu |
|
Dynamic |
Indicates that this menu item is part of a dynamic group. See Dynamic Menu Items for more information. |
|
Not Previous Alternate |
Indicates that this menu item is not part of the previous dynamic group. See Dynamic Menu Items for more information. |
|
Hidden |
Menu item is hidden. |
|
IgnoreMeta |
Ignore the dash (-) meta character when drawing this item. Only required if you want to display a dash in your menu item. See Menu Manager Reference for more details. |
|
Section Header |
Item is a section header. This item is disabled and cannot be selected. |
|
Custom Draw |
Indicates that this is a custom menu item. The Menu Manager sends the appropriate menu drawing events to your application. See Menu Manager Reference for more details. |
|
Auto Repeat |
Indicates that |
|
Auto Disable |
Indicates that this item is automatically disabled if
the item does not respond to the |
|
Update Single Item |
Update only the menu item with the matching command key when
calling |
|
Use in Cmd Key Matching |
Consider this item when using |
|
Use SetMenuItemIconHandle to
set an icon in a menu item.
The Menus Palette
For Carbon applications, Interface Builder provides five different layout palettes, which are displayed in the Carbon palettes window. If the window is not already open, you can do so by choosing Palettes from Interface Builder’s Tools menu. This document focuses on the Menu palette, which you can display by selecting the leftmost item in the palette window toolbar. Figure 2-5 shows the Menus palette
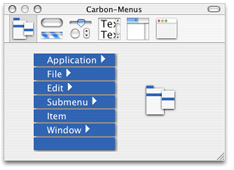
You add menus or menu items to the menu bar by simply dragging the appropriate blue box from the menu palette.
The Application element corresponds to the menu containing the application name immediately to the left of the Apple menu. You should rename the menu title to be your application’s name. By default, this menu contains only the About AppName menu item, but often you will want to add more.
Note that the system automatically adds additional menu items to the end of the Application menu at run time (Services, Hide, Hide Others, Show All, and Quit).
The system also adds a Preferences menu item at runtime (with the standard Command-, keyboard shortcut), but this is hidden by default. To access the menu item, you need to call
GetIndMenuItemWithCommandID, searching for thekHICommandPreferencescommand ID. After obtaining the menu item, you can make it visible and otherwise manipulate it.The File, Edit, and Window elements correspond to those particular menu types, and they contain the default items for those menu types. For example, the Edit menu contains the Copy, Cut, and Paste items, among others.
The Submenu element can be used for any nonstandard menus you want to add to the menu bar. If you drag the Submenu item to the menu bar, it becomes a new menu, which you can then rename and populate as necessary. If you drag the Submenu item into an existing menu, it becomes a submenu. You an position the menu as desired by simply dragging it to the desired location.
The Item element corresponds to a menu item. You can drag an item into any menu or submenu, and position it as desired.
The empty element corresponds to a separator item. This special menu item appears as a gray line, and is used to group menu items into logical categories.
At run time, the system automatically adds an Apple menu to the left of the Application menu. You should not add any application-specific menu items to the Apple menu.
Creating a Simple Menu
This section gives a step-by step example of adding a simple menu to the menu bar. The ideas and methods used apply to any menu you may want to create.
First, begin with a menu bar. The default menu bar is already populated with the standard Application, File, Edit, and Window menus. If your application uses multiple menu bars, you should assign each a unique name by selecting the title in the main nib window, as shown in figure. You specify this name in your application when it comes time to create a menu bar from the nib.
To add a new menu to the menu bar, drag a Submenu item from the Menu palette. While dragging, a faint red line appears in the menu bar to indicate where the menu will appear. If you don’t like where it ended up, you can simply drag it to a new location, or simply remove it by selecting it and hitting Delete.
You can rename the menu by double-clicking on it or by changing the title from the Info palette. You can also assign a menu ID if you like.
Clicking on the menu in the menu bar opens it, displaying a single menu item. If you want to add additional menu items, you can drag them from the Menu palette.
For each item, you assign a name by double-clicking the item or by changing the title from the Info panel. If desired you can also assign a keyboard equivalent and check any desired attributes. You should also assign a command ID to each item, which will be used in event handling. See Simple Event Handling for more details.
Standalone Menus
Interface Builder also allows you to create standalone menus that are not part of the menu bar. You may want to create such menus if you want to insert them into the menu bar at some later time. For example, you can use these menus in popup or contextual menus.
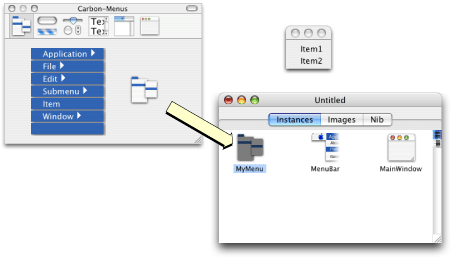
To create a standalone menu, drag the menu icon in the lower right of the Menus palette to the Instances pane of the main nib window. A menu then appears in the Instances pane, and a small menu window appears containing two items. By selecting the menu in the instance pane, you can change its title and other attributes in the Info window. You can modify the menu items in a similar fashion, just as if they were in a menu installed in the menu bar.
Dynamic Menu Items
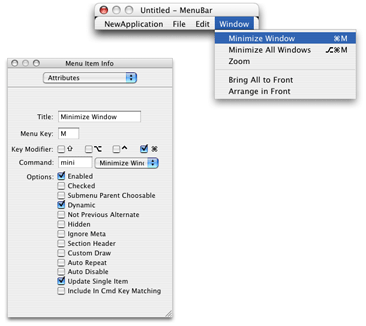
In some cases, you may want to create menu items that change depending on the state of the modifier keys held down by the user. For example, in the default Window menu, a menu item named “Minimize Window” changes to “Minimize All Windows” when the user depresses the Option key while the menu is open. Similarly, if the keyboard equivalent Command-M activates “Minimize Window,” Command-Option-M activates “Minimize All Windows.” Such items are called dynamic menu items.
Creating a dynamic menu item requires you to create two or more menu items in Interface Builder, one for each possible state.
Figure 2-7 shows two menu items that make up the Minimize dynamic item. To indicate that they are dynamic and should work together, you must check the Dynamic attribute for each item. In addition, each item must have the same letter or number for its keyboard equivalent. The modifier keys for the keyboard equivalent do not have to “stack.” For example, you can specify that Command-K activate “Remove Mark” while Option-K activates “Remove All Marks.” You can specify several different modifier keys for a single dynamic menu.
The Menu Manager assumes that if multiple sequential menu items have the same menu key, the are part of the same dynamic group. However, if there is a case where a menu item with the same command key (or no command key at all) should not be considered part of the dynamic group, you can flag it by checking the NotPreviousAlternate attribute for that item. Any menu items that follow are also not considered to be part of the dynamic group.
Creating Menus From a Nib file
After you have created a nib file containing your menus, you can access them from your application.
Note that while a nib file can contain multiple windows, menus, and so on, to make the best use of resources, you may want to break up your user interface elements among several nib files. For example, you can put your main menu bar and menus in one nib file, windows in another, and so on.
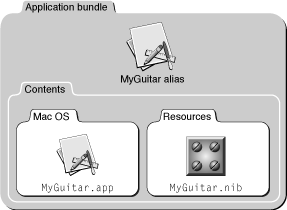
To make sure your application can find the nib file, you should place it in the Resources folder of your application’s bundle hierarchy, as shown in Figure 2-8. For information about creating application bundles, see Mac Technology Overview.
When retrieving menus from a nib, you can either load the entire menu bar with its associated windows, or load a particular menu.
Listing 2-1 shows how you to load a menu bar from a nib.
Listing 2-1 Creating a menu bar from a nib file
OSStatus err; |
IBNibRef theNib; |
err = CreateNibReference (CFSTR("MyGuitar"), &theNib); // 1 |
if (!err) |
SetMenuBarFromNib (theNib, CFSTR("GuitarMenu")); // 2 |
Here is what the code does:
The Interface Builder Services function
CreateNibReferencesimply creates a nib reference that points to the specified file. In this case, the file isMyGuitar.nib(you don’t need to specify the.nibextension when calling this function). TheCFSTRfunction converts the string into a Core Foundation string, which is the format thatCreateNibReferenceexpects.The Interface Builder Services function
SetMenuBarFromNibuses the nib reference to access a menu bar within the nib file. The name of the menu bar (GuitarMenusin this example) is the name you assigned to it in the Instances pane of the nib file window. As with theCreateNibReferencefunction,SetMenuBarFromNibexpects a Core Foundation string for the window name, so it must first be converted usingCFSTR. The created window is stored as a window reference intheWindow.Note that
SetMenuBarFromNibautomatically sets the menu bar you specified to be visible. If for some reason you want to create a menu bar but don’t want it to be immediately visible, you can callCreateMenuBarFromNib.
The complete menu bar can now appear in your application. However, while the facade is there (and the menus and menu items are functional), this menu bar does not do anything useful. To make the menu items do useful work, you must attach Carbon event handlers, which are described in detail in Simple Event Handling.
Simple Event Handling
After you have populated the menu bar with your menus and menu items, you need to make them functional, which means they must be able to respond to events. To do so, you must install Carbon event handlers. To get the most out of this section, you should be familiar the Carbon Event Manager, as described in Handling Carbon Events in Carbon Events and Other Input documentation.
For most applications, you should assign a command ID to each
menu item. The command ID is a four-character code that uniquely
identifies a particular action. When the user selects a menu item,
the Carbon Event Manager sends a kEventCommandProcess event containing
the menu item’s command ID to your application. You application
can then filter the event to determine the command ID and take the
appropriate action.
If you
assigned a command ID to your menu item, your application is sent
command events whenever the menu item is activated. Command events
are of the class kEventClassCommand.
The Carbon Event Manager defines command ID’s for many common
commands, such as OK, Cancel, Cut, Paste, and so on. You can also
define your own for application-specific commands. Your event handler
for the kEventCommandProcess event
can then determine which command ID was sent and take appropriate
action.
You assign the command ID to a menu item in the Attributes
pane of Interface Builder’s Info window, as shown previously in Figure 2-4. You
can also call the Menu Manager function SetMenuItemCommandID.
The kEventCommandProcess event
indicates that your menu item was selected. The actual command ID
is stored within an HICommand structure
in the event reference, so you must call the Carbon Event Manager
function GetEventParameter to
retrieve it, as shown in Listing 2-2.
Listing 2-2 Obtaining the command ID from the event reference
HICommand commandStruct; |
UInt32 theCommandID; |
GetEventParameter (event, kEventParamDirectObject, // 1 |
typeHICommand, NULL, sizeof(HICommand), |
NULL, &commandStruct); |
theCommandID = commandStruct.commandID; // 2 |
Here is what the code does:
When calling
GetEventParameter, you must specify which parameter you want to obtain. For command events, the direct object (kEventParamDirectObject) is theHICommandstructure, which describes the command that occurred.The command ID of the control (or menu) that generated the event is stored in the
commandIDfield of theHICommandstructure.
To respond to events from menus, you should install your command event handler at the window or application level. Doing so also allows you to use the same handler to catch command events coming from controls, if so desired. Also, attaching your handler at the window level makes sense if you have menu items that apply to one type of document window but not to another.
After
handling a command, your application may need to change the state
of a menu item. For example, after saving a document, the Save menu
item should be disabled until the document changes. Whenever the
status of a command item might be in question, the system makes
a note of it. When the user takes an action that may require updating
the status (such as pulling down a menu), your application receives
a kEventCommandUpdate event.
To make sure that the states of your menus are properly synchronized,
you should install a handler for the kEventCommandUpdate event.
This handler should check the attributes bit of the command event
to determine which items may need updating. Some examples of possible
updates include
enabling or disabling menu items
changing the text of a menu item (for example, from Show xxxx to Hide xxxx).
If the kHICommandFromMenu bit
in the attributes field
of the HICommand structure
(shown in Listing 2-3) is set, then you should check the menu item in question
to see if you need to update it.
Listing 2-3 The HICommand structure
struct HIComamnd |
{ |
UInt32 attributes; |
UInt32 commandID; |
struct |
{ |
MenuRef menuRef; |
MenuItemIndex menuItemIndex; |
} menu; |
}; |
Copyright © 2004 Apple Computer, Inc. All Rights Reserved. Terms of Use | Privacy Policy | Updated: 2004-02-23