Retired Document
Important: OpenGL ES was deprecated in iOS 12. To create high-performance code on GPUs, use the Metal framework instead. See Metal.
Drawing to Other Rendering Destinations
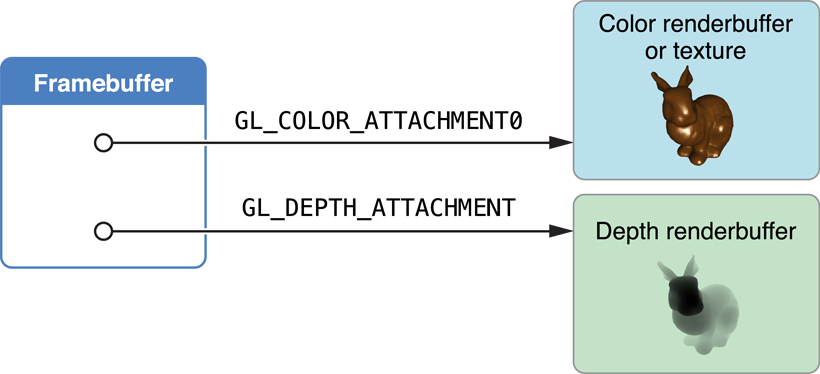
Framebuffer objects are the destination for rendering commands. When you create a framebuffer object, you have precise control over its storage for color, depth, and stencil data. You provide this storage by attaching images to the framebuffer, as shown in Figure 4-1. The most common image attachment is a renderbuffer object. You can also attach an OpenGL ES texture to the color attachment point of a framebuffer, which means that any drawing commands are rendered into the texture. Later, the texture can act as an input to future rendering commands. You can also create multiple framebuffer objects in an single rendering context. You might do this so that you can share the same rendering pipeline and OpenGL ES resources between multiple framebuffers.

All of these approaches require manually creating framebuffer and renderbuffer objects to store the rendering results from your OpenGL ES context, as well as writing additional code to present their contents to the screen and (if needed) run an animation loop.
Creating a Framebuffer Object
Depending on what task your app intends to perform, your app configures different objects to attach to the framebuffer object. In most cases, the difference in configuring the framebuffer is in what object is attached to the framebuffer object’s color attachment point:
To use the framebuffer for offscreen image processing, attach a renderbuffer. See Creating Offscreen Framebuffer Objects.
To use the framebuffer image as an input to a later rendering step, attach a texture. See Using Framebuffer Objects to Render to a Texture.
To use the framebuffer in a Core Animation layer composition, use a special Core Animation–aware renderbuffer. See Rendering to a Core Animation Layer.
Creating Offscreen Framebuffer Objects
A framebuffer intended for offscreen rendering allocates all of its attachments as OpenGL ES renderbuffers. The following code allocates a framebuffer object with color and depth attachments.
Create the framebuffer and bind it.
GLuint framebuffer;
glGenFramebuffers(1, &framebuffer);
glBindFramebuffer(GL_FRAMEBUFFER, framebuffer);
Create a color renderbuffer, allocate storage for it, and attach it to the framebuffer’s color attachment point.
GLuint colorRenderbuffer;
glGenRenderbuffers(1, &colorRenderbuffer);
glBindRenderbuffer(GL_RENDERBUFFER, colorRenderbuffer);
glRenderbufferStorage(GL_RENDERBUFFER, GL_RGBA8, width, height);
glFramebufferRenderbuffer(GL_FRAMEBUFFER, GL_COLOR_ATTACHMENT0, GL_RENDERBUFFER, colorRenderbuffer);
Create a depth or depth/stencil renderbuffer, allocate storage for it, and attach it to the framebuffer’s depth attachment point.
GLuint depthRenderbuffer;
glGenRenderbuffers(1, &depthRenderbuffer);
glBindRenderbuffer(GL_RENDERBUFFER, depthRenderbuffer);
glRenderbufferStorage(GL_RENDERBUFFER, GL_DEPTH_COMPONENT16, width, height);
glFramebufferRenderbuffer(GL_FRAMEBUFFER, GL_DEPTH_ATTACHMENT, GL_RENDERBUFFER, depthRenderbuffer);
Test the framebuffer for completeness. This test only needs to be performed when the framebuffer’s configuration changes.
GLenum status = glCheckFramebufferStatus(GL_FRAMEBUFFER) ;
if(status != GL_FRAMEBUFFER_COMPLETE) {NSLog(@"failed to make complete framebuffer object %x", status);
}
After drawing to an offscreen renderbuffer, you can return its contents to the CPU for further processing using the glReadPixels function.
Using Framebuffer Objects to Render to a Texture
The code to create this framebuffer is almost identical to the offscreen example, but now a texture is allocated and attached to the color attachment point.
Create the framebuffer object (using the same procedure as in Creating Offscreen Framebuffer Objects).
Create the destination texture, and attach it to the framebuffer’s color attachment point.
// create the texture
GLuint texture;
glGenTextures(1, &texture);
glBindTexture(GL_TEXTURE_2D, texture);
glTexParameteri(GL_TEXTURE_2D, GL_TEXTURE_MIN_FILTER, GL_LINEAR);
glTexImage2D(GL_TEXTURE_2D, 0, GL_RGBA8, width, height, 0, GL_RGBA, GL_UNSIGNED_BYTE, NULL);
glFramebufferTexture2D(GL_FRAMEBUFFER, GL_COLOR_ATTACHMENT0, GL_TEXTURE_2D, texture, 0);
Allocate and attach a depth buffer (as before).
Test the framebuffer for completeness (as before).
Although this example assumes you are rendering to a color texture, other options are possible. For example, using the OES_depth_texture
Rendering to a Core Animation Layer
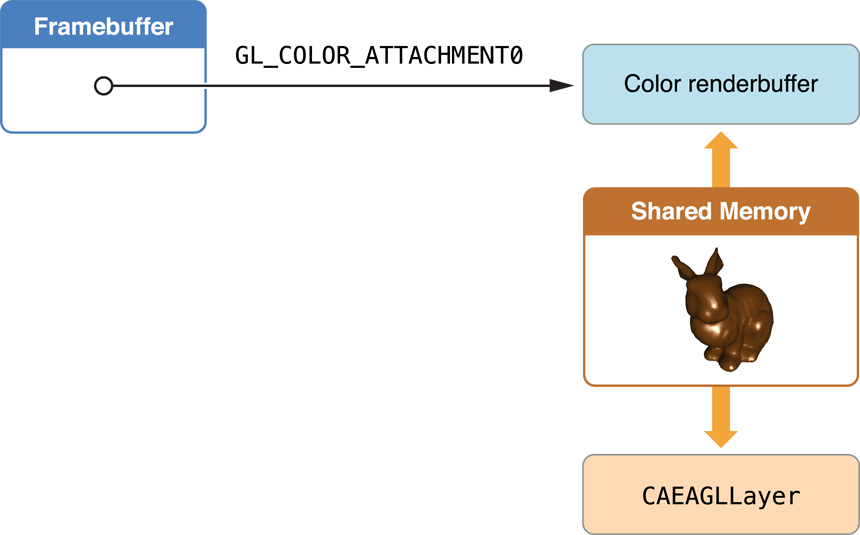
Core Animation is the central infrastructure for graphics rendering and animation on iOS. You can compose your app’s user interface or other visual displays using layers that host content rendered using different iOS subsystems, such as UIKit, Quartz 2D, and OpenGL ES. OpenGL ES connects to Core Animation through the CAEAGLLayer class, a special type of Core Animation layer whose contents come from an OpenGL ES renderbuffer. Core Animation composites the renderbuffer’s contents with other layers and displays the resulting image on screen.

The CAEAGLLayer provides this support to OpenGL ES by providing two key pieces of functionality. First, it allocates shared storage for a renderbuffer. Second, it presents the renderbuffer to Core Animation, replacing the layer’s previous contents with data from the renderbuffer. An advantage of this model is that the contents of the Core Animation layer do not need to be drawn in every frame, only when the rendered image changes.
To use a Core Animation layer for OpenGL ES rendering:
Create a
CAEAGLLayerobject and configure its properties.For optimal performance, set the value of the layer’s
opaqueproperty toYES. See Be Aware of Core Animation Compositing Performance.Optionally, configure the surface properties of the rendering surface by assigning a new dictionary of values to the
drawablePropertiesproperty of theCAEAGLLayerobject. You can specify the pixel format for the renderbuffer and specify whether the renderbuffer’s contents are discarded after they are sent to Core Animation. For a list of the permitted keys, see EAGLDrawable Protocol Reference.Allocate an OpenGL ES context and make it the current context. See Configuring OpenGL ES Contexts.
Create the framebuffer object (as in Creating Offscreen Framebuffer Objects above).
Create a color renderbuffer, allocating its storage by calling the context’s
renderbufferStorage:fromDrawable:method and passing the layer object as the parameter. The width, height and pixel format are taken from the layer and used to allocate storage for the renderbuffer.GLuint colorRenderbuffer;
glGenRenderbuffers(1, &colorRenderbuffer);
glBindRenderbuffer(GL_RENDERBUFFER, colorRenderbuffer);
[myContext renderbufferStorage:GL_RENDERBUFFER fromDrawable:myEAGLLayer];
glFramebufferRenderbuffer(GL_FRAMEBUFFER, GL_COLOR_ATTACHMENT0, GL_RENDERBUFFER, colorRenderbuffer);
Retrieve the height and width of the color renderbuffer.
GLint width;
GLint height;
glGetRenderbufferParameteriv(GL_RENDERBUFFER, GL_RENDERBUFFER_WIDTH, &width);
glGetRenderbufferParameteriv(GL_RENDERBUFFER, GL_RENDERBUFFER_HEIGHT, &height);
In earlier examples, the width and height of the renderbuffers were explicitly provided to allocate storage for the buffer. Here, the code retrieves the width and height from the color renderbuffer after its storage is allocated. Your app does this because the actual dimensions of the color renderbuffer are calculated based on the layer’s bounds and scale factor. Other renderbuffers attached to the framebuffer must have the same dimensions. In addition to using the height and width to allocate the depth buffer, use them to assign the OpenGL ES viewport and to help determine the level of detail required in your app’s textures and models. See Supporting High-Resolution Displays.
Allocate and attach a depth buffer (as before).
Test the framebuffer for completeness (as before).
Add the
CAEAGLLayerobject to your Core Animation layer hierarchy by passing it to theaddSublayer:method of a visible layer.
Drawing to a Framebuffer Object
Now that you have a framebuffer object, you need to fill it. This section describes the steps required to render new frames and present them to the user. Rendering to a texture or offscreen framebuffer acts similarly, differing only in how your app uses the final frame.
Rendering on Demand or with an Animation Loop
You must choose when to draw your OpenGL ES content when rendering to a Core Animation layer, just as when drawing with GLKit views and view controllers. If rendering to an offscreen framebuffer or texture, draw whenever is appropriate to the situations where you use those types of framebuffers.
For on-demand drawing, implement your own method to draw into and present your renderbuffer, and call it whenever you want to display new content.
To draw with an animation loop, use a CADisplayLink object. A display link is a kind of timer provided by Core Animation that lets you synchronize drawing to the refresh rate of a screen. Listing 4-1 shows how you can retrieve the screen showing a view, use that screen to create a new display link object and add the display link object to the run loop.
Listing 4-1 Creating and starting a display link
displayLink = [myView.window.screen displayLinkWithTarget:self selector:@selector(drawFrame)]; |
[displayLink addToRunLoop:[NSRunLoop currentRunLoop] forMode:NSDefaultRunLoopMode]; |
Inside your implementation of the drawFrame method, read the display link’s timestamp property to get the timestamp for the next frame to be rendered. It can use that value to calculate the positions of objects in the next frame.
Normally, the display link object is fired every time the screen refreshes; that value is usually 60 Hz, but may vary on different devices. Most apps do not need to update the screen 60 times per second. You can set the display link’s frameInterval property to the number of actual frames that go by before your method is called. For example, if the frame interval was set to 3, your app is called every third frame, or roughly 20 frames per second.
Rendering a Frame
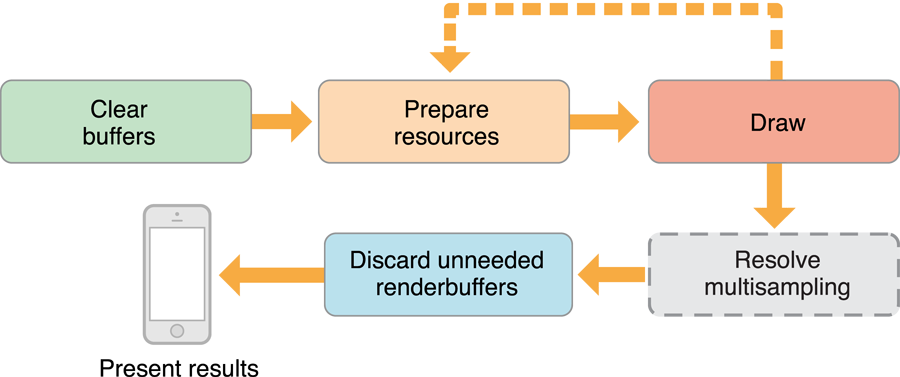
Figure 4-3 shows the steps an OpenGL ES app should take on iOS to render and present a frame. These steps include many hints to improve performance in your app.

Clear Buffers
At the start of every frame, erase the contents of all framebuffer attachments whose contents from a previous frames are not needed to draw the next frame. Call the glClear function, passing in a bit mask with all of the buffers to clear, as shown in Listing 4-2.
Listing 4-2 Clear framebuffer attachments
glBindFramebuffer(GL_FRAMEBUFFER, framebuffer); |
glClear(GL_DEPTH_BUFFER_BIT | GL_COLOR_BUFFER_BIT); |
Using glClear “hints” to OpenGL ES that the existing contents of a renderbuffer or texture can be discarded, avoiding costly operations to load the previous contents into memory.
Prepare Resources and Execute Drawing Commands
These two steps encompass most of the key decisions you make in designing your app’s architecture. First, you decide what you want to display to the user and configure the corresponding OpenGL ES objects—such as vertex buffer objects, textures, shader programs and their input variables—for uploading to the GPU. Next, you submit drawing commants that tell the GPU how to use those resources for rendering a frame.
Renderer design is covered in more detail in OpenGL ES Design Guidelines. For now, the most important performance optimization to note is that your app runs faster if it modifies OpenGL ES objects only at the start of rendering a new frame. Although your app can alternate between modifying objects and submitting drawing commands (as shown by the dotted line in Figure 4-3), it runs faster if it performs each step only once per frame.
Execute Drawing Commands
This step takes the objects you prepared in the previous step and submits drawing commands to use them. Designing this portion of your rendering code to run efficiently is covered in detail in OpenGL ES Design Guidelines. For now, the most important performance optimization to note is that your app runs faster if it only modifies OpenGL ES objects at the start of rendering a new frame. Although your app can alternate between modifying objects and submitting drawing commands (as shown by the dotted line), it runs faster if it only performs each step once.
Resolve Multisampling
If your app uses multisampling to improve image quality, your app must resolve the pixels before they are presented to the user. Multisampling is covered in detail in Using Multisampling to Improve Image Quality.
Discard Unneeded Renderbuffers
A discard operation is a performance hint that tells OpenGL ES that the contents of one or more renderbuffers are no longer needed. By hinting to OpenGL ES that you do not need the contents of a renderbuffer, the data in the buffers can be discarded and expensive tasks to keep the contents of those buffers updated can be avoided.
At this stage in the rendering loop, your app has submitted all of its drawing commands for the frame. While your app needs the color renderbuffer to display to the screen, it probably does not need the depth buffer’s contents. Listing 4-3 discards the contents of the depth buffer.
Listing 4-3 Discarding the depth framebuffer
const GLenum discards[] = {GL_DEPTH_ATTACHMENT}; |
glBindFramebuffer(GL_FRAMEBUFFER, framebuffer); |
glDiscardFramebufferEXT(GL_FRAMEBUFFER,1,discards); |
Present the Results to Core Animation
At this step, the color renderbuffer holds the completed frame, so all you need to do is present it to the user. Listing 4-4 binds the renderbuffer to the context and presents it. This causes the completed frame to be handed to Core Animation.
Listing 4-4 Presenting the finished frame
glBindRenderbuffer(GL_RENDERBUFFER, colorRenderbuffer); |
[context presentRenderbuffer:GL_RENDERBUFFER]; |
By default, you must assume that the contents of the renderbuffer are discarded after your app presents the renderbuffer. This means that every time your app presents a frame, it must completely re-create the frame’s contents when it renders a new frame. The code above always erases the color buffer for this reason.
If your app wants to preserve the contents of the color renderbuffer between frames, add the kEAGLDrawablePropertyRetainedBacking key to the dictionary stored in the drawableProperties property of the CAEAGLLayer object, and remove the GL_COLOR_BUFFER_BIT constant from the earlier glClear function call. Retained backing may require iOS to allocate additional memory to preserve the buffer’s contents, which may reduce your app’s performance.
Using Multisampling to Improve Image Quality
Multisampling is a form of antialiasing that smooths jagged edges and improves image quality in most 3D apps. OpenGL ES 3.0 includes multisampling as part of the core specification, and iOS provides it in OpenGL ES 1.1 and 2.0 through the APPLE_framebuffer_multisample
Figure 4-4 shows how multisampling works. Instead of creating one framebuffer object, your app creates two. The multisampling buffer contains all attachments necessary to render your content (typically color and depth buffers). The resolve buffer contains only the attachments necessary to display a rendered image to the user (typically a color renderbuffer, but possibly a texture), created using the appropriate procedure from Creating a Framebuffer Object. The multisample renderbuffers are allocated using the same dimensions as the resolve framebuffer, but each includes an additional parameter that specifies the number of samples to store for each pixel. Your app performs all of its rendering to the multisampling buffer and then generates the final antialiased image by resolving those samples into the resolve buffer.

Listing 4-5 shows the code to create the multisampling buffer. This code uses the width and height of the previously created buffer. It calls the glRenderbufferStorageMultisampleAPPLE function to create multisampled storage for the renderbuffer.
Listing 4-5 Creating the multisample buffer
glGenFramebuffers(1, &sampleFramebuffer); |
glBindFramebuffer(GL_FRAMEBUFFER, sampleFramebuffer); |
glGenRenderbuffers(1, &sampleColorRenderbuffer); |
glBindRenderbuffer(GL_RENDERBUFFER, sampleColorRenderbuffer); |
glRenderbufferStorageMultisampleAPPLE(GL_RENDERBUFFER, 4, GL_RGBA8_OES, width, height); |
glFramebufferRenderbuffer(GL_FRAMEBUFFER, GL_COLOR_ATTACHMENT0, GL_RENDERBUFFER, sampleColorRenderbuffer); |
glGenRenderbuffers(1, &sampleDepthRenderbuffer); |
glBindRenderbuffer(GL_RENDERBUFFER, sampleDepthRenderbuffer); |
glRenderbufferStorageMultisampleAPPLE(GL_RENDERBUFFER, 4, GL_DEPTH_COMPONENT16, width, height); |
glFramebufferRenderbuffer(GL_FRAMEBUFFER, GL_DEPTH_ATTACHMENT, GL_RENDERBUFFER, sampleDepthRenderbuffer); |
if (glCheckFramebufferStatus(GL_FRAMEBUFFER) != GL_FRAMEBUFFER_COMPLETE) |
NSLog(@"Failed to make complete framebuffer object %x", glCheckFramebufferStatus(GL_FRAMEBUFFER)); |
Here are the steps to modify your rendering code to support multisampling:
During the Clear Buffers step, you clear the multisampling framebuffer’s contents.
glBindFramebuffer(GL_FRAMEBUFFER, sampleFramebuffer);
glViewport(0, 0, framebufferWidth, framebufferHeight);
glClear(GL_COLOR_BUFFER_BIT | GL_DEPTH_BUFFER_BIT);
After submitting your drawing commands, you resolve the contents from the multisampling buffer into the resolve buffer. The samples stored for each pixel are combined into a single sample in the resolve buffer.
glBindFramebuffer(GL_DRAW_FRAMEBUFFER_APPLE, resolveFrameBuffer);
glBindFramebuffer(GL_READ_FRAMEBUFFER_APPLE, sampleFramebuffer);
glResolveMultisampleFramebufferAPPLE();
In the Discard step, you can discard both renderbuffers attached to the multisample framebuffer. This is because the contents you plan to present are stored in the resolve framebuffer.
const GLenum discards[] = {GL_COLOR_ATTACHMENT0,GL_DEPTH_ATTACHMENT};glDiscardFramebufferEXT(GL_READ_FRAMEBUFFER_APPLE,2,discards);
In the Present Results step, you present the color renderbuffer attached to the resolve framebuffer.
glBindRenderbuffer(GL_RENDERBUFFER, colorRenderbuffer);
[context presentRenderbuffer:GL_RENDERBUFFER];
Multisampling is not free; additional memory is required to store the additional samples, and resolving the samples into the resolve framebuffer takes time. If you add multisampling to your app, always test your app’s performance to ensure that it remains acceptable.
Copyright © 2018 Apple Inc. All Rights Reserved. Terms of Use | Privacy Policy | Updated: 2018-06-04